Debugging Network Traffic With Proxyman
Disclaimer: This post is not sponsored by Proxyman, nor am I affiliated with Proxyman in any way. I pay for my license myself, and this post is simply written as a guide to learning more about a tool that I find very important in the iOS Developer toolbox.
Networking is an essential part of modern iOS applications. Most apps I’ve worked have some kind of networking component. Sometimes the networking layer involves user authentication, token refresh flows, and more. Other times, I’ll simply need to hit one or two endpoints to fetch new data or configuration files for my app.
When this all works well, everything is great. But when I notice that things don’t work quite as expected, it’s time to start digging in and debug my network calls. The most simple method would be to convert the data that I’ve fetched from the server to a String and printing it. However, a large response will be hard to read in Xcode’s console so you might have to paste it elsewhere, like in a JSON validator.
When the response you receive is wrong, or not quite what you expected, you’ll want to take a look at the data you’ve sent to the server to make sure you’re not sending it bad data. Doing this isn’t always trivial. Especially when you’re dealing with setting HTTP headers and/or multipart form requests.
In this post, I will show you how you can gain insight into the requests that your app sends to the server as well as see the responses that the server sends to your app. To do this, we’ll use he app Proxyman.
💡 Tip: I’ve written a similar post to this one about Charles Proxy that you can read here. Over time I’ve come to prefer Proxyman for debugging because it’s a nicer app and it’s just a bit easier to set up.
Installing and configuring Proxyman
To use Proxyman, you must first download and install it. You can do this right here on their website. The download for Proxyman is free, and the free version of the app is perfectly usable to explore and learn about debugging your app through a proxy. However, Proxyman isn’t a free app and if you want to use all its features you’ll need to purchase a license. Luckily, a single license is valid forever and entitles you to a year of free updates. After that you can continue the last version that became available during the year, or buy a new license for another year of updates.
Once you’ve downloaded Proxyman, install it by opening the dmg and dragging the app to your Applications folder.
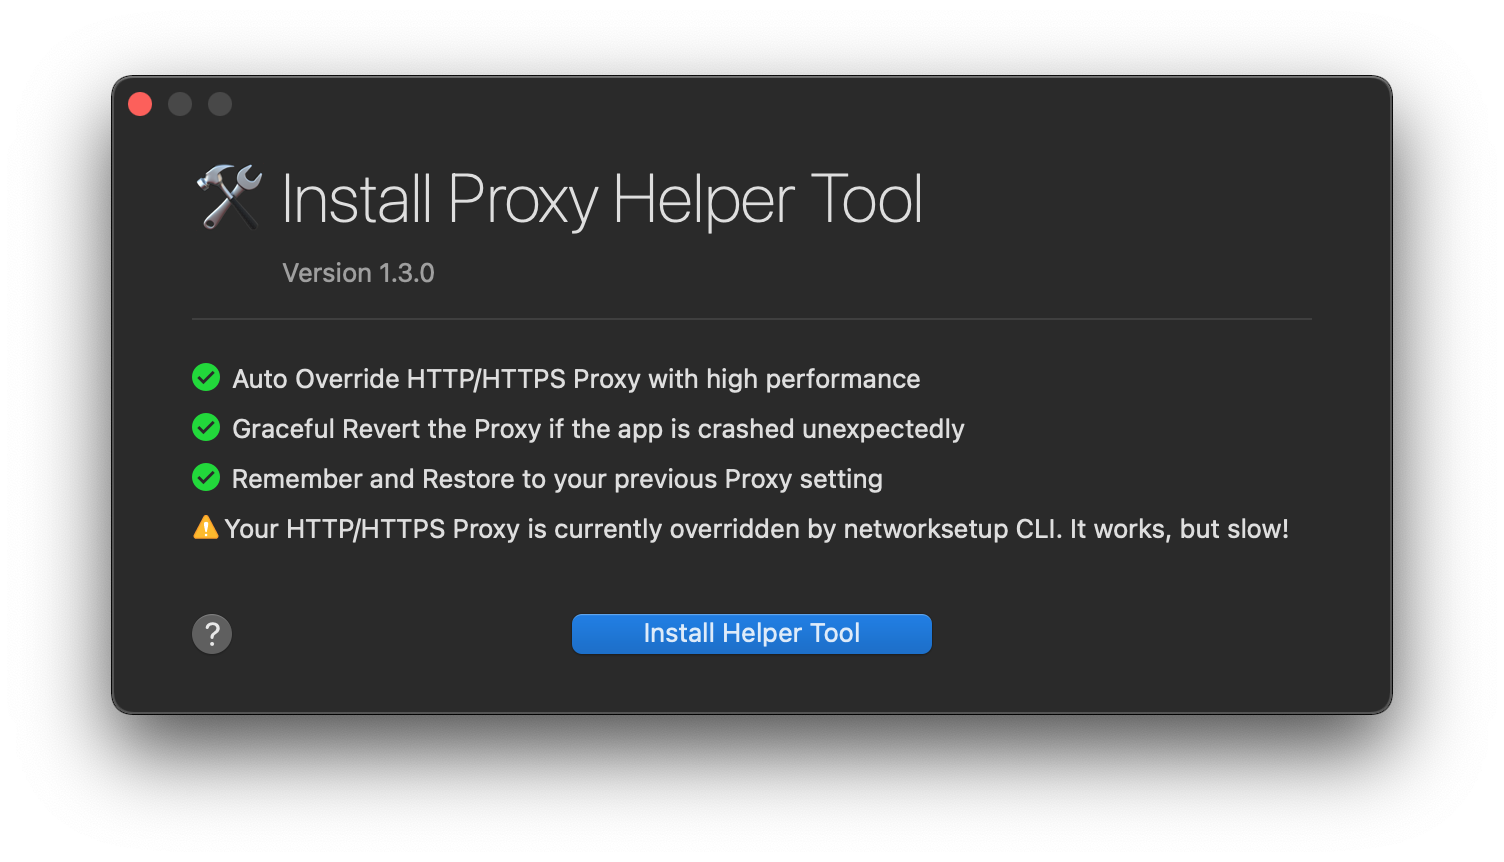
When you first launch Proxyman, it will prompt you for some setup steps and eventually Proxyman will want to install a helper tool. You can safely accept all of Proxyman’s defaults and install the helper tool.
After setting everything up, you should immediately see network traffic appear in Proxyman’s main window. This is all of the traffic that your Mac is sending and receiving in real-time. This means that you can see any app or website’s network traffic in Proxyman.
When you click on one of the requests, you can see some details about the request. Like for example the request headers, body, and more. You can also see the response for a given request.
There is a caveat though; if the request is performed over HTTPS you won’t see anything just yet.
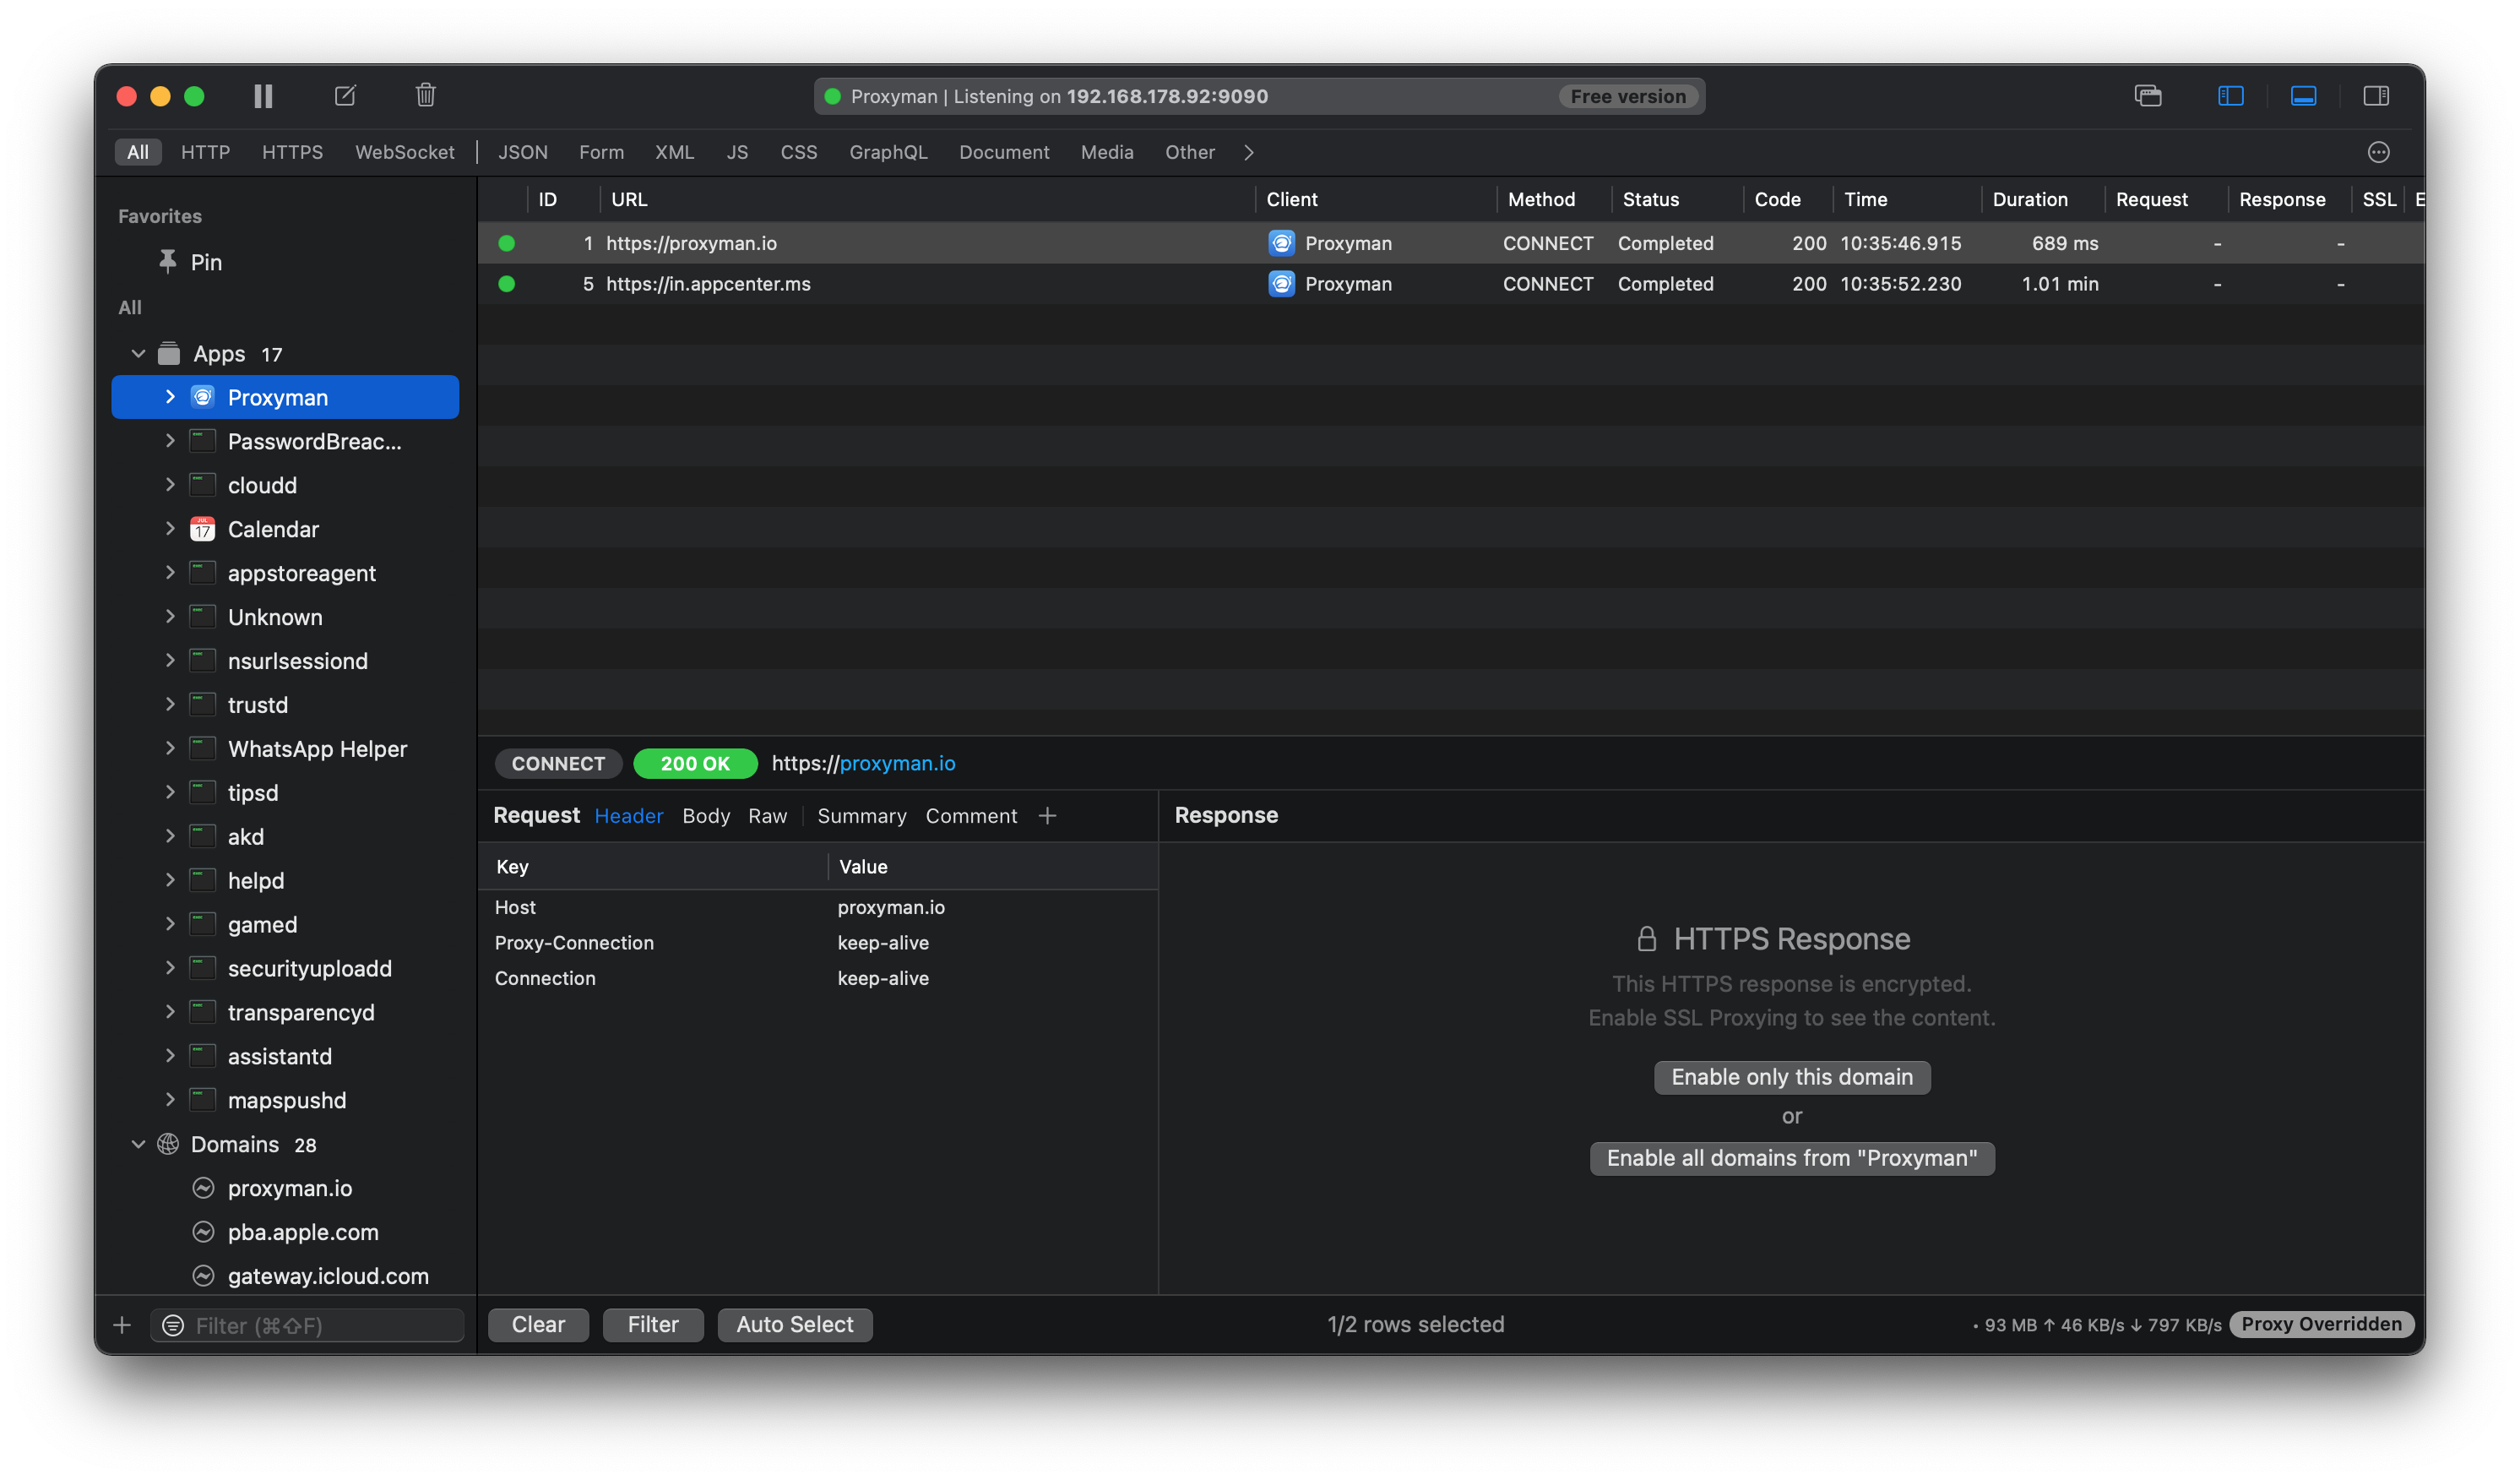
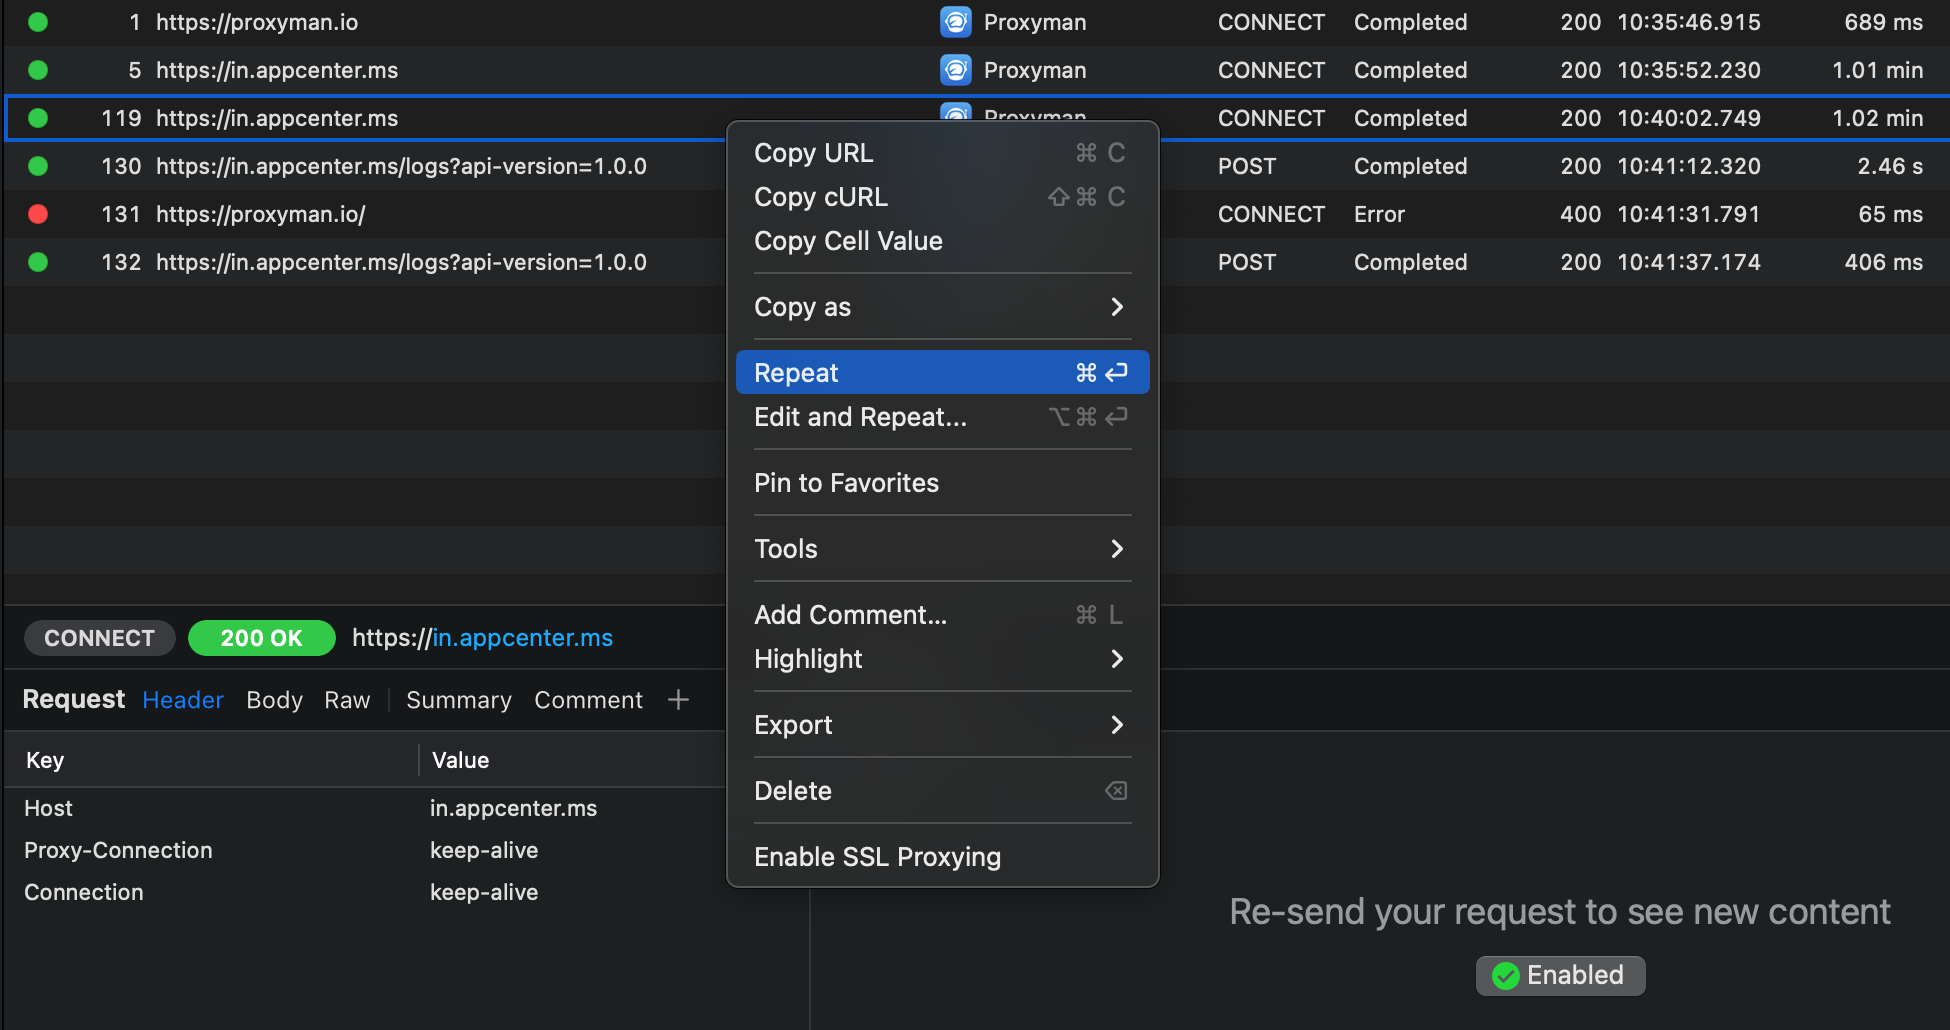
In the screenshot below, I’ve selected all traffic made by the Proxyman app in the left hand sidebar, and I’ve selected one of the requests in the main section to see more details. Because the request is made using HTTPS, I need to explicitly enable SSL proxying for either a specific host, or all requests made by, in this case, the Proxyman app. Once enabled, re-executing these requests would allow me to inspect their contents.
When you first allow SSL proxying for either a domain or an app, you will be prompted to install the Proxyman root certificate. Proxyman can do this automatically for you which is quite convenient. You will be prompted for your admin password so that Proxyman can update your settings and allow SSL proxying.
After enabling SSL proxying, you can select any request and repeat it to make sure that you can now inspect your request and the server’s response. Note that repeating a request isn’t always a valid thing to do so the server you’re hitting might give you an error response; this isn’t something you did wrong with your setup, if you can see the error code everything is working as intended.
With Proxyman set up, let’s see how we can use it for our apps.
Using Proxyman with the simulator
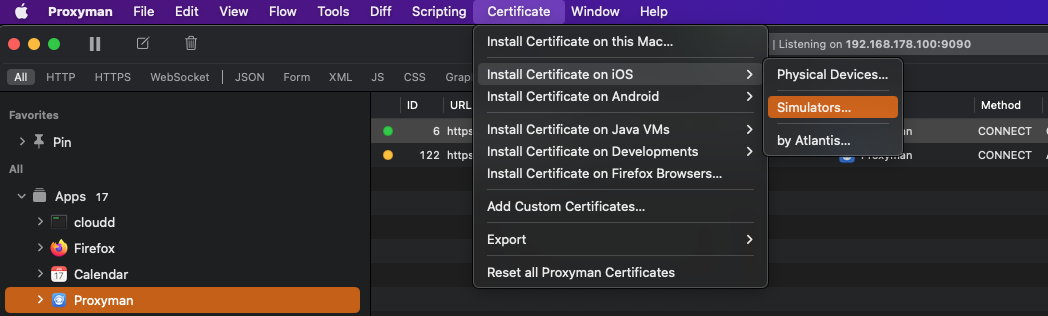
In order to see the iOS simulator’s traffic appear in Proxyman, you’ll need to install the Proxyman certificates in the simulator. You can do this by selecting Certificates -> Install Certificate on iOS -> Simulators.... This will automatically add the needed certificates to your active iOS simulators so make sure the simulator you want to debug with is active.
After installing the certificate, you need to reboot your simulator. Once you’ve done this, you can re-run your app and you should start seeing your simulator’s network traffic appear. If you haven’t enabled SSL proxying for the hosts you’re hitting yet, you might have to do this first as you’ve seen earlier.
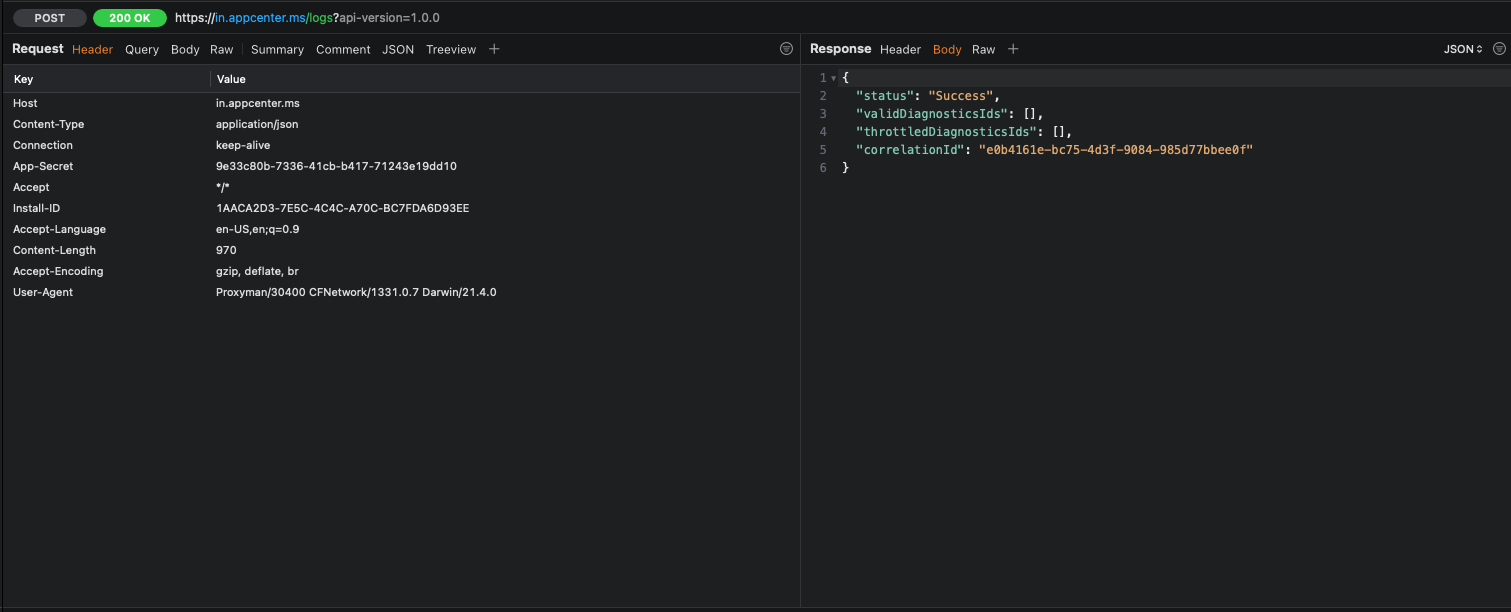
Inspecting your networking traffic is done in the bottom section of the Proxyman window. On the left side you can see the request you’re sending to the server. You can inspect headers, the request body, query parameters, and anything else you might need.
On the right side of the window you can see the server’s response body and headers.
Being able to have real-time detailed insights into the exact request and responses you’re dealing with is extremely convenient. What’s even more convenient is that you can use Proxyman on a physical device too, allowing you to connect your device to Proxyman on your mac whenever you need to quickly check what your app is doing; even for production builds!
Using Proxyman with a real device
To run Proxyman on a real device, there are a couple of things you’ll need to do. Luckily, Proxyman provides really good instructions in the Mac app.
Start by selecting Certificate -> Install Certificate on iOS -> Physical Devices....
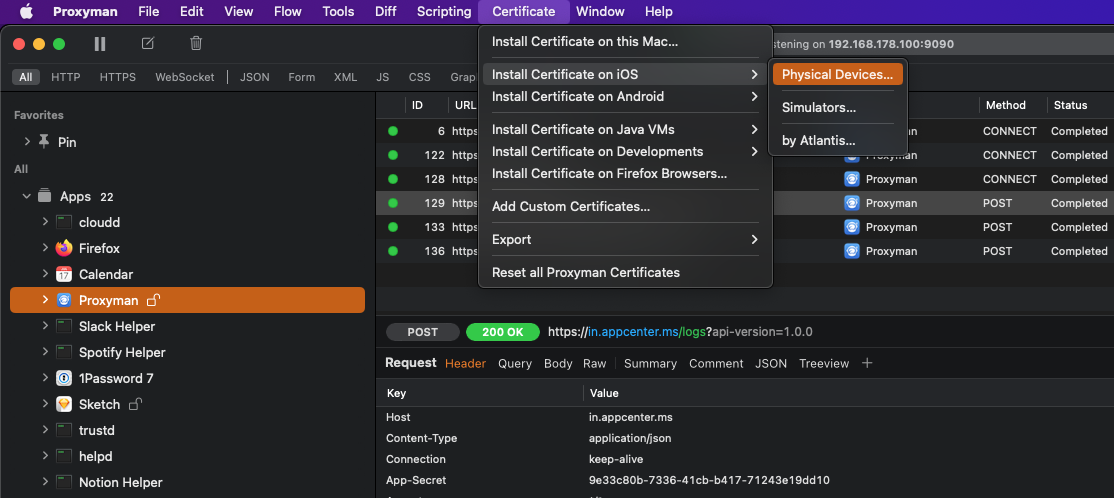
This will open a window with instructions that you should follow to set up Proxyman for your device.
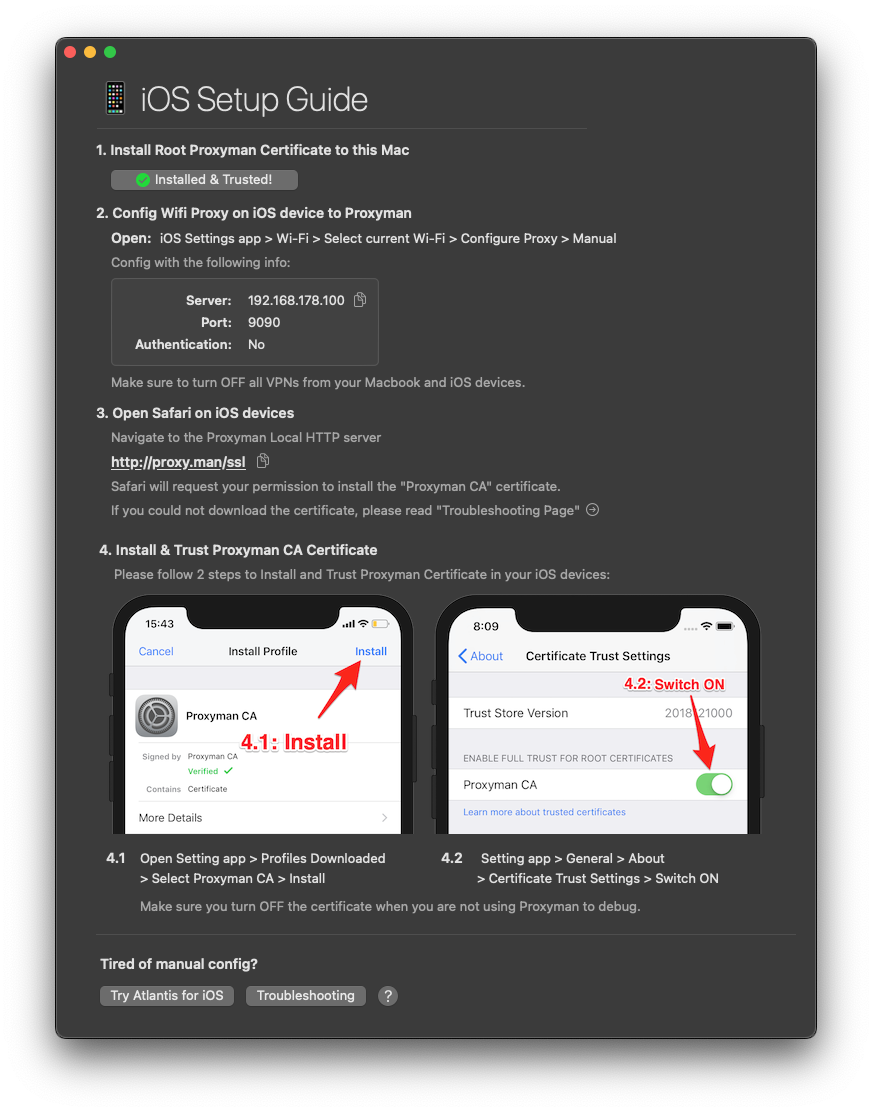
You only need to go through all of these steps once. When you’ve set up your device, all you need to do to start a debugging session is to launch Proxyman on your Mac, connect your iOS device to the network that your Mac is on, and set up the proxy settings for your device in your WiFi settings.
Sharing Proxyman logs with others
One of the main selling points of using a proxy to debug networking isn’t that it’s convenient for developers to validate the request and responses they’re creating and receiving in their apps. In my opinion one of the key selling points of Proxyman is the fact that anybody can install it to capture network traffic.
This means that your QA team can run their device through Proxyman to capture an app’s networking traffic, and include a log of network calls made by the app along with a bug report. This is extremely valuable because it makes troubleshooting network related issues infinitely easier. Having a detailed overview of network calls is so much better than “I just keep getting an unknown error”.
Furthermore, when you’re sure that you’re sending your backend the right thing but the response you’re getting is malformed, or not what you expected, you can easily get Proxyman to export a cURL command that you can send to your backend engineers to help them figure out what’s wrong.
To export a collection of requests you can select them in the main window and right click. Then select Export to see the various export options that are available. You’ll typically want to export as Proxyman Log but if the receiver of your log doesn’t have Proxyman, Charles, Postman, or another format might be more useful.
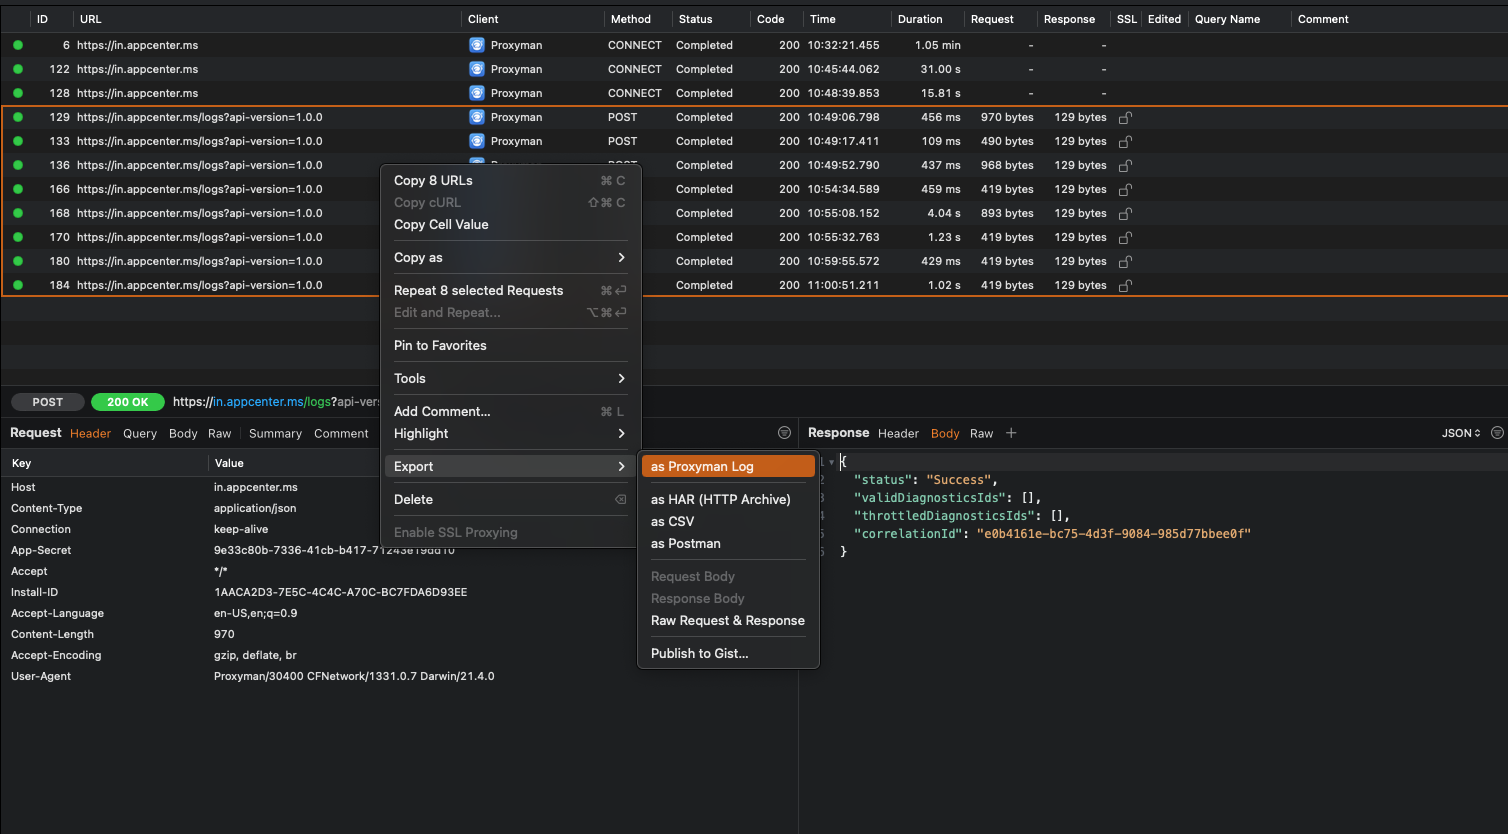
If you just want to export a cURL for a single request you can select the request you want a cURL for, right click, and select Copy cURL. This will get you a cURL request that anybody can run to repeat the request that you’re debugging.
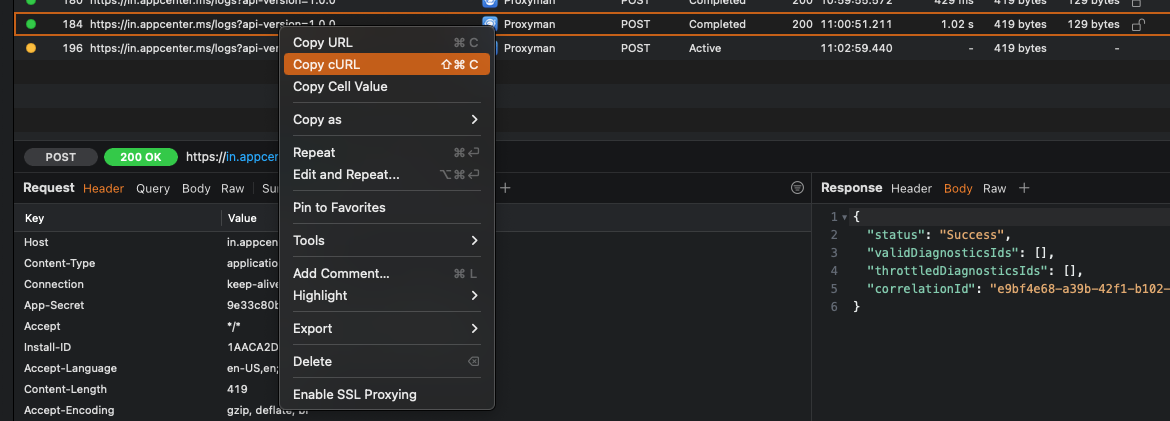
Sending a log or a cURL along with any bug report you have is a really good practice in my opinion. Not only does it improve the quality of your reports, it also makes the lives of your fellow engineers, and backend engineers a lot easier because they’ll have much better insights into what the app is doing with regards to networking.
In addition to capturing iOS device traffic through the Mac app, you can also capture traffic directly on your iOS device with the Proxyman for iOS app. The app can be downloaded through the App Store, and it allows you to quickly start a debugging session right on your iOS device. This can be incredibly useful when you’re not near a Mac but see some weird behavior in your app that you want to explore later. I don’t use the iOS app a lot, but I wanted to mention it anyway.
In summary
In today's tip, you learned how you can use Proxyman to inspect and debug your app’s networking traffic. Being able to debug network calls is an essential skill in the toolbox of any iOS developer in my opinion. Or more broadly speaking, anybody that’s involved in the process of building and testing apps should know how to run an app through a proxy like Proxyman to gain much better insights into an app’s networking traffic, and to build much better bug reports.
This post is merely an introduction to Proxyman, it can do a lot more than just show you request / response pairs. For example, it also allows you to throttle network speeds for specific hosts, and it even allows you to replace requests and responses with local files so you can override what your app sends and/or receives when needed for debugging.
For now, I wish you happy debugging sessions and don't hesitate to shoot me a message on Twitter if you have any questions about debugging your network calls.