Understanding how and when SwiftUI decides to redraw views
There's a good chance that you're using SwiftUI and that you're not quite sure how and when SwiftUI determines which views should redraw. And arguably, that's a good thing. SwiftUI is clearly smart enough to make decent decisions without any negative consequences. In fact, you might even have set up your app in a way that coincidentally plays into SwiftUI's strength beautifully. There's an equal likelihood that your setup isn't as performant as you might think but you're just not seeing any issues yet.
Recently, I had to figure out how SwiftUI determines that it should redraw views in order to fix some performance issues. One issue was that for some reason SwiftUI decided that it needed access the bodies of a lot of views that never changed which led to some dropped frames while scrolling. Another issue that I investigated is one where scrolling performance suffered greatly when just one or two items in a list were updated.
The details and specifics of these issues aren't that interesting. What's more interesting in my opinion is what I learned about how and when SwiftUI determines to redraw views because some of the things I've noticed were quite surprising to me while others felt very natural and confirmed some thoughts I've had regarding SwiftUI for a while.
Please keep in mind that I don't have insight into SwiftUI's internals, the information I've gathered in this post is based on observations and measurements and there are no guarantees that they'll remain accurate in the future. In general you shouldn't rely on undocumented internals, even if you have lots of proof to back up your reasoning. That said, the measurements in this post were done to solve real problems, and I think the conclusions that can be drawn from these measurements explain sensible best-practices without relying on the internals of SwiftUI too much.
With that out of the way, let's dive right in!
Understanding the example we'll work from
The most important thing to understand while we're exploring SwiftUI is the example that I'm using to work from. Luckily, this example is relatively simple. If you want to check out the source code that I've used to gather measurements during my exploration, you can grab it from GitHub.
The sample I've been working from is based on a list of items. There's functionality to set a list item to "active". Doing this will mark the currently active item (if one exists) as not active, and the next item in the list becomes active. I can either do this by hand, or I can do it on a timer. The models used to populate my cells also have a random UUID that's not shown in the cell. However, when changing the active cell there's an option in the app to update the random UUID on every model in the my data source.
I'll show you the important parts of my model and data source code first. After that I'll show you the view code I'm working from, and then we can get busy with taking some measurements.
Understanding the sample's data model
My sample app uses an MVVM-like strategy where cells in my list receive a model object that they display. The list itself uses a view model that maintains some state surrounding which item is active, and whether a list of items is loaded already.
Let's look at the model that's shown in my cells first:
struct Item: Identifiable {
    var isActive: Bool
    let id = UUID()
    var nonVisibleProperty = UUID()

    init(id: UUID = UUID(), isActive: Bool = false, nonVisibleProperty: UUID = UUID()) {
        self.isActive = isActive
    }
}
It's pretty simple and what's important for you to note is that my model is a struct. This means that changing the nonVisibleProperty or isActive state does not trigger a view redraw. The reason for this is that there's a view model that holds all of the items I want to show. The view model is an observable object and whenever one of its items changes, it will update its @Published list of items.
I won't put the full view model code in this post, you can view it right here on GitHub if you're interested to see the entire setup.
The list of items is defined as follows:
@Published var state: State = .loadingBy using a State enum it's possible to easily show appropriate UI that corresponds to the state of the view model. For simplicity I only have two states in my State enum:
enum State {
    case loading
    case loaded([Item])
}
Probably the most interesting part of the view model I defined is how I'm toggling my model's isActive property. Here's what my implementation looks like for the method that activates the next item in my list:
func activateNextItem() {
    guard case .loaded(let items) = state else {
        return
    }

    var itemsCopy = items

    defer {
        if isMutatingHiddenProperty {
            itemsCopy = itemsCopy.map { item in
                var copy = item
                copy.nonVisibleProperty = UUID()
                return copy
            }
        }

        self.state = .loaded(itemsCopy)
    }

    guard let oldIndex = activeIndex, oldIndex + 1 < items.endIndex else {
        activeIndex = 0
        setActiveStateForItem(at: activeIndex!, to: true, in: &itemsCopy)
        return
    }

    activeIndex = oldIndex + 1

    setActiveStateForItem(at: oldIndex, to: false, in: &itemsCopy)
    setActiveStateForItem(at: activeIndex!, to: true, in: &itemsCopy)
}
I'm using a defer to assign a copy of my list of items to self.state regardless of whether my guard requirement is satisfied or not.
If this method looks suboptimal to you, that's ok. The point of this exercise was never to write optimal code. The point is to write code that allows us to observe and analyze SwiftUI's behavior when it comes to determining to which views get redrawn and when.
Before we start taking some measurements, I want to show you what my views look like.
Understanding the sample's views
The sample views are quite simple so I won't explain them in detail. My cell view looks as follows:
struct StateDrivenCell: View {
    let item: Item

    var body: some View {
        VStack(alignment: .leading, spacing: 8) {
            HStack {
                VStack(alignment: .leading) {
                    Text("identifier:").bold()
                    Text(item.id.uuidString.split(separator: "-").first!)
                }
                Spacer()
            }

            HStack {
                VStack(alignment: .leading) {
                    Text("active state:").bold()
                    Text("is active: \(item.isActive  ? "✅ yes": "❌ no")")
                }
                Spacer()
            }

        }.padding()
    }
}
All this cell does is display its model. Nothing more, nothing less.
The list view looks as follows:
struct StateDrivenView: View {
    @StateObject var state = DataSource()

    var body: some View {
        NavigationView {
            ScrollView {
                if case .loaded(let items) = state.state {
                    LazyVStack {
                        ForEach(items) { item in
                            StateDrivenCell(item: item)
                        }
                    }
                } else {
                    ProgressView()
                }
            }
            .toolbar {
                // some buttons to activate next item, start timer, etc.
            }
            .navigationTitle(Text("State driven"))
        }
        .onAppear {
            state.loadItems()
        }
    }
}
Overall, this view shouldn't surprise you too much.
When looking at this, you might expect things to be suboptimal and you would maybe set this example up in a different way. That's okay because again, the point of this code is not to be optimal. In fact, as our measurements will soon prove, we can write much better code with minimal changes. Instead, the point is to observe and analyze how SwiftUI determines what it should redraw.
To do that, we'll make extensive use of Instruments.
Using Instruments to understand SwiftUI's redraw behavior
When we run our app, everything looks fine at first glance. When we set the application up to automatically update the active item status every second, we don't see any issues. Even when we set the application up to automatically mutate our non-visible property everything seems completely fine.
At this point, it's a good idea to run the application with the SwiftUI Instruments template to see if everything looks exactly as we expect.
In particular, we're looking for body access where we don't expect it.
If everything works correctly, we only want the view bodies for cells that have different data to be accessed. More specifically, ideally we don't redraw any views that won't end up looking any different if they would be redrawn.
Whenever you build your app for profiling in Xcode, Instruments will automatically open. If you're running your own SwiftUI related profiling, you'll want to select the SwiftUI template from Instruments' templates.
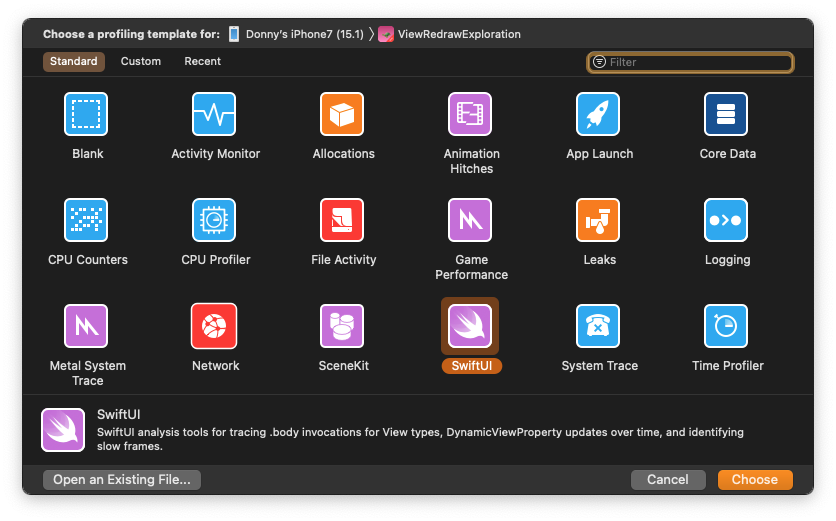
Once you've opened the SwiftUI template, you can run your application and perform the interactions that you want to profile. In my case, I set my sample app up to automatically update the active item every second, and every time this happens I change some non-visible properties to see if cells are redrawn even if their output looks the same.
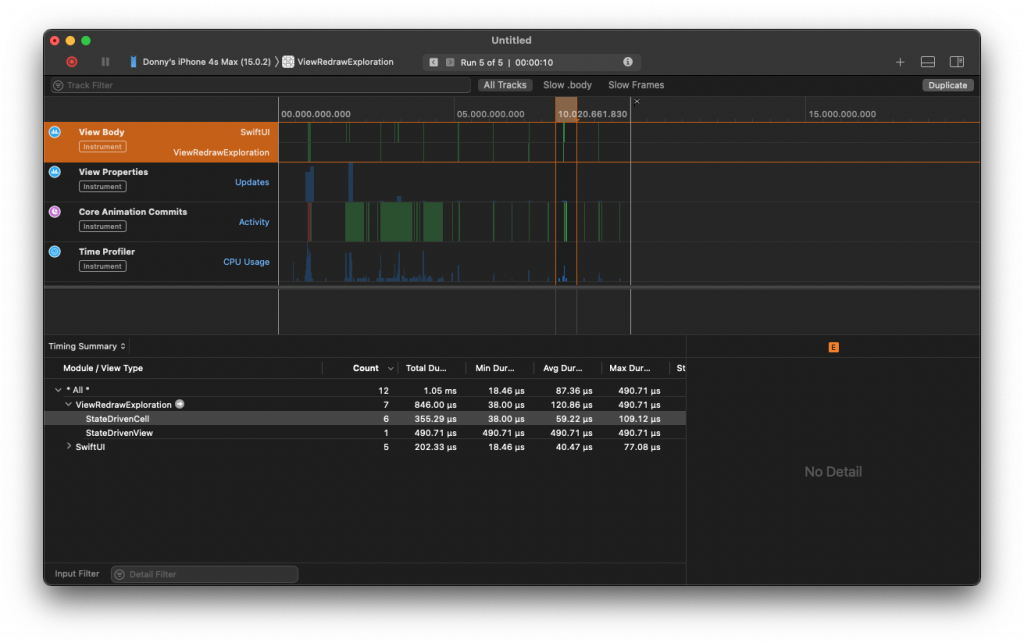
When I run the app with this configuration, here's what a single timer tick looks like in Instruments when I focus on the View Body timeline:
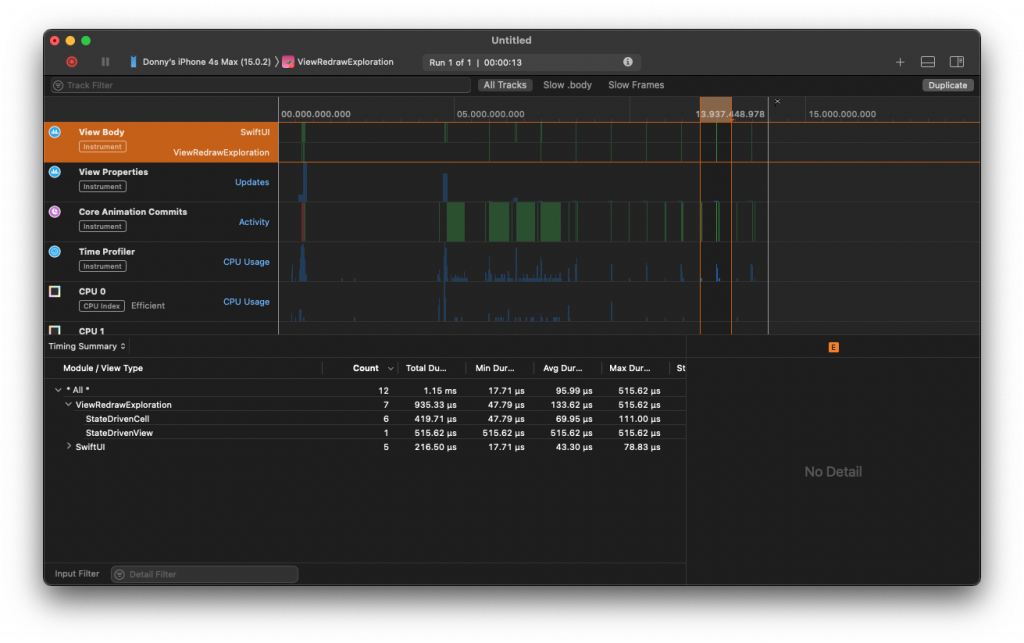
In this image, you can see that the view body for StateDrivenCell was invoked six times. In other words, six cells got their bodies evaluated so they could be redrawn on the screen. This number is roughly equal to the number of cells on screen (my device fits five cells) so to some extent this makes sense.
On the other hand, we know that out of these six cells only two actually updated. One would have its isActive state flipped from true to false and the other would have its isActive state flipped from false to true. The other property that we updated is not shown and doesn't influence the cell's body in any way. If I run the same experiment except I don't update the non-visible property every time, the result is that only two cell bodies get re-evaluated.
We can see that apparently SwiftUI is smart enough to somehow compare our models even though they're not Equatable. In an ideal world, we would write our app in a way that would ensure only the two cell bodies that show the models that changed in a meaningful way are evaluated.
Before we dig into that, take a good look at what's shown in Instruments. It shows that StateDrivenView also has its body evaluated.
The reason this happens is that the StateDrivenView holds a @StateObject as the source of truth for the entire list. Whenever we change one of the @StateObject's published properties, the StateDrivenView's body will be evaluated because its source of truth changed.
Note that body evalulation is not guaranteed to trigger an actual redraw on the screen. We're seeing Core Animation commits in the Instruments anlysis so it's pretty safe to assume something got redrawn, but it's hard to determine what exactly. What's certain though is that if SwiftUI evaluates the body of a view, there's a good chance this leads to a redraw of the accessed view itself, or that one of its child views needs to be redrawn. It's also good to mention that a body evaluation does not immediately lead to a redraw. In other words, if a view's body is evaulated multiple times during a single render loop, the view is only redrawn once. As a mental model, you can think of SwiftUI collecting views that need to be redrawn during each render loop, and then only redrawing everything that needs to be redrawn once rather than commiting a redraw for every change (this would be wildly inefficient as you can imagine). This model isn't 100% accurate, but in my opinion it's good enough for the context of this blog post.
Because we're using a LazyVStack in the view, not all cells are instantiated immediately which means that the StateDrivenView will initially only create about six cells. Each of these six cells gets created when the StateDrivenView's body is re-evaluated and all of their bodies get re-evaluated too.
You might think that this is just the way SwiftUI works, but we can actually observe some interesting behavior if we make some minor changes to our model. By making our model Equatable, we can give some hints to SwiftUI about whether or not the underlying data for our cell got changed. This will in turn influence whether the cell's body is evaluated or not.
This is also where things get a little... strange. For now, let's pretend everything is completely normal and add an Equatable conformance to our model to see what happens.
Here's what my conformance looks like:
struct Item: Identifiable, Equatable {
    var isActive: Bool
    let id = UUID()
    var nonVisibleProperty = UUID()

    init(id: UUID = UUID(), isActive: Bool = false, nonVisibleProperty: UUID = UUID()) {
        self.isActive = isActive
    }

    static func == (lhs: Item, rhs: Item) -> Bool {
        return lhs.id == rhs.id && lhs.isActive == rhs.isActive
    }
}
The parameters for my test are the exact same. Every second, a new item is made active, the previously active item is made inactive. The nonVisibleProperty for every item in my list is mutated.
My Equatable conformance ignores the nonVisibleProperty and only compares the id and the isActive property. Based on this, what I want to happen is that only the bodies of the cells who's item's isActive state changed is evaluated.
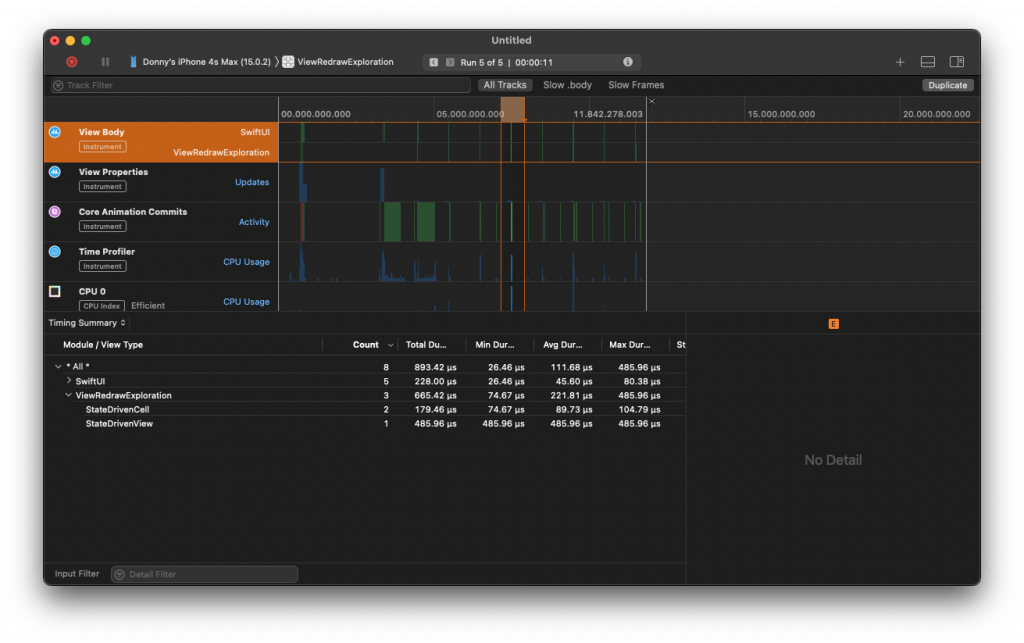
Unfortunately, my Instruments output at this point still looks the same.
While I was putting together the sample app for this post, this outcome had me stumped. I literally had a project open alongside this project where I could reliably fix this body evaluation by making my model Equatable. After spending a lot of time trying to figure out what was causing this, I added a random String to my model, making it look like this:
struct Item: Identifiable, Equatable {
var isActive: Bool
let id = UUID()
var nonVisibleProperty = UUID()
let someString: String
init(id: UUID = UUID(), isActive: Bool = false, nonVisibleProperty: UUID = UUID()) {
self.isActive = isActive
self.someString = nonVisibleProperty.uuidString
}
static func == (lhs: Item, rhs: Item) -> Bool {
return lhs.id == rhs.id && lhs.isActive == rhs.isActive
}
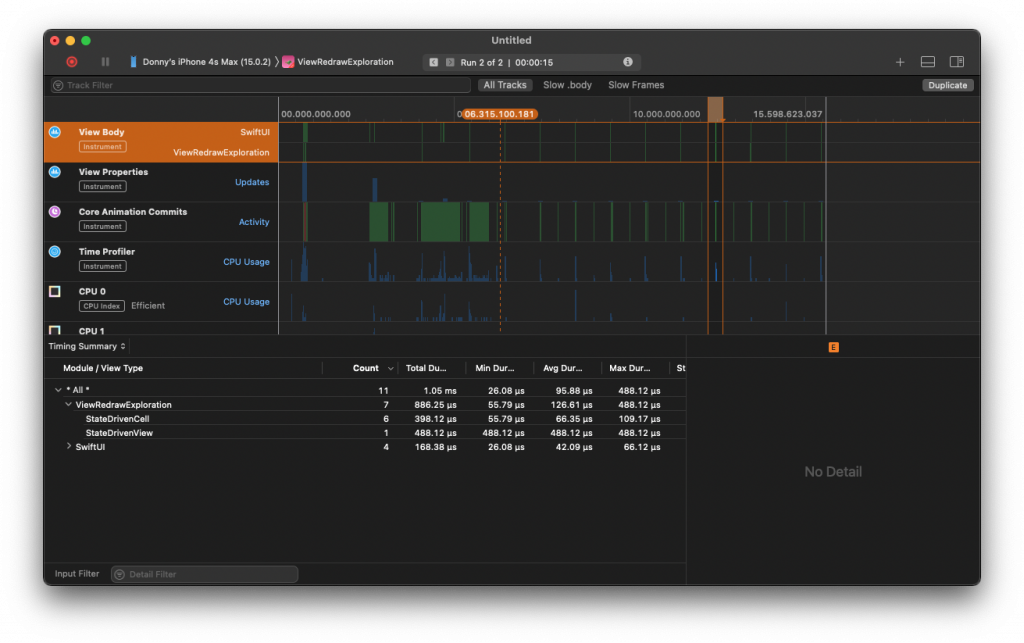
}After updating the app with this random String added to my model, I'm suddenly seeing the output I was looking for. The View body timeline now shows that only two StateDrivenCell bodies get evaluated every time my experiment runs.
It appears that SwiftUI determines whether a struct is a plain data type, or a more complex one by running the built-in _isPOD function that's used to determin whether a struct is a "plain old data" type. If it is, SwiftUI will use reflection to directly compare fields on the struct. If we're not dealing with a plain old data type, the custom == function is used. Adding a String property to our struct changes it from being a plain old data type to a complex type which means SwiftUI will use our custom == implementation.
To learn more about this, take a look at this post by the SwiftUI Lab.
After I realized that I can make my models conform to Equatable and that influences whether my view's body is evaluated or not, I was wondering what leads SwiftUI to compare my model struct in the first place. After all, my cell is defined is follows:
struct StateDrivenCell: View {
    let item: Item

    var body: some View {
        VStack(alignment: .leading, spacing: 8) {
            // cell contents
        }.padding()
    }
}
The item property is not observed. It's a simple stored property on my view. And according to Instruments my view's body isn't evaluated. So it's not like SwiftUI is comparing the entire view. More interestingly, it was able to do some kind of comparison before I made my model Equatable.
The only conclusion that I can draw here is that SwiftUI will compare your models regardless of their Equatable conformance in order to determine whether a view needs to have its body re-evaluated. And in some cases, your Equatable conformance might be ignored.
At this point I was curious. Does SwiftUI evaluate everything on my struct that's not my body? Or does it evaluate stored properties only? To find out, I added the following computed property to my view:
var randomInt: Int { Int.random(in: 0..<Int.max) }Every time this is accessed, it will return a new random value. If SwiftUI takes this property into account when it determines whether or not StateDrivenCell's body needs to be re-evaluated, that means that this would negate my Equatable conformance.
After profiling this change with Instruments, I noticed that this did not impact my body access. The body for only two cells got evaluated every second.
Then I redefined randomInt as follows:
let randomInt = Int.random(in: 0..<Int.max)Now, every time an instance of my struct is created, randomInt will get a constant value. When I ran my app again, I noticed that I was right back where I started. Six body evaluations for every time my experiment runs.
This led me to conclude that SwiftUI will always attempt to compare all of its stored properties regardless of whether they're Equatable. If you provide an Equatable conformance on one of the view's stored properties this implementation will be used if SwiftUI considers it relevant for your model. It's not quite clear when using your model's Equatable implementation is or is not relevant according to SwiftUI.
An interesting side-note here is that it's also possible to make your view itself conform to Equatable and compare relevant model properties in there if the model itself isn't Equatable:
extension StateDrivenCell: Equatable {
    static func ==(lhs: StateDrivenCell, rhs: StateDrivenCell) -> Bool {
        return lhs.item.id == rhs.item.id && lhs.item.isActive == rhs.item.isActive
    }
}
What's interesting is that this conformance is pretty much ignored under the same circumstances as before. If Item does not have this extra string that I added, there are six cell bodies accessed every second. Adding the string back makes this work properly regardless of whether the Item itself is Equatable.
I told you things would get weird here, didn't I...
Overall, I feel like the simple model I had is probably way too simple which might lead SwiftUI to get more eager with its body access. The situation where an Equatable conformance to a model would lead to SwiftUI no longer re-evaluating a cell's body if the model is considered equal seems more likely in the real world than the situation where it doesn't.
In fact, I have tinkered with this in a real app, a sample experiment, and a dedicated sample app for this post and only in the dedicated app did I see this problem.
Takeaways on SwiftUI redrawing based on Instruments analysis
What we've seen so far is that SwiftUI will evaluate a view's body if it thinks that this view's underlying data will change its visual representation (or that of one the view's subviews). It will do so by comparing all stored properties before evaluating the body, regardless of whether these stored properties are Equatable.
If your stored properties are Equatable, SwiftUI might decide to rely on your Equatable conformance to determine whether or not your model changed. If SwiftUI determines that all stored properties are still equal, your view's body is not evaluated. If one of the properties changed, the body is evaluated and each of the views returned from your view's body is evaluated in the same way that I just described.
Conforming your view to Equatable works in the same way except you get to decide which properties participate in the comparison. This means that you could take computed properties into account, or you could ignore some of your view's stored properties.
Note that this only applies to view updates that weren't triggered by a view's @ObservedObject, @StateObject, @State, @Binding, and similar properties. Changes in these properties will immediately cause your view's body to be evaluated.
Designing your app to play into SwiftUI's behavior
Now that we know about some of SwiftUI's behavior, we can think about how our app can play into this behavior. One thing I've purposefully ignored up until now is that the body for our StateDrivenView got evaluated every second.
The reason this happens is that we assign to the DataSource's state property every second and this property is marked with @Published.
Technically, our data source didn't really change. It's just one of the properties on one of the models that we're showing in the list that got changed. It'd be far nicer if we could scope our view updates entirely to the cells holding onto the changed models.
Not only would this get rid of the StateDrivenView's body being evaluated every second, it would allow us to get rid of the entire Equatable conformance that we added in the previous section.
To achieve this, we can keep the @Published property on DataSource. It doesn't need to be changed. What needs to be updated is the definition of Item, and the way we toggle the active item.
First, let's make Item a class and mark it as an ObservableObject. We'll also mark its isActive property as @Published:
class Item: Identifiable, ObservableObject {
    @Published var isActive: Bool
    let id = UUID()
    var nonVisibleProperty = UUID()

    init(id: UUID = UUID(), isActive: Bool = false, nonVisibleProperty: UUID = UUID()) {
        self.isActive = isActive
    }
}
Note that I got rid of someString since its only purpose was to make the Equatable workaround work.
The view needs to be updated to use Item as an observed object:
struct StateDrivenView: View {
    @ObservedObject var item: Item

    var body: some View {
        VStack(alignment: .leading, spacing: 8) {
            HStack {
                VStack(alignment: .leading) {
                    Text("identifier:").bold()
                    Text(item.id.uuidString.split(separator: "-").first!)
                }
                Spacer()
            }

            HStack {
                VStack(alignment: .leading) {
                    Text("active state:").bold()
                    Text("is active: \(item.isActive ? "✅ yes": "❌ no")")
                }
                Spacer()
            }

        }.padding()
    }
}
Now that Item can be observed by our view, we need to change the implementation of activateNextItem() in the DataSource:
func activateNextItem() {
    guard case .loaded(let items) = state else {
        return
    }

    defer {
        if isMutatingHiddenProperty {
            for item in items {
                item.nonVisibleProperty = UUID()
            }
        }
    }

    guard let oldIndex = activeIndex, oldIndex + 1 < items.endIndex else {
        activeIndex = 0
        items[activeIndex!].isActive = true
        return
    }

    activeIndex = oldIndex + 1

    items[oldIndex].isActive = false
    items[activeIndex!].isActive = true
}
Instead of updating the state property on DataSource every time this method is called, I just mutate the items I want to mutate directly.
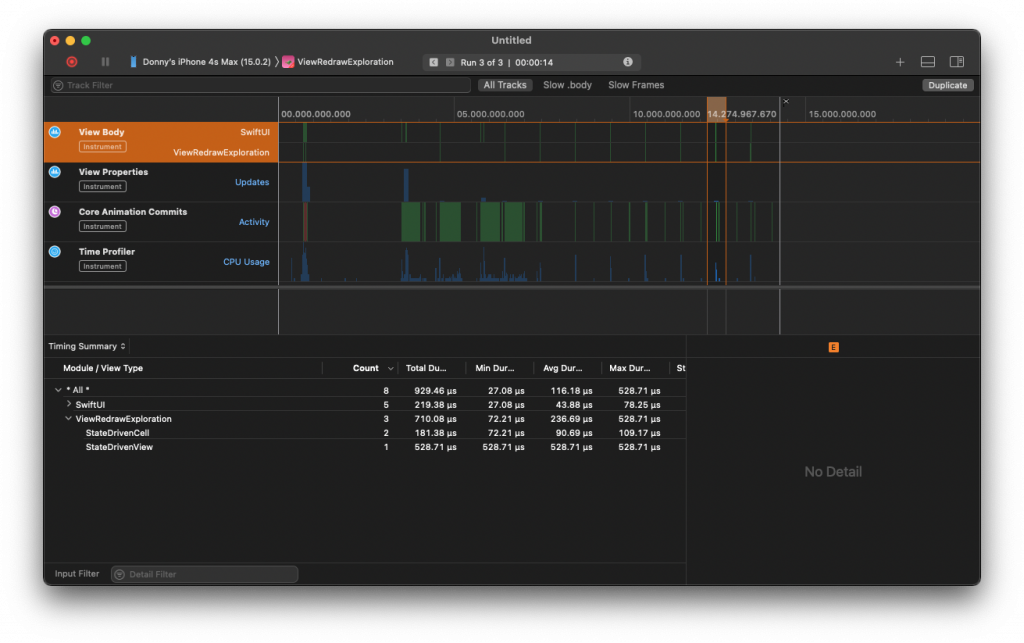
Running the sample app with Instruments again yields the following result:
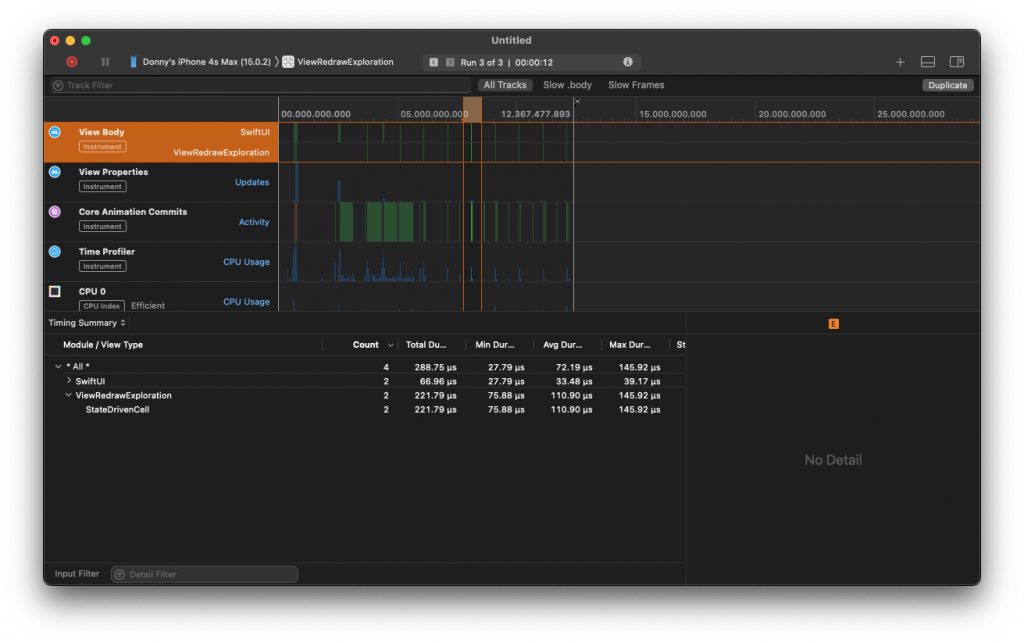
As you can see, only two cell bodies get evaluated now. That's the cell that's no longer active, and the newly activated cell. The StateDrivenView itself is no longer evaluated every second.
I'm sure you can imagine that this is the desired situation to be in. We don't want to re-evaluate and redraw our entire list when all we really want to do is re-evaluate one or two cells.
The lesson to draw from this optimization section is that you should always aim to make your data source scope as small as possible. Triggering view updates from way up high in your view hierarchy to update something that's all that way at the bottom is not very efficient because all of the bodies of views in between will need to be evaluated and redrawn in the process.
Conclusions
In this post you learned a lot about how and when SwiftUI decides to redraw your views. You learned that if the model for a view contains properties that changed, SwiftUI will re-evaluate the view's body. This is true even if the changed properties aren't used in your view. More interestingly, you saw that SwiftUI can compare your models even if they're not Equatable.
Next, I showed you that adding Equatable conformance to your model can influence how SwiftUI decides whether or not your view's body needs to be re-evaluated. There's one caveat though. Your Equatable conformance won't influence SwiftUI's re-evaluation behavior depending on whether your model object is a "plain old data" object or not.
After that, you saw that your view will automatically take all of its stored properties into account when it decides whether or not your view's body needs re-evaluation. Computed properties are ignored. You also saw that instead of conforming your model to Equatable, you can conform your views to Equatable and as far as I can tell, the same caveat mentioned earlier applies.
Lastly, you saw that in order to keep tight control over your views and when they get redrawn, it's best to keep your data sources small and focussed. Instead of having a global state that contains a lot of structs, it might be better have your models as ObservableObjects that can be observed at a more granular level. This can, for example, prevent your lists body from being evaluated and works around the extra redraws that were covered in the first half of this post entirely.
I'd like to stress one last time that it's not guaranteed that SwiftUI will continue working the way it does, and this post is an exercise in trying to unravel some of SwiftUI's mysteries like, for example, how SwiftUI's diffing works. Investigating all of this was a lot of fun and if you have any additions, corrections, or suggestions for this post I'd love to add them, please send them to me on Twitter.