Building a backend-driven paywall with RevenueCat
Published on: April 4, 2024Updated on: April 23, 2024
On of app development’s largest downsides (in my opinion) is that it’s frustratingly hard for developers to quickly iterate on an app’s core features due to the App Review process which can take anywhere between a few hours to a few days.
As a result of this process, developers either need to ship their apps with A/B testing built in if they want to test multiple variations of a feature, they can iterate more slowly or they can opt to build a so-called backend-driven UI. A backend-driven UI is a user interface that’s drawn by fetching information about the UI from a server, parsing the information, and placing appropriate UI components on screen based on the retrieved data.
One of the most important components in an app that implements in-app purchases is the paywall. You want to make sure that your paywall is presented at the right time, and that it presents the best possible offer for your user in the best way. Usually, you’ll want to iterate on your paywall and experiment with different configurations to decide which paywall converts best for your app.
In this post, we’ll explore RevenueCat’s paywall feature to see how we can leverage this feature to build a backend-driven, native paywall for your apps.
This post is a sponsored post. Its target is to provide an honest and fair view on RevenueCat. To make sure that this post is valuable to my readers, all opinions expressed in this post are my own.
Understanding what backend-driven is
If you think that a backend-driven UI sounds incredibly complicated, that’s because it can be very complex indeed. The simplest version of a backend-driven UI is a UI that loads JSON, parses that JSON into model objects, and then your views render the parsed models into a SwiftUI list view.
In this example, the backend didn’t decide how your screen looks, but it did inform your app about what should be presented to the user. Of course, this is a very simple example of a backend-driven UI and it’s usually not what people mean when they talk about being backend-driven but it does demonstrate the basics of being backend-driven without being overly complex.
When we apply the idea of being backend-driven to RevenueCat paywalls, what we’re talking about is the ability for a backend to tell your app exactly which in-app purchases, metadata and UI elements should be shown to your user.
Let’s get started by looking at how you can set up the RevenueCat side of things by configuring a paywall and its contents. After that, we’ll see how we can leverage the RevenueCat paywall in an app to show our paywall with backend-driven components.
Setting up RevenueCat for backend driven paywalls
If you’ve worked with RevenueCat before, you’ll know that RevenueCat models your in-app purchases through entitlements, products and offerings. In short, here’s what each of these configurations are for:
- Entitlement An entitlement is what “marks” your user as having access to one or more features in your app. Having “pro access” to an app is an example of an entitlement.
- Product These map to your in app purchases in App Store Connect. For example, you can have a monthly, yearly and lifetime subscription enabled for your app. These are three separate products in App Store Connect but all three can unlock the same entitlement in RevenueCat.
- Offerings An offering in RevenueCat is a collection of products that you group together as a paywall. This allows you to experiment with different products being offered to your user (for example, you can have an offering that shows your monthly / yearly subscriptions, one that only shows your lifetime subscription, and one that shows all your products). You can programmatically decide which offering is presented to a user. You can even set up experiments to present different offers to your users as a means of A/B testing your pricing strategy.
In order to implement a backend driven paywall, you will need to have created your entitlements and products. If you’re just getting started with RevenueCat, they have great documentation available to help you get set up quickly.
The trick to implementing a backend-driven paywall is in how you set up your offer.
RevenueCat allows you to associate JSON metadata with your offering. You’re free to include as much metadata as you’d like which means that you can provide loads of paywall related information for a specific offer as metadata.

For example, when you’re presenting your lifetime subscription only offering, you might want your app to highlight the features your user unlocks along with some positive user reviews. When you’re presenting a user with the option to choose a monthly vs. yearly subscription, you could opt to present the user with some benefits of choosing yearly instead of monthly.
You might want to switch things up after you’ve tried an approach for a while.
All of this is possible by associating the right metadata to your offering. In the next section, I’ll show you what this looks like from an app point of view. For now, we’ll focus on the somewhat more abstract JSON side of things.
Rather than showing you everything that’s possible with this JSON, I’d like to focus on presenting something relatively simple. If you want to see a more elaborate example of what can be done, check out this talk from RevenueCat’s Charlie Chapman where he demoes backend-driven paywalls as well as the corresponding demo app code.
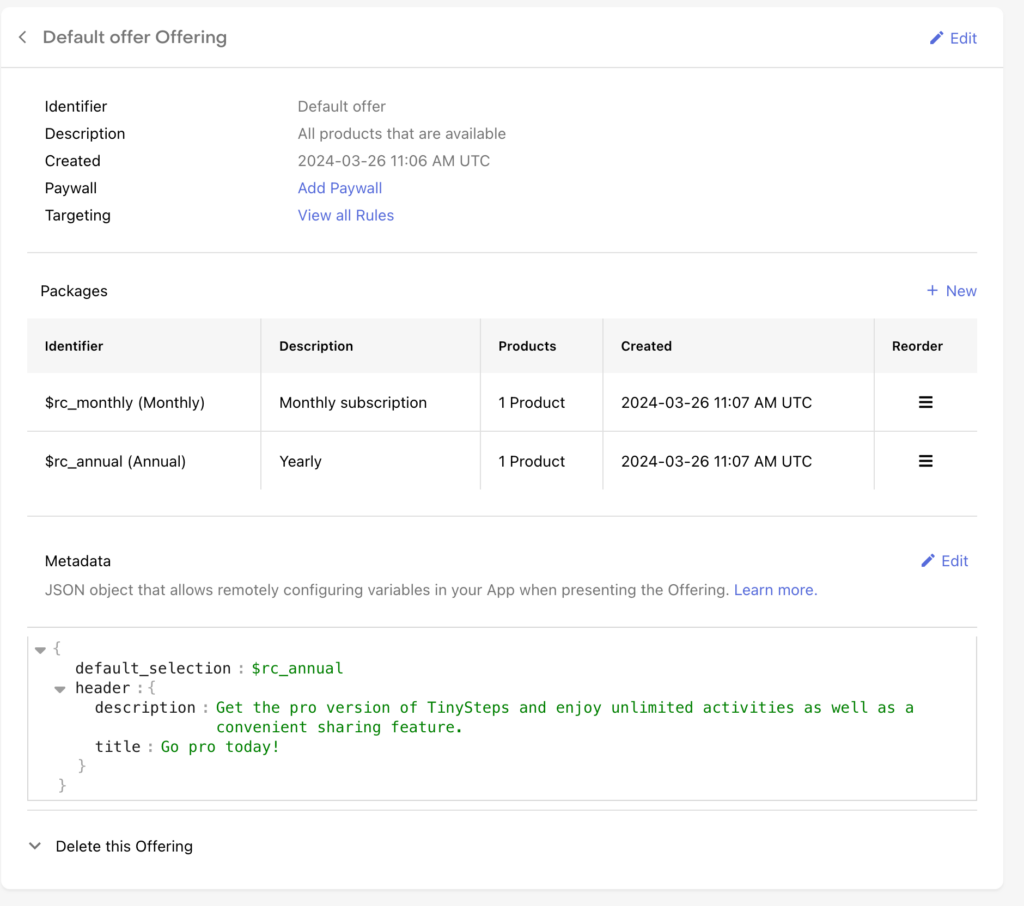
For the purposes of this blog post, here’s the JSON I’ll be working with:
{
  "default_selection": "$rc_annual",
  "header": {
    "description": "Get the pro version of TinySteps and enjoy unlimited activities as well as a convenient sharing feature.",
    "title": "Go pro today!"
  }
}
All we’re doing here is setting up a simple header object as well as configuring a default selected package. This will allow us to experiment with pre-selecting a subscription to see whether that impacts a user’s choice between yearly and monthly subscriptions.
Here’s what that end up looking like in RevenueCat’s UI.
Now that we’ve set up our offering, let’s take a look at how we can leverage this in our app.
Presenting the paywall in your app
Once you’ve included the RevenueCat SDK in your app and you’ve configured it with your api key, you can start implementing your paywall. For this post, we’ll implement a very simple paywall that displays our header, lists all different subscription types that we have available, and we pre-select the subscription that we’ve configured in our JSON metadata.
To get started, we should write out the model that we intend to decode from our JSON Metadata. In this case, we’re working with fairly simple data so our model can be simple too:
struct PaywallInfo: Decodable {
  let defaultSelection: String
  let header: Header
}

extension PaywallInfo {
  struct Header: Decodable {
    let description: String
    let title: String
  }
}
To load PaywallInfo from our metadata, we can fetch our offering from RevenueCat, extract the metadata, and then decode that metadata into our model object.
Here’s what that could look like:
enum PaywallLoader {
  static func getPayWallInfo() async -> (PaywallInfo, [Package])? {
    do {
      guard let offering = try await Purchases.shared.offerings().current else {
        return nil
      }

      let data = try JSONSerialization.data(withJSONObject: offering.metadata)
      let decoder = JSONDecoder()
      decoder.keyDecodingStrategy = .convertFromSnakeCase
      let paywallInfo = try decoder.decode(PaywallInfo.self, from: data)

      let packages = offering.availablePackages

      return (paywallInfo, packages)
    } catch {
      print("Error: \(error)")
      return nil
    }
  }
}
In the snippet above, you might notice the following lines and wonder what they do:
let data = try JSONSerialization.data(withJSONObject: offering.metadata)
let decoder = JSONDecoder()
decoder.keyDecodingStrategy = .convertFromSnakeCase
let paywallInfo = try decoder.decode(PaywallInfo.self, from: data)
The metadata JSON that we get on our offering is of type [String: Any]. We know that this data originated as JSON from the RevenueCat admin panel but we want to be able to transform the [String: Any] dictionary into our model object. To do this we convert the dictionary to Data, and from Data into our model. It’s a little tedious but it works.
Once we’ve retrieved our data, we can use it to populate our view.
The following shows an extremely bare-bones example of using our PaywallLoader in a view:
struct PaywallMainView: View {
  @State var paywallData: (PaywallInfo, [Package])?
  @State var selectedPackage: Package?

  var body: some View {
    if let paywallData {
      VStack {
        Text(paywallData.0.header.title)
          .font(.title)

        Text(paywallData.0.header.description)
          .font(.title)

        ForEach(paywallData.1) { package in
          if package.identifier == selectedPackage?.identifier {
            Button(package.storeProduct.localizedTitle, action: {
              selectedPackage = package
            })
            .background(Color.gray)
          } else {
            Button(package.storeProduct.localizedTitle, action: {
              selectedPackage = package
            })
          }
        }
      }
    } else {
      ProgressView()
        .task {
          paywallData = await PaywallLoader.getPayWallInfo()
          selectedPackage = paywallData?.1.first(where: { package in
            return package.identifier == paywallData?.0.defaultSelection
          })
        }
    }
  }
}
This code is purely provided as a reference to show you what’s next after decoding your model data. It’s not intended to look pretty, nor is it intended to show you the most beautiful paywall. The key lesson here is that you can leverage the JSON metadata on a RevenueCat offering to build a paywall that uses backend-driven UI, allowing you to experiment with different texts, configuration and more.
In Summary
There’s no limit to how flexible you can get with a backend-driven UI other than your imagination. In this post, I’ve shown you a very basic backend-driven UI that would allow me to change a default selection for my paywall and to experiment with different texts on my paywall.
You’ve seen how you can configure an offering in your RevenueCat console with any JSON you’d like, allowing you to experiment to your heart’s content. You’ve also seen how you can write code that fetches an offering and extract the relevant information from the JSON metadata.
Again, there’s virtually no limit to what you can do here. You can provide as much JSON data as you’d like to build complex, dynamic, and customizable paywalls that can be updated on the fly. No App Review needed.
I’m a big fan of RevenueCat’s implementation of JSON metadata. Being able to expand the available information like this is a huge benefit to experimentation and testing to find out the absolute best paywall implementation for your app.