Building a simple remote configuration loader for your apps
Published on: October 26, 2020Remote configuration is a common practice in almost every app I have worked on. Sometimes these configurations can be large and the implications of a configuration change can be far-reaching while other times a configuration is used to change the number of items shown in a list, or to enable or disable certain features. You can even use remote configuration to set up your networking layer. For example by setting certain headers on a request, providing endpoints for your remote data, and more.
In this week's post I will not go into detail about every possible use case that you might have for a remote configuration. Instead, I will show you how you can create a remote configuration, host it, load it, and cache it for subsequent launches.
While it might be tempting to look at a third-party solution for a feature like this, I want to show you how you can set up a remote configuration yourself because it's much more straightforward than you might think.
Hosting a remote configuration file
There are countless ways to create and host a configuration file. For example, you can generate a configuration file using a Content Management System (CMS), write a JSON file by hand, or generate JSON files by concatenating several JSON files into a single, larger JSON file. In this post we'll keep it simple and write a JSON file by hand.
In terms of hosting your remote configuration file, you could upload the file to a server that you own, use a static file server like Amazon's S3, or use any other platform that allows you to serve JSON files. As you can imagine there are tons of solutions that allow you to serve a static file but I'd like to keep things simple and straightforward.
My personal choice for hosting static files is Amazon's S3. I already have an account there, and creating S3 buckets is fairly simple. And most importantly, it's cheap. Amazon has a generous free tier and even when your data traffic exceeds the free tier, S3 is still very affordable.
You can create an S3 bucket by signing up for an AWS account at https://aws.amazon.com. Just to be clear, I am not affiliated with Amazon and will not receive any money if you create an account through me. They are not paying me to promote their services in any way.
After you've signed up for an AWS account go to the S3 page and click the big Create bucket button. Choose an appropriate name for your bucket (for example com.yourname.app-config) and choose a region. The region you pick is the physical location where your bucket is stored. This means that if you pick EU (Frankfurt) your app config will be served from a server in Frankfurt. It's typically a good idea to choose a region that you would consider to be close to the majority of your users. The closer the server is to your users, the less latency the user will experience while loading your app config. However, since we'll be caching the app config and including an initial config in the app bundle later you don't have to worry about this too much. Your user won't notice when the config loaded slightly slower than you'd like.
After choosing a name and region, click Next. On this screen, you can uncheck the Block all public access option and accept the warning that pops up. The whole purpose of this bucket is to be public so you can serve your config from it. Click Next again and then click Create Bucket. That's it, you've created your first Amazon S3 bucket!
To test your bucket, create a file called config.json on your Desktop (or in any other location you find convenient) and add the following contents to it:
{
  "minVersion": "1.0.0"
}
Select your bucket in the overview on your S3 page and click the Upload button to add a file to your bucket. Select your config.json file and set the Managed public permissions field to Grant public read access to this object(s):
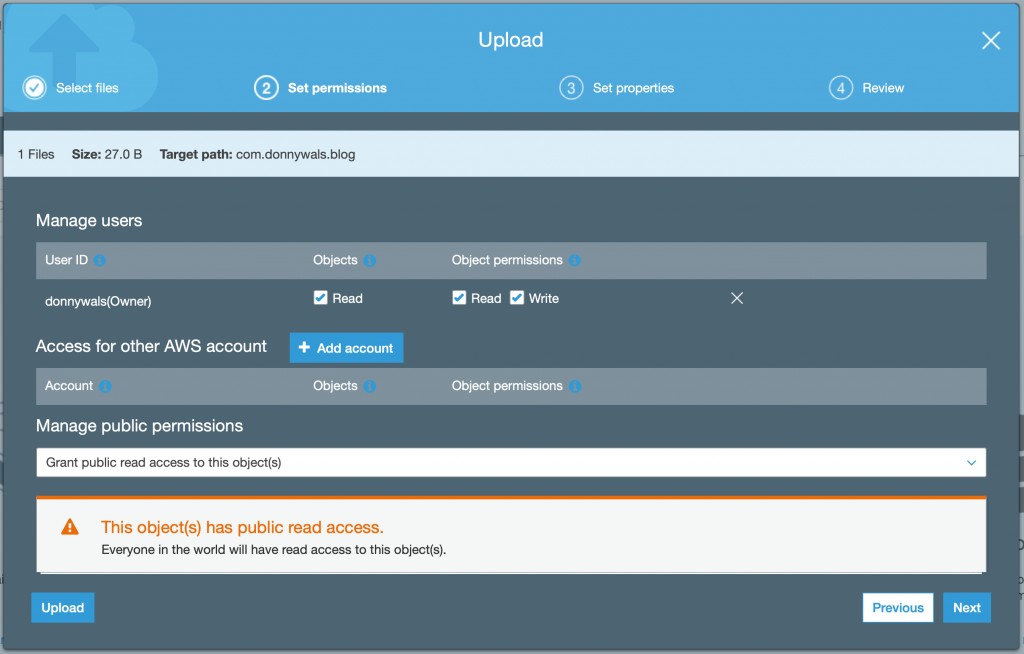
After doing this, click the Upload button.
Your file will upload and be visible in your bucket. Click the file name to inspect its details. The last field in the detail view is called Object URL and it contains your config's URL. For example my config was uploaded to https://s3.eu-central-1.amazonaws.com/com.donnywals.blog/config.json.
And that's it! You've uploaded your first config to an S3 bucket. Now let's see how you can use this config in an app.
Loading a remote config in your application
Once you have uploaded your app configuration somewhere, you can start thinking about adding it to your app. There are a couple of important requirements that I think are essential to a good app config setup:
- The app must be able to function offline or if config loading fails
- It should be possible to mock the app config for testing purposes
- Config changes should be applied as soon as possible
The first two requirements are essential in my opinion. If your app doesn't work without loading a configuration first your users will likely experience frustratingly slow startup times that get worse as their network quality degrades. Worse, they wouldn't be able to use your app while they are offline.
The third requirement is a somewhat optional requirement that might not be realistic for every configuration property that you use. For example, if you have config flags for your UI you might not want to immediately redraw your UI when you've loaded a new config. You can probably use your older configuration until the next time the user launches your app. Other features like an update prompt are much easier to implement in a way that's dynamic and applied as soon as your configuration is loaded. In this post I'll show you how you can use Combine to subscribe to changes in your configuration.
First, let's see how you can add a default configuration to your app, load a new configuration, and store this new configuration for later use.
We'll write a ConfigProvider class that takes care of all of this. Since we want to pass this object around without copying it we must use a class for this object. If you'd make this a struct Swift would create a copy every time you pass your config provider to a view model, view, or view controller. This would be fine if the config provider was completely immutable but it's not. When the app initially launches we'll load a cached config, and when this config updates we want to use the updated configuration which means we need to mutate the config provider by making it point to a new config.
Before we write this ConfigProvider, copy the config.json file you created to your project in Xcode and make sure it's included in your app by setting its Target Membership.
Before we write the ConfigProvider, you should also define a struct that your configuration JSON is decoded into. For the sample config you wrote earlier the struct would look like this:
struct AppConfig: Codable {
  let minVersion: String
}
You can name this struct whatever you want, and make sure it matches the JSON that you use in your configuration file.
Let's start building our ConfigProvider by writing a skeleton class that contains the properties and methods that I'd like to use:
class ConfigProvider {

  private(set) var config: AppConfig

  func updateConfig() {
    // here we'll load the config
  }
}
This API is nice and simple. There's a config property that can be used to retrieve the current config, and there's an updateConfig() method that can be used to fetch a remote configuration and update the config property.
The ConfigProvider must be able to load local configuration files and remote configuration files as needed. The provider should always return a configuration file, even if no file was loaded before. That's why you added the config.json to the app bundle earlier.
To keep functionality separated, we'll create two helper objects that are abstracted behind a protocol so they can be swapped out when testing the config provider object. Let's define these protocols first:
protocol LocalConfigLoading {
  func fetch() -> AppConfig
  func persist(_ config: AppConfig)
}

protocol RemoteConfigLoading {
  func fetch() -> AnyPublisher<AppConfig, Error>
}
Both protocols are pretty lean. A LocalConfigLoading object is capable of fetching a local configuration and persisting an AppConfig file to the file system. A RemoteConfigLoading object is capable of loading configuration from a remote server. Before we implement objects that conform to these protocols, we can already write the ConfigProvider's implementation.
Let's look at the initializer first:
class ConfigProvider {

  private(set) var config: AppConfig

  private let localConfigLoader: LocalConfigLoading
  private let remoteConfigLoader: RemoteConfigLoading

  init(localConfigLoader: LocalConfigLoading, remoteConfigLoader: RemoteConfigLoading) {
    self.localConfigLoader = localConfigLoader
    self.remoteConfigLoader = remoteConfigLoader

    config = localConfigLoader.fetch()
  }

  func updateConfig() {

  }
}
This is nice and straightforward. The ConfigProvider takes two objects in its initializer and uses the local loader's fetch method to set an initial local configuration.
The updateConfig method will use the remote provider to fetch a new configuration. To make sure don't have more than one update request in flight at a time, we'll use a DispatchQueue and dispatch to it synchronously.To learn more about this you can read my post on using DispatchQueue.sync and DisptachQueue.async.
Since we need to subscribe to a publisher to obtain the remote config, we also need a property to hold on to a cancellable. The following code should be added to the ConfigProvider:
private var cancellable: AnyCancellable?
private var syncQueue = DispatchQueue(label: "config_queue_\(UUID().uuidString)")

func updateConfig() {
  syncQueue.sync {
    guard self.cancellable == nil else {
      return
    }

    self.cancellable = self.remoteConfigLoader.fetch()
      .sink(receiveCompletion: { completion in
        // clear cancellable so we could start a new load
        self.cancellable = nil
      }, receiveValue: { [weak self] newConfig in
        self?.config = newConfig
        self?.localConfigLoader.persist(newConfig)
      })
  }
}
If we already have a cancellable stored we return early to avoid making two requests. If we don't have a cancellable, the remote loader's fetch() method is called. When this call completes the cancellable is cleaned up. When a new config is received, it is assigned to self?.config to make it available to users of the config provider. I also call persist on the local config loader to make sure the loaded config is available locally.
Let's look at the implementation for the local config loader:
class LocalConfigLoader: LocalConfigLoading {
  private var cachedConfigUrl: URL? {
    guard let documentsUrl = FileManager.default.urls(for: .documentDirectory, in: .userDomainMask).first else {
      return nil
    }

    return documentsUrl.appendingPathComponent("config.json")
  }

  private var cachedConfig: AppConfig? {
    let jsonDecoder = JSONDecoder()

    guard let configUrl = cachedConfigUrl,
          let data = try? Data(contentsOf: configUrl),
          let config = try? jsonDecoder.decode(AppConfig.self, from: data) else {
      return nil
    }

    return config
  }

  private var defaultConfig: AppConfig {
    let jsonDecoder = JSONDecoder()

    guard let url = Bundle.main.url(forResource: "config", withExtension: "json"),
          let data = try? Data(contentsOf: url),
          let config = try? jsonDecoder.decode(AppConfig.self, from: data) else {
      fatalError("Bundle must include default config. Check and correct this mistake.")
    }

    return config
  }

  func fetch() -> AppConfig {
    if let cachedConfig = self.cachedConfig {
      return cachedConfig
    } else {
      let config = self.defaultConfig
      persist(config)
      return config
    }
  }

  func persist(_ config: AppConfig) {
    guard let configUrl = cachedConfigUrl else {
      // should never happen, you might want to handle this
      return
    }

    do {
      let encoder = JSONEncoder()
      let data = try encoder.encode(config)
      try data.write(to: configUrl)
    } catch {
      // you could forward this error somewhere
      print(error)
    }
  }
}
The most interesting parts are the fetch() and persist(_:) methods. In fetch() I first access self.cachedConfig. This property returns an optional AppConfig. It checks whether a config is stored in the app documents directory and decoding it. If no file exists, or the decoding fails this property is nil which means that we should use the default config that was bundled with the app. This config is loaded by the defaultConfig property and can't fail. If it does, the project is misconfigured.
After grabbing the default config it is passed to persist(_:) so it's copied to the documents directory which means it'll be loaded from there on the next launch.
The persist method encodes the AppConfig that it receives and writes it to the documents directory. It's a whole bunch of code, but the principles this is built on are fairly straightforward.
Let's look at the remote config loader next:
class RemoteConfigLoader: RemoteConfigLoading {
  func fetch() -> AnyPublisher<AppConfig, Error> {
    let configUrl = URL(string: "https://s3.eu-central-1.amazonaws.com/com.donnywals.blog/config.json")!

    return URLSession.shared.dataTaskPublisher(for: configUrl)
      .map(\.data)
      .decode(type: AppConfig.self, decoder: JSONDecoder())
      .eraseToAnyPublisher()
  }
}
This class is nice and tiny. It uses Combine to load my configuration file from the S3 bucket that I created earlier. I extract data from the output of my data task, I decode it into AppConfig and then I erase to AnyPublisher to keep my return type nice and clean.
Let's make one last change. When a new config is loaded we want to be able to respond to this. The easiest way to do this is by making ConfigProvider conform to ObservableObject and marking config as @Published:
class ConfigProvider: ObservableObject {

  @Published private(set) var config: AppConfig

  // rest of the code...
}
When using this config loader in a SwiftUI app you could write something like the following in your App struct:
@main
struct ConfigExampleApp: App {
  let configProvider = ConfigProvider(localConfigLoader: LocalConfigLoader(),
                                      remoteConfigLoader: RemoteConfigLoader())

  var body: some Scene {
    WindowGroup {
      ContentView()
        .environmentObject(configProvider)
        .onAppear(perform: {
          self.configProvider.updateConfig()
        })
    }
  }
}
This code makes the config provider available in the ContentView's environment. It also updates the config when the content view's onAppear is called. You can use the config provider in a SwiftUI view like this:
struct ContentView: View {
  @EnvironmentObject var configProvider: ConfigProvider

  var body: some View {
    Text(configProvider.config.minVersion)
      .padding()
  }
}
When the config updates, your view will automatically rerender. Pretty neat, right?
In a UIKit app you would add a property to your AppDelegate and inject the config provider into your view controller. The code would look a bit like this:
class AppDelegate: NSObject, UIApplicationDelegate {
  let configProvider = ConfigProvider(localConfigLoader: LocalConfigLoader(),
                                      remoteConfigLoader: RemoteConfigLoader())

  var window: UIWindow?

  func application(_ application: UIApplication,
                   didFinishLaunchingWithOptions launchOptions: [UIApplication.LaunchOptionsKey : Any]? = nil) -> Bool {

    configProvider.updateConfig()

    let window = UIWindow()
    window.rootViewController = ViewController(configProvider: configProvider)
    window.makeKeyAndVisible()

    self.window = window

    return true
  }
}
To receive configuration changes you can subscribe to the provider's $config property as follows:
configProvider.$config.sink { newConfig in
  // use the new config
}
.store(in: &cancellables)
Of course the exact usage will vary per app, but I'm sure this should help you to get started. The main point is that you know how you can load a remote config and cache it locally for future usage.
In Summary
In this week's post you have seen several interesting techniques. You learned how you can upload a configuration file for your app to an S3 bucket. You saw how you can load this file and cache it locally for future use. The contents of the config I've shown you are very basic but you can add tons of information to your config file. Some ideas are a minimum version that your users should have installed or feature flags to enable or disable app features remotely.
I've also shown you how you can make your config provider observable so you can react to changes in both SwiftUI and UIKit. This allows you to present popovers or show / hide UI elements as needed by reading values from the config object.
If you have any questions about this post, or if you have any feedback for me, please make sure to reach out on Twitter.
