Build a simple web scraper with node.js
Recently I released my first personal iOS app into the wild. The app is called unit guide for Starcraft 2 and it provides Starcraft 2 player with up to date and accurate information for every unit in the game. Instead of manually creating a huge JSON file I wrote a web scraper in node.js that allows me to quickly extract all the data I need and output it in a JSON format. In this post I will explain how you can build something similar using techniques that are familiar for most web developers.
Step 1: preparing
Before you get started you're going to want to install some dependencies. The ones I have used are: request, cheerio and promise. Installing them will work like this:
npm install --save request cheerio promise
If you don't have npm installed yet then follow the instructions here to install node and npm.
Once you have all the dependencies, you're going to need a webpage that you will scrape. I picked the Starcraft 2 units overview page as a starting point. You can pick any page you want, as long as it contains some data that you want to extract into a JSON file.
Step 2: loading the webpage
In order to start scraping the page, we're going to need to load it up. We'll be using request for this. Note that this will simply pull down the html, for my use case that was enough but if you need the webpage to execute javascript in order to get the content you need you might want to have a look at phantomjs. It's a headless browser that will allow javascript execution. I won't go in to this right now as I didn't need it for my project.
Downloading the html using request is pretty straightforward, here's how you can load a webpage:
var request = require('request');

request('http://eu.battle.net/sc2/en/game/unit/', function(error, result, html){
    if(error) {
        console.log('An error occurred');
        console.log(error);
        return;
    }

    console.log(html);
});
Getting the html was pretty easy right? Now that we have the html we can use cheerio to convert the html string in to a DOM-like object that we can query with css style selectors. All we have to do is include cheerio in our script and use it like this:
var request = require('request');
var cheerio = require('cheerio');

request('http://eu.battle.net/sc2/en/game/unit/', function(error, result, html){
    if(error) {
        console.log('An error occurred');
        console.log(error);
        return;
    }

    var $ = cheerio.load(html);
});
That's it. We now have an object that we can query for data pretty easily.
Step 3: finding and extracting some content
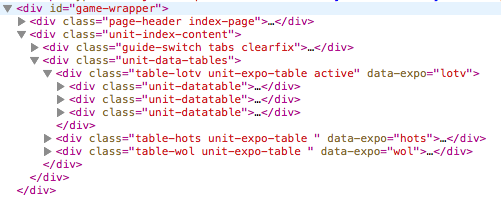
Now that we have the entire webpage loaded up and we can query it, it's time to look for content. Or in my case, I was looking for references to pages that contain the actual content I wanted to extract. The easiest way to find out what you should query the DOM for is to use the "inspect element" feature of your browser. It will give you an overview of all of the html elements on the page and where they are in the page's hierarchy. Here's part of the hierarchy I was interested in:
You can see an element that has the class table-lotv in the hierarchy. This element has three children with the class unit-datatable. The contents of this unit-datatable are of interest for me because somewhere in there I can find the names of the units I want to extract. To access these data tables and extract the relevant names you could use a query selector like this:
$('.table-lotv .unit-datatable').each(function(i, dataTable){
    var race = $(dataTable).find('.title-bar span').text();
    var $unitnames =  $(dataTable).find('.databox table .button-rollover');
});
In the above snippet $('.table-lotv .unit-datatable') selects all of the data tables. When I loop over these I have access to the individual dataTable objects. Inside of these objects I have found the race name (Terran, Protoss or Zerg) which is contained inside of a span element which is contained in an element with the class title-bar. Extracting the name isn't enough for my use case though. I also want to scrape each unit's page and after doing that I want to write all of the data to a JSON file at once. To do this I used promises. This is a great fit because I can easily create an array of promise objects and wait for all of them to be fulfilled. Let's see how that's done, shall we?
Step 4: build your list of promises
While we're looping over the dataTable objects we can create some promises that will need to be fulfilled before we output the big JSON file we're aiming for. Let's look at some code:
var request = require('request');
var cheerio = require('cheerio');
var Promise = require('promise');
var fs = require('fs');

request('http://eu.battle.net/sc2/en/game/unit/', function(error, result, html){
    //error handling code and cheerio loading

    var promises = [];

    $('.table-lotv .unit-datatable').each(function(i, dataTable){
        var race = $(dataTable).find('.title-bar span').text();
        var $unitnames =  $(dataTable).find('.databox table .button-rollover');

        promises.append(scrapeUnits($unitnames));
    });

    Promise.all(promises).then(function(promiseResults){
        var data = {};

        // use the promiseResults to populate and  build your data object...

        // write the JSON file to disk
        fs.writeFile('public/units.json', JSON.stringify(data), function(err){
            if(err) { console.log(err); }
        });
    });
});
Okay, so in this snippet I included Promise to the requirements. Inside of the request callback I created an empty array of promises. When Looping over the data tables I insert a new promise which is returned by the scrapeUnits function (I'll get to that function in the next snippet). After looping through all of the data tables I use the Promise.all function to wait until all promises in my promises array are fulfilled. When they are fulfilled I use the results of these promises to populate a data object (which is our JSON data). The function we provide to the then handler for Promise.all receives one argument. This argument is an array of results for the responses we put in the promises array. If the promises array contains three elements, then so will the promiseResults. Finally I write the data to disk using fs. Which is also added in the requirements section. (fs is part of node.js so you don't have to install that through npm).
Step 5: nesting promises is cool
In the previous snippet I showed you this line of code:
promises.append(scrapeUnits($unitnames));
The function scrapeUnits is a function which returns a promise, let's have a look at how this works, shall we?.
function scrapeUnits(unitUrls) {
    return new Promise(function(fulfil, reject) {
        var units = [];

        // some code that loads a new page with request
        // some code that uses querySelectors and cheerio to extract data
        // some code that creates a unit object and eventually adds units to the array

        // eventually we're done with grabbing data for our units and we do this:
        fulfil(units);
    });
}
This function is pretty straightforward. It returns a new Promise object. A Promise object takes one function as a parameter. The function should take two arguments, fulfil and reject. The two arguments are functions and we should call them to either fulfil the Promise when our operation was successful, or we reject it if we encountered an error. When we call fulfil, the Promise is "done". When we use Promise.all, the then handler will only get called if all promises passed to all have been fulfilled.
Step6: Putting it all together
var request = require('request');
var cheerio = require('cheerio');
var Promise = require('promise');
var fs = require('fs');

request('http://eu.battle.net/sc2/en/game/unit/', function(error, result, html){
    if(error) {
        console.log('An error occurred');
        console.log(error);
        return;
    }

    var $ = cheerio.load(html);

    var promises = [];

    $('.table-lotv .unit-datatable').each(function(i, dataTable){
        var race = $(dataTable).find('.title-bar span').text();
        var $unitnames =  $(dataTable).find('.databox table .button-rollover');

        promises.append(scrapeUnits($unitnames));
    });

    Promise.all(promises).then(function(promiseResults){
        var data = {};

        // use the promiseResults to populate and  build your data object...

        // write the JSON file to disk
        fs.writeFile('public/units.json', JSON.stringify(data), function(err){
            if(err) { console.log(err); }
        });
    });
});

function scrapeUnits(unitUrls) {
    return new Promise(function(fulfil, reject) {
        var units = [];

        // some code that loads a new page with request
        // some code that uses querySelectors and cheerio to extract data
        // some code that creates a unit object and eventually adds units to the array

        // eventually we're done with grabbing data for our units and we do this:
        fulfil(units);
    });
}
The above script is a stripped version of the code I wrote to scrape all of the unit information I needed. What you should take away from all this, is that it's not very complex to build a scraper in node.js. Especially if you're using promises. At first promises might seem a bit weird, but if you get used to them you'll realise that they are the perfect way to write maintainable and understandable asynchronous code. Especially Promise.all is a very fitting tool for what we're trying to do when we scrape multiple webpages that should be merged into a single JSON file. The nice thing about node.js is that it's javascript so we can use a lot us the technology we also use in a browser. Such as the css / jQuery selectors that cheerio makes available to us.
Before you scrape a webpage, please remember that not every webpage owner appreciates it if you scrape their page to use their content so make sure to only scrape what you need, when you need it. Especially if you start hitting somebody's websites with hundreds of requests you should be asking yourself if scraping this site is the correct thing to do.
If you have questions about this article, or would like to learn more about how I used the above techniques, you can let me know on Twitter


