Testing your push notifications without a third party service
Published on: December 13, 2019Many apps rely on push notifications to inform their users about interesting updates, important events, or interactions on social media that a user probably wants to know about. It's the perfect way to grab your users' attention and inform them about information they are likely interested in. To send push notifications, a lot of companies and developers make use of third-party services like Firebase, Amazon, Pusher, and others.
Today, I would like to show you a simple way to send push notifications without needing any of these services. Personally, I like to use this approach in the early stages of development because I don't want to have to go through a third party dashboard, integrate an SDK and just prefer to keep everything on my own machine.
It's also much quicker to set up quick prototypes or test cases if you don't need to involve an external service in your workflow. In today's article you will learn the following:
- Preparing your app and certificates for push notifications
- Writing a script to send notifications
Note that I mentioned services in this introduction, not libraries or frameworks. As you will see in the second section of this article, I use a small Javascript library to help me send push notifications because that actually saves me a lot of time.
Preparing your app and certificates for push notifications
Preparing for push notifications is a two-step process:
- Prepare and register the app
- Create the needed certificates
Preparing your app for push notifications
In order for your app to be able to receive push notifications, you need to add the Push Notifications entitlement to your project. To do this, go to the Signing & Capabilities tab in your project settings, click the + Capability button and add the Push Notifications capability to your app. Doing this will update the certificate that Xcode manages for you, and it allows you to create the needed certificates for your test script. It also allows you to register your app for push notifications.
To register your app for push notifications, you need to call the following method. Make sure to do this after you've asked the user for permission to send notifications.
UIApplication.shared.registerForRemoteNotifications()
Also, implement the following two AppDelegate methods:
func application(_ application: UIApplication, didRegisterForRemoteNotificationsWithDeviceToken deviceToken: Data) {
  let deviceTokenString = deviceToken.map { String(format: "%02x", $0) }.joined()
  print(deviceTokenString)
}

func application(_ application: UIApplication, didFailToRegisterForRemoteNotificationsWithError error: Error) {
  print(error.localizedDescription)
}
When your app successfully registers for push notifications, the device token is printed to the console. Make sure to keep the token somewhere where you can easily access it so you can use it when we write the script that will send our test notifications.
Generating the required certificates
There are two ways that you can use to generate your push certificates; manually or using a tool called Fastlane. I will briefly outline both options here.
Generating certificates manually
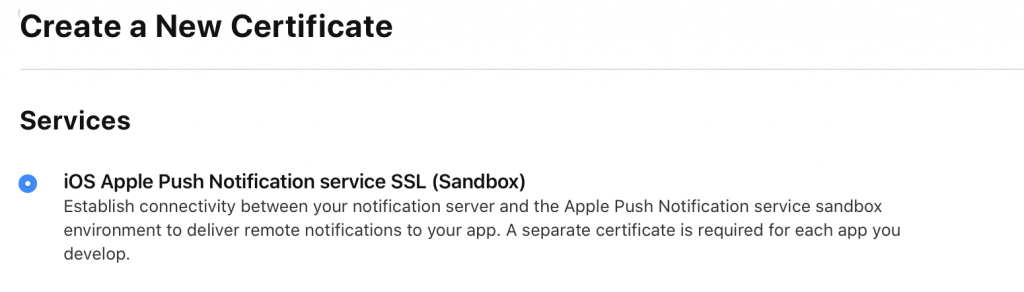
To generate your push certificates manually, you need to log in to the Apple Developer Portal and go to the Certificates, Identifiers & Profiles section. Click the + button to create a new certificate and choose the iOS Apple Push Notification service SSL (Sandbox) certificate.
Click continue and find the App ID that you want to send push notifications to. If your app doesn't show up, make sure you have added the push notifications entitlement to your app in Xcode.
The next step is to create a certificate signing request. To do this, open the Keychain Access app on your Mac and choose Keychain Access -> Certificate Assistant -> Request a Certificate from a Certificate Authority from the menu. Enter an email address and name in the required fields, and leave the CA Email address empty. Also, make sure to check the Saved to disk option.

Click continue and store the certificate in a convenient place, for example on your desktop.
Go back to the developer portal where you should see a screen that asks you to Upload a Certificate Signing Request. Choose the request you just created using Keychain Access. After clicking continue you should be able to download your freshly generated certificate.
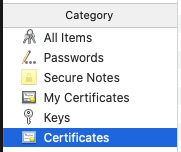
After downloading the certificate, double click it so it's added to your keychain. Once it's added, make sure to select the Certificates option in the list of keychain Categories:
Now find the certificate you just added, expand it using the arrow that should be visible next to it. Select both the certificate and the private key, right-click and choose the Export 2 items... option. Store the .p12 file that Keychain will export in a place where you can easily find it, for example, your desktop.
Open your terminal, navigate to the folder where you've stored your .p12 file and type the following command. Make sure to replace <your file> with the filename you chose in the previous step:
openssl pkcs12 -in <your filename>.p12 -out certs.pem -nodes -clcerts
This command will generate a .pem file which is needed to connect to Apple's push service. Move the generated file to the folder where you'll be writing your script. I like to keep the certs file and the script itself all in the same folder. Of course, you're free to do whatever you want if something else works better for you.
Generating certificates with Fastlane
By far the easier option and the one I prefer is to generate the needed .pem files with Fastlane. If you have Fastlane installed, use the following command to generate a .pem file for your app:
fastlane pem --development
You will be asked to log in to your Apple ID and to provide the bundle identifier for the app that you need a .pem file for. Once you've done this Fastlane will generate three files for you. Copy the .pem file to a place where you can easily reference it from the push notification script. Like I mentioned earlier, I like to keep them all in the same folder but you can store them wherever you want.
Writing a script to send push notifications
Before you get started writing your push script, make sure you have Node.js installed. Navigate to the folder where you'll create your push script and use the following command to install node-apn, the helper library we'll use to send notifications:
npm install --save node-apn
The preceding command will pull down the node-apn package from Node.js' version of SPM and install it in the current directory. Next, create a new javascript file. Call it what you want but I will call it send_push.js. Sending push notifications with node-apn is fairly simple. First, import the package and create the push service:
const apn = require("apn");

let provider = new apn.Provider({
  "cert": "certs.pem",
  "key": "certs.pem",
});
Next, create a notification to send to your app:
let notification = new apn.Notification();
notification.alert = "Hello, this is a test!";
notification.badge = 1337;
The Notification object that's created has all the properties that you might normally see on an apns payload. For more information on what can be included in the payload, refer to Apple's documentation and the documentation for node-apn.
After creating the notification, all you need to do is grab the push token that you obtained from your app in the first section of this article, and send the notification:
let token = "<your-token>";

provider.send(notification, token).then( (response) => {
  console.log("done");
});
To run this script, open your terminal, navigate to the folder that your script is in and run the following command:
node send_push.js
This will run your javascript file using Node.js, and you should see a push message appear on your device! Pretty cool, right? Even if you've never written a line of javascript in your life, modifying this sample script should be fairly straightforward and both Apple's documentation and node-apn's documentation should be able to point you in the right direction if you get stuck.
In summary
In today's article, you learned how you can set up push notifications in your app, generate certificates that are used to send push notifications manually or through Fastlane and you saw how you can create a simple Node.js script to send push notifications. Personally, I love using Fastlane to generate my .pem file and sending push notifications through a simple script feels so much more flexible than having to use third-party provider during development.
Of course, when your app is finished and you deploy it to the App Store, it might make much more sense for you to integrate Firebase push messages in your app. They handle all the complicated stuff like keeping track of push tokens, certificates and know how to send push notifications without blowing up their server. However, if you don't send many push messages, or if you have some knowledge of back-end development, it might be feasible for you to own your push notification service yourself. It really depends on what you're comfortable with.
That said, during development I personally prefer using a local script to send test push notifications. And maybe you will too now that you realize it's not extremely complicated to do. If you have any questions, feedback or anything else please feel to reach out on Twitter.
