Exploring concurrency changes in Swift 6.2

It's no secret that Swift concurrency can be pretty difficult to learn. There are a lot of concepts that are different from what you're used to when you were writing code in GCD. Apple recognized this in one of their vision documents and they set out to make changes to how concurrency works in Swift 6.2. They're not going to change the fundamentals of how things work. What they will mainly change is where code will run by default.

In this blog post, I would like to take a look at the two main features that will change how your Swift concurrency code works:

  1. The new nonisolated(nonsending) default feature flag
  2. Running code on the main actor by default with the defaultIsolation setting

By the end of this post you should have a pretty good sense of the impact that Swift 6.2 will have on your code, and how you should be moving forward until Swift 6.2 is officially available in a future Xcode release.

Understanding nonisolated(nonsending)

The nonisolated(nonsending) feature is introduced by SE-0461 and it’s a pretty big overhaul in terms of how your code will work moving forward. At the time of writing this, it’s gated behind an upcoming feature compiler flag called NonisolatedNonsendingByDefault. To enable this flag on your project, see this post on leveraging upcoming features in an SPM package, or if you’re looking to enable the feature in Xcode, take a look at enabling upcoming features in Xcode.

For this post, I’m using an SPM package so my Package.swift contains the following:

.executableTarget(
    name: "SwiftChanges",
    swiftSettings: [
        .enableExperimentalFeature("NonisolatedNonsendingByDefault")
    ]
)

I’m getting ahead of myself though; let’s talk about what nonisolated(nonsending) is, what problem it solves, and how it will change the way your code runs significantly.

Exploring the problem with nonisolated in Swift 6.1 and earlier

When you write async functions in Swift 6.1 and earlier, you might do so on a class or struct as follows:

class NetworkingClient {
  func loadUserPhotos() async throws -> [Photo] {
    // ...
  }
}

When loadUserPhotos is called, we know that it will not run on any actor. Or, in more practical terms, we know it’ll run away from the main thread. The reason for this is that loadUserPhotos is a nonisolated and async function.

This means that when you have code as follows, the compiler will complain about sending a non-sendable instance of NetworkingClient across actor boundaries:

struct SomeView: View {
  let network = NetworkingClient()

  var body: some View {
    Text("Hello, world")
      .task { await getData() }
  }

  func getData() async {
    do {
      // sending 'self.network' risks causing data races
      let photos = try await network.loadUserPhotos()
    } catch {
      // ...
    }
  }
}

When you take a closer look at the error, the compiler will explain:

sending main actor-isolated 'self.network' to nonisolated instance method 'loadUserPhotos()' risks causing data races between nonisolated and main actor-isolated uses

This error is very similar to one that you’d get when sending a main actor isolated value into a sendable closure.

The problem with this code is that loadUserPhotos runs in its own isolation context. This means that it will run concurrently with whatever the main actor is doing.

Since our instance of NetworkingClient is created and owned by the main actor we can access and mutate our networking instance while loadUserPhotos is running in its own isolation context. Since that function has access to self, it means that we can have two isolation contexts access the same instance of NetworkingClient at the exact same time.

And as we know, multiple isolation contexts having access to the same object can lead to data races if the object isn’t sendable.

The difference between an async function and a non-async function that are both nonisolated, is that the non-async function will always run on the caller’s actor. On the other hand, if we call a nonisolated async function from the main actor then the function will not run on the main actor. When we call a nonisolated async function from a place that’s not on the main actor, then the called function will also not run on the main actor.

The code below is commented to show this through some examples:

// this function will _always_ run on the caller's actor
nonisolated func nonIsolatedSync() {}

// this function is isolated to an actor so it always runs on that actor (main in this case)
@MainActor func isolatedSync() {}

// this function will _never_ run on any actor (it runs on a bg thread)
nonisolated func nonIsolatedAsync() async {}

// this function is isolated to an actor so it always runs on that actor (main in this case)
@MainActor func isolatedAsync() async {}

As you can see, there's quite some difference in behavior for functions that are async versus functions that are not. Specifically for nonisolated async versus nonisolated non-async.

Swift 6.2 aims to fix this with a new default for nonisolated functions that's intended to make sure that async and non-async functions can behave in the exact same way.

Understanding nonisolated(nonsending)

The behavior in Swift 6.1 and earlier is inconsistent and confusing for folks, so in Swift 6.2, async functions will adopt a new default for nonisolated functions called nonisolated(nonsending). You don’t have to write this manually; it’s the default so every nonisolated async function will be nonsending unless you specify otherwise.

When a function is nonisolated(nonsending) it means that the function won’t cross actor boundaries. Or, in a more practical sense, a nonisolated(nonsending) function will run on the caller’s actor.

So when we opt-in to this feature by enabling the NonisolatedNonsendingByDefault upcoming feature, the code we wrote earlier is completely fine.

The reason for that is that loadUserPhotos() would now be nonisolated(nonsending) by default, and it would run its function body on the main actor instead of running it on the cooperative thread pool.

Let’s take a look at some examples, shall we? We saw the following example earlier:

class NetworkingClient {
  func loadUserPhotos() async throws -> [Photo] {
    // ...
  }
}

In this case, loadUserPhotos is both nonisolated and async. This means that the function will receive a nonisolated(nonsending) treatment by default, and it runs on the caller’s actor (if any). In other words, if you call this function on the main actor it will run on the main actor. Call it from a place that’s not isolated to an actor; it will run away from the main thread.

Alternatively, we might have added a @MainActor declaration to NetworkingClient:

@MainActor
class NetworkingClient {
  func loadUserPhotos() async throws -> [Photo] {
    return [Photo()]
  }
}

This makes loadUserPhotos isolated to the main actor so it will always run on the main actor, no matter where it’s called from.

Then we might also have the main actor annotation along with nonisolated on loadUserPhotos:

@MainActor
class NetworkingClient {
  nonisolated func loadUserPhotos() async throws -> [Photo] {
    return [Photo()]
  }
}

In this case, the new default kicks in even though we didn’t write nonisolated(nonsending) ourselves. So, NetworkingClient is main actor isolated but loadUserPhotos is not. It will inherit the caller’s actor. So, once again if we call loadUserPhotos from the main actor, that’s where we’ll run. If we call it from some other place, it will run there.

So what if we want to make sure that our function never runs on the main actor? Because so far, we’ve only seen possibilities that would either isolate loadUserPhotos to the main actor, or options that would inherit the callers actor.

Running code away from any actors with @concurrent

Alongside nonisolated(nonsending), Swift 6.2 introduces the @concurrent keyword. This keyword will allow you to write functions that behave in the same way that your code in Swift 6.1 would have behaved:

@MainActor
class NetworkingClient {
  @concurrent
  nonisolated func loadUserPhotos() async throws -> [Photo] {
    return [Photo()]
  }
}

By marking our function as @concurrent, we make sure that we always leave the caller’s actor and create our own isolation context.

The @concurrent attribute should only be applied to functions that are nonisolated. So for example, adding it to a method on an actor won’t work unless the method is nonisolated:

actor SomeGenerator {
  // not allowed
  @concurrent
  func randomID() async throws -> UUID {
    return UUID()
  }

  // allowed
  @concurrent
  nonisolated func randomID() async throws -> UUID {
    return UUID()
  }
}

Note that at the time of writing both cases are allowed, and the @concurrent function that’s not nonisolated acts like it’s not isolated at runtime. I expect that this is a bug in the Swift 6.2 toolchain and that this will change since the proposal is pretty clear about this.

How and when should you use NonisolatedNonSendingByDefault

In my opinion, opting in to this upcoming feature is a good idea. It does open you up to a new way of working where your nonisolated async functions inherit the caller’s actor instead of always running in their own isolation context, but it does make for fewer compiler errors in practice, and it actually helps you get rid of a whole bunch of main actor annotation based on what I’ve been able to try so far.

I’m a big fan of reducing the amount of concurrency in my apps and only introducing it when I want to explicitly do so. Adopting this feature helps a lot with that. Before you go and mark everything in your app as @concurrent just to be sure; ask yourself whether you really have to. There’s probably no need, and not running everything concurrently makes your code, and its execution a lot easier to reason about in the big picture.

That’s especially true when you also adopt Swift 6.2’s second major feature: defaultIsolation.

Exploring Swift 6.2’s defaultIsolation options

In Swift 6.1 your code only runs on the main actor when you tell it to. This could be due to a protocol being @MainActor annotated or you explicitly marking your views, view models, and other objects as @MainActor.

Marking something as @MainActor is a pretty common solution for fixing compiler errors and it’s more often than not the right thing to do.

Your code really doesn’t need to do everything asynchronously on a background thread.

Doing so is relatively expensive, often doesn’t improve performance, and it makes your code a lot harder to reason about. You wouldn’t have written DispatchQueue.global() everywhere before you adopted Swift Concurrency, right? So why do the equivalent now?

Anyway, in Swift 6.2 we can make running on the main actor the default on a package level. This is a feature introduced by SE-0466.

This means that you can have UI packages and app targets and model packages etc, automatically run code on the main actor unless you explicitly opt-out of running on main with @concurrent or through your own actors.

Enable this feature by setting defaultIsolation in your swiftSettings or by passing it as a compiler argument:

swiftSettings: [
    .defaultIsolation(MainActor.self),
    .enableExperimentalFeature("NonisolatedNonsendingByDefault")
]

You don’t have to use defaultIsolation alongside NonisolatedNonsendingByDefault but I did like to use both options in my experiments.

Currently you can either pass MainActor.self as your default isolation to run everything on main by default, or you can use nil to keep the existing behavior (or don’t pass the setting at all to keep the existing behavior).

Once you enable this feature, Swift will infer every object to have an @MainActor annotation unless you explicitly specify something else:

@Observable
class Person {
  var myValue: Int = 0
  let obj = TestClass()

  // This function will _always_ run on main 
  // if defaultIsolation is set to main actor
  func runMeSomewhere() async {
    MainActor.assertIsolated()
    // do some work, call async functions etc
  }
}

This code contains a nonisolated async function. This means that, by default, it would inherit the actor that we call runMeSomewhere from. If we call it from the main actor that’s where it runs. If we call it from another actor or from no actor, it runs away from the main actor.

This probably wasn’t intended at all.

Maybe we just wrote an async function so that we could call other functions that needed to be awaited. If runMeSomewhere doesn’t do any heavy processing, we probably want Person to be on the main actor. It’s an observable class so it probably drives our UI which means that pretty much all access to this object should be on the main actor anyway.

With defaultIsolation set to MainActor.self, our Person gets an implicit @MainActor annotation so our Person runs all its work on the main actor.

Let’s say we want to add a function to Person that’s not going to run on the main actor. We can use nonisolated just like we would otherwise:

// This function will run on the caller's actor
nonisolated func runMeSomewhere() async {
  MainActor.assertIsolated()
  // do some work, call async functions etc
}

And if we want to make sure we’re never on the main actor:

// This function will run on the caller's actor
@concurrent
nonisolated func runMeSomewhere() async {
  MainActor.assertIsolated()
  // do some work, call async functions etc
}

We need to opt-out of this main actor inference for every function or property that we want to make nonisolated; we can’t do this for the entire type.

Of course, your own actors will not suddenly start running on the main actor and types that you’ve annotated with your own global actors aren’t impacted by this change either.

Should you opt-in to defaultIsolation?

This is a tough question to answer. My initial thought is “yes”. For app targets, UI packages, and packages that mainly hold view models I definitely think that going main actor by default is the right choice.

You can still introduce concurrency where needed and it will be much more intentional than it would have been otherwise.

The fact that entire objects will be made main actor by default seems like something that might cause friction down the line but I feel like adding dedicated async packages would be the way to go here.

The motivation for this option existing makes a lot of sense to me and I think I’ll want to try it out for a bit before making up my mind fully.

Expand your learning with my books

Practical Swift Concurrency (the video course) header image

Learn everything you need to know about Swift Concurrency and how you can use it in your projects with Practical Swift Concurrency the video course. It contains:

  • About ten hours worth of videos and exercises
  • Sample projects that use the code shown in the videos.
  • FREE access to the Practical Swift Concurrency book
  • Free updates for future iOS and Swift versions.

The course is available on Teachable for just $89

Enroll now

Enabling upcoming feature flags in an SPM package

As Swift evolves, a lot of new evolution proposals get merged into the language. Eventually these new language versions get shipped with Xcode, but sometimes you might want to try out Swift toolchains before they're available inside of Xcode.

For example, I'm currently experimenting with Swift 6.2's upcoming features to see how they will impact certain coding patterns once 6.2 becomes available for everybody.

This means that I'm trying out proposals like SE-0461 that can change where nonisolated async functions run. This specific proposal requires me to turn on an upcoming feature flag. To do this in SPM, we need to configure the Package.json file as follows:

let package = Package(
    name: "SwiftChanges",
    platforms: [
        .macOS("15.0")
    ],
    targets: [
        // Targets are the basic building blocks of a package, defining a module or a test suite.
        // Targets can depend on other targets in this package and products from dependencies.
        .executableTarget(
            name: "SwiftChanges",
            swiftSettings: [
                .enableExperimentalFeature("NonisolatedNonsendingByDefault")
            ]
        ),
    ]
)

The section to pay attention to is the swiftSettings argument that I pass to my executableTarget:

swiftSettings: [
    .enableExperimentalFeature("NonisolatedNonsendingByDefault")
]

You can pass an array of features to swiftSettings to enable multiple feature flags.

Happy experimenting!

Should you use network connectivity checks in Swift?

A lot of modern apps have a networking component to them. This could be because your app relies on a server entirely for all data, or you’re just sending a couple of requests as a back up or to kick off some server side processing. When implementing networking, it’s not uncommon for developers to check the network’s availability before making a network request.

The reasoning behind such a check is that we can inform the user that their request will fail before we even attempt to make the request.

Sound like good UX, right?

The question is whether it really is good UX. In this blog post I’d like to explore some of the pros and cons that a user might run into when you implement a network connectivity check with, for example, NWPathMonitor.

A user’s connection can change at any time

Nothing is as susceptible to change as a user’s network connection. One moment they might be on WiFi, the next they’re in an elevator with no connection, and just moments later they’ll be on a fast 5G connection only to switch to a much slower connection when their train enters a huge tunnel.

If you’re preventing a user from initiating a network call when they momentarily don’t have a connection, that might seem extremely weird to them. By the time your alert shows up to tell them there’s no connection, they might have already restored connection. And by the time the actual network call gets made the elevator door close and … the network call still fails due to the user not being connected to the internet.

Due to changing conditions, it’s often recommended that apps attempt a network call, regardless of the user’s connection status. After all, the status can change at any time. So while you might be able to successfully kick off a network call, there’s no guarantee you’re able to finish the call.

A much better user experience is to just try the network call. If the call fails due to a lack of internet connection, URLSession will tell you about it, and you can inform the user accordingly.

Speaking of URLSession… there are several ways in which URLSession will help us handle offline usage of our app.

You might have a cached response

If your app is used frequently, and it displays relatively static data, it’s likely that your server will include cache headers where appropriate. This will allow URLSession to locally cache responses for certain requests which means that you don’t have to go to the server for those specific requests.

This means that, when configured correctly, URLSession can serve certain requests without an internet connection.

Of course, that means that the user must have visited a specific URL before, and the server must include the appropriate cache headers in its response but when that’s all set up correctly, URLSession will serve cached responses automatically without even letting you, the developer, know.

Your user might be offline and most of the app still works fine without any work from your end.

This will only work for requests where the user fetches data from the server so actions like submitting a comment or making a purchase in your app won’t work, but that’s no reason to start putting checks in place before sending a POST request.

As I mentioned in the previous section, the connection status can change at any time, and if URLSession wasn’t able to make the request it will inform you about it.

For situations where your user tries to initiate a request when there’s no active connection (yet) URLSession has another trick up its sleeve; automatic retries.

URLSession can retry network calls automatically upon reconnecting

Sometimes your user will initiate actions that will remain relevant for a little while. Or, in other words, the user will do something (like sending an email) where it’s completely fine if URLSession can’t make the request now and instead makes the request as soon as the user is back online.

To enable this behavior you must set the waitsForConnectivity on your URLSession’s configuration to true:

class APIClient {
  let session: URLSession

  init() {
    let config = URLSessionConfiguration.default
    config.waitsForConnectivity = true

    self.session = URLSession(configuration: config)
  }

  func loadInformation() async throws -> Information {
    let (data, response) = try await session.data(from: someURL)
    // ...
  }

In the code above, I’ve created my own URLSession instance that’s configured to wait for connectivity if we attempt to make a network call when there’s no network available. Whenever I make a request through this session while offline, the request will not fail immediately. Instead, it remains pending until a network connection is established.

By default, the wait time for connectivity is several days. You can change this to a more reasonable number like 60 seconds by setting timeoutIntervalForResource:

init() {
  let config = URLSessionConfiguration.default
  config.waitsForConnectivity = true
  config.timeoutIntervalForResource = 60

  self.session = URLSession(configuration: config)
}

That way a request will remain pending for 60 seconds before giving up and failing with a network error.

If you want to have some logic in your app to detect when URLSession is waiting for connectivity, you can implement a URLSessionTaskDelegate. The delegate’s urlSession(_:taskIsWaitingForConnectivity:) method will be called whenever a task is unable to make a request immediately.

Note that waiting for connectivity won’t retry the request if the connection drops in the middle of a data transfer. This option only applies to waiting for a connection to start the request.

In summary

Handling offline scenarios should be a primary concern for mobile developers. A user’s connection status can change quickly, and frequently. Some developers will “preflight” their requests and check whether a connection is available before attempting to make a request in order to save a user’s time and resources.

The major downside of doing this is that having a connection right before making a request doesn’t mean the connection is there when the request actually starts, and it doesn’t mean the connection will be there for the entire duration of the request.

The recommended approach is to just go ahead and make the request and to handle offline scenarios if / when a network call fails.

URLSession has built-in mechanisms like a cache and the ability to wait for connections to provide data (if possible) when the user is offline, and it also has the built-in ability to take a request, wait for a connection to be available, and then start the request automatically.

The system does a pretty good job of helping us support and handle offline scenarios in our apps, which means that checking for connections with utilities like NWPathMonitor usually ends up doing more harm than good.

Choosing between LazyVStack, List, and VStack in SwiftUI

SwiftUI offers several approaches to building lists of content. You can use a VStack if your list consists of a bunch of elements that should be placed on top of each other. Or you can use a LazyVStack if your list is really long. And in other cases, a List might make more sense.

In this post, I’d like to take a look at each of these components, outline their strengths and weaknesses and hopefully provide you with some insights about how you can decide between these three components that all place content on top of each other.

We’ll start off with a look at VStack. Then we’ll move on to LazyVStack and we’ll wrap things up with List.

Understanding when to use VStack

By far the simplest stack component that we have in SwiftUI is the VStack. It simply places elements on top of each other:

VStack {
  Text("One")
  Text("Two")
  Text("Three")
}

A VStack works really well when you only have a handful of items, and you want to place these items on top of each other. Even though you’ll typically use a VStack for a small number of items, but there’s no reason you couldn’t do something like this:

ScrollView {
  VStack {
    ForEach(models) { model in 
      HStack {
        Text(model.title)
        Image(systemName: model.iconName)
      }
    }
  }
}

When there’s only a few items in models, this will work fine. Whether or not it’s the correct choice… I’d say it’s not.

If your models list grows to maybe 1000 items, you’ll be putting an equal number of views in your VStack. It will require a lot of work from SwiftUI to draw all of these elements.

Eventually this is going to lead to performance issues because every single item in your models is added to the view hierarchy as a view.

Now let's say these views also contain images that must be loaded from the network. SwiftUI is then going to load these images and render them too:

ScrollView {
  VStack {
    ForEach(models) { model in 
      HStack {
        Text(model.title)
        RemoteImage(url: model.imageURL)
      }
    }
  }
}

The RemoteImage in this case would be a custom view that enables loading images from the network.

When everything is placed in a VStack like I did in this sample, your scrolling performance will be horrendous.

A VStack is great for building a vertically stacked view hierarchy. But once your hierarchy starts to look and feel more like a scrollable list… LazyVStack might be the better choice for you.

Understanding when to use a LazyVStack

The LazyVStack components is functionally mostly the same as a regular VStack. The key difference is that a LazyVStack doesn’t add every view to the view hierarchy immediately.

As your user scrolls down a long list of items, the LazyVStack will add more and more views to the hierarchy. This means that you’re not paying a huge cost up front, and in the case of our RemoteImage example from earlier, you’re not loading images that the user might never see.

Swapping a VStack out for a LazyVStack is pretty straightforward:

ScrollView {
  LazyVStack {
    ForEach(models) { model in 
      HStack {
        Text(model.title)
        RemoteImage(url: model.imageURL)
      }
    }
  }
}

Our drawing performance should be much better with the LazyVStack compared to the regular VStack approach.

In a LazyVStack, we’re free to use any type of view that we want, and we have full control over how the list ends up looking. We don’t gain any out of the box functionality which can be great if you require a higher level of customization of your list.

Next, let’s see how List is used to understand how this compares to LazyVStack.

Understanding when to use List

Where a LazyVStack provides us maximum control, a List provides us with useful features right of the box. Depending on where your list is used (for example a sidebar or just as a full screen), List will look and behave slightly differently.

When you use views like NavigationLink inside of a list, you gain some small design tweaks to make it clear that this list item navigates to another view.

This is very useful for most cases, but you might not need any of this functionality.

List also comes with some built-in designs that allow you to easily create something that either looks like the Settings app, or something a bit more like a list of contacts. It’s easy to get started with List if you don’t require lots of customization.

Just like LazyVStack, a List will lazily evaluate its contents which means it’s a good fit for larger sets of data.

A super basic example of using List in the example that we saw earlier would look like this:

List(models) { model in 
  HStack {
    Text(model.title)
    RemoteImage(url: model.imageURL)
  }
}

We don’t have to use a ForEach but we could if we wanted to. This can be useful when you’re using Sections in your list for example:

List {
  Section("General") {
    ForEach(model.general) { item in 
      GeneralItem(item)
    }
  }

  Section("Notifications") {
    ForEach(model.notifications) { item in 
      NotificationItem(item)
    }
  }
}

When you’re using List to build something like a settings page, it’s even allowed to skip using a ForEach altogether and hardcode your child views:

List {
  Section("General") {
    GeneralItem(model.colorScheme)
    GeneralItem(model.showUI)
  }

  Section("Notifications") {
    NotificationItem(model.newsletter)
    NotificationItem(model.socials)
    NotificationItem(model.iaps)
  }
}

The decision between a List and a LazyVStack for me usually comes down to whether or not I need or want List functionality. If I find that I want little to none of List's features odds are that I’m going to reach for LazyVStack in a ScrollView instead.

In Summary

In this post, you learned about VStack, LazyVStack and List. I explained some of the key considerations and performance characteristics for these components, without digging to deeply into solving every use case and possibility. Especially with List there’s a lot you can do. The key point is that List is a component that doesn’t always fit what you need from it. In those cases, it’s useful that we have a LazyVStack.

You learned that both List and LazyVStack are optimized for displaying large amounts of views, and that LazyVStack comes with the biggest amount of flexibility if you’re willing to implement what you need yourself.

You also learned that VStack is really only useful for smaller amounts of views. I love using it for layout purposes but once I start putting together a list of views I prefer a lazier approach. Especially when i’m dealing with an unknown number of items.

Differences between Thread.sleep and Task.sleep explained

In Swift, we have several ways to “suspend” execution of our code. While that’s almost always a bad practice, I’d like to explain why Task.sleep really isn’t as problematic as you might expect when you’re familiar with Thread.sleep.

When you look for examples of debouncing or implementing task timeout they will frequently use Task.sleep to suspend a task for a given amount of time.

The key difference is in how tasks and threads work in Swift.

In Swift concurrency, we often say that tasks replace threads. Or in other words, instead of worrying about threads, we worry about tasks.

While that not untrue, it’s also a little bit misleading. It sounds like tasks and threads are mostly analogous to each other and thats not the case.

A more accurate mental model is that without Swift concurrency you used Dispatch Queues to schedule work on threads. In Swift concurrency, you use tasks to schedule work on threads. In both cases, you don’t directly worry about thread management or creation.

Exploring Thread.sleep

When you suspend execution of a thread using Thread.sleep you prevent that thread from doing anything other than sleeping. It’s not working on dispatch queues, nor on tasks.

With GCD that’s bad but not hugely problematic because if there are no threads available to work on our queue, GCD will just spin up a new thread.

Swift Concurrency isn’t as eager to spin up threads; we only have a limited number of threads available.

This means that if you have 4 threads available to your program, Swift Concurrency can use those threads to run dozens of tasks efficiently. Sleeping one of these threads with Thread.sleep means that you now only have 3 threads available to run the same dozen of tasks.

If you hit a Thread.sleep in four tasks, that means you’re now sleeping every thread available to your program and your app will essentially stop performing any work at all until the threads resume.

What about Task.sleep?

Sleeping a task with Task.sleep is, in some ways, quite similar to Thread.sleep. You suspend execution of your task, preventing that task to make progress. The key difference in how that suspension happens. Sleeping a thread just stops it from working and reducing the number of threads available. Sleeping a task means you suspend the task, which allows the thread that was running your task to start running another task.

You’re not starving the system from resources with Task.sleep and you’re not preventing your code from making forward progress which is absolutely essential when you’re using Swift Concurrency.

If you find yourself needing to suspend execution in your Swift Concurrency app you should never use Thread.sleep and use Task.sleep instead. I don’t say never often, but this is one of those cases.

Also, when you find yourself adding a Task.sleep you should also make sure that you’re using it to solve a real problem and not just because “without sleeping for 0.01 seconds this didn’t work properly”. Those kinds of sleeps usually mask serialization and queueing issues that should be solved instead of hidden.

Protecting mutable state with Mutex in Swift

Once you start using Swift Concurrency, actors will essentially become your standard choice for protecting mutable state. However, introducing actors also tends to introduce more concurrency than you intended which can lead to more complex code, and a much harder time transitioning to Swift 6 in the long run.

When you interact with state that’s protected by an actor, you have to to do so asynchronously. The result is that you’re writing asynchronous code in places where you might never have intended to introduce concurrency at all.

One way to resolve that is to annotate your let's say view model with the @MainActor annotation. This makes sure that all your code runs on the main actor, which means that it's thread-safe by default, and it also makes sure that you can safely interact with your mutable state.

That said, this might not be what you're looking for. You might want to have code that doesn't run on the main actor, that's not isolated by global actors or any actor at all, but you just want to have an old-fashioned thread-safe property.

Historically, there are several ways in which we can synchronize access to properties. We used to use Dispatch Queues, for example, when GCD was the standard for concurrency on Apple Platforms.

Recently, the Swift team added something called a Mutex to Swift. With mutexes, we have an alternative to actors for protecting our mutable state. I say alternative, but it's not really true. Actors have a very specific role in that they protect our mutable state for a concurrent environment where we want code to be asynchronous. Mutexes, on the other hand, are really useful when we don't want our code to be asynchronous and when the operation we’re synchronizing is quick (like assigning to a property).

In this post, we’ll explore how to use Mutex, when it's useful, and how you choose between a Mutex or an actor.

Mutex usage explained

A Mutex is used to protect state from concurrent access. In most apps, there will be a handful of objects that might be accessed concurrently. For example, a token provider, an image cache, and other networking-adjacent objects are often accessed concurrently.

In this post, I’ll use a very simple Counter object to make sure we don’t get lost in complex details and specifics that don’t impact or change how we use a Mutex.

When you increment or decrement a counter, that’s a quick operation. And in a codebase where. the counter is available in several tasks at the same time, we want these increment and decrement operations to be safe and free from data races.

Wrapping your counter in an actor makes sense from a theory point of view because we want the counter to be protected from concurrent accesses. However, when we do this, we make every interaction with our actor asynchronous.

To somewhat prevent this, we could constrain the counter to the main actor, but that means that we're always going to have to be on the main actor to interact with our counter. We might not always be on the same actor when we interact with our counter, so we would still have to await interactions in those situations, and that isn't ideal.

In order to create a synchronous API that is also thread-safe, we could fall back to GCD and have a serial DispatchQueue.

Alternatively, we can use a Mutex.

A Mutex is used to wrap a piece of state and it ensures that there's exclusive access to that state. A Mutex uses a lock under the hood and it comes with convenient methods to make sure that we acquire and release our lock quickly and correctly.

When we try to interact with the Mutex' state, we have to wait for the lock to become available. This is similar to how an actor would work with the key difference being that waiting for a Mutex is a blocking operation (which is why we should only use it for quick and efficient operations).

Here's what interacting with a Mutex looks like:

class Counter {
    private let mutex = Mutex(0)

    func increment() {
        mutex.withLock { count in
            count += 1
        }
    }

    func decrement() {
        mutex.withLock { count in
            count -= 1
        }
    }
}

Our increment and decrement functions both acquire the Mutex, and mutate the count that’s passed to withLock.

Our Mutex is defined by calling the Mutex initializer and passing it our initial state. In this case, we pass it 0 because that’s the starting value for our counter.

In this example, I’ve defined two functions that safely mutate the Mutex' state. Now let’s see how we can get the Mutex' value:

var count: Int {
    return mutex.withLock { count in
        return count
    }
}

Notice that reading the Mutex value is also done withLock. The key difference with increment and decrement here is that instead of mutating count, I just return it.

It is absolutely essential that we keep our operations inside of withLock short. We do not want to hold the lock for any longer than we absolutely have to because any threads that are waiting for our lock or blocked while we hold the lock.

We can expand our example a little bit by adding a get and set to our count. This will allow users of our Counter to interact with count like it’s a normal property while we still have data-race protection under the hood:

var count: Int {
    get {
        return mutex.withLock { count in
            return count
        }
    }

    set {
        mutex.withLock { count in
            count = newValue
        }
    }
}

We can now use our Counter as follows:

let counter = Counter()

counter.count = 10
print(counter.count)

That’s quite convenient, right?

While we now have a type that is free of data-races, using it in a context where there are multiple isolation contexts is a bit of an issue when we opt-in to Swift 6 since our Counter doesn’t conform to the Sendable protocol.

The nice thing about Mutex and sendability is that mutexes are defined as being Sendable in Swift itself. This means that we can update our Counter to be Sendable quite easily, and without needing to use @unchecked Sendable!

final class Counter: Sendable {
    private let mutex = Mutex(0)

    // ....
}

At this point, we have a pretty good setup; our Counter is Sendable, it’s free of data-races, and it has a fully synchronous API!

When we try and use our Counter to drive a SwiftUI view by making it @Observable, this get a little tricky:

struct ContentView: View {
    @State private var counter = Counter()

    var body: some View {
        VStack {
            Text("\(counter.count)")

            Button("Increment") {
                counter.increment()
            }

            Button("Decrement") {
                counter.decrement()
            }
        }
        .padding()
    }
}

@Observable
final class Counter: Sendable {
    private let mutex = Mutex(0)

    var count: Int {
        get {
            return mutex.withLock { count in
                return count
            }
        }

        set {
            mutex.withLock { count in
                count = newValue
            }
        }
    }
}

The code above will compile but the view won’t ever update. That’s because our computed property count is based on state that’s not explicitly changing. The Mutex will change the value it protects but that doesn’t change the Mutex itself.

In other words, we’re not mutating any data in a way that @Observable can “see”.

To make our computed property work @Observable, we need to manually tell Observable when we're accessing or mutating (in this case, the count keypath). Here's what that looks like:

var count: Int {
    get {
        self.access(keyPath: \.count)
        return mutex.withLock { count in
            return count
        }
    }

    set {
        self.withMutation(keyPath: \.count) {
            mutex.withLock { count in
                count = newValue
            }
        }
    }
}

By calling the access and withMutation methods that the @Observable macro adds to our Counter, we can tell the framework when we’re accessing and mutating state. This will tie into our Observable’s regular state tracking and it will allow our views to update when we change our count property.

Mutex or actor? How to decide?

Choosing between a mutex and an actor is not always trivial or obvious. Actors are really good in concurrent environments when you already have a whole bunch of asynchronous code. When you don't want to introduce async code, or when you're only protecting one or two properties, you're probably in the territory where a mutex makes more sense because the mutex will not force you to write asynchronous code anywhere.

I could pretend that this is a trivial decision and you should always use mutexes for simple operations like our counter and actors only make sense when you want to have a whole bunch of stuff working asynchronously, but the decision usually isn't that straightforward.

In terms of performance, actors and mutexes don't vary that much, so there's not a huge obvious performance benefit that should make you lean in one direction or the other.

In the end, your choice should be based around convenience, consistency, and intent. If you're finding yourself having to introduce a ton of async code just to use an actor, you're probably better off using a Mutex.

Actors should be considered an asynchronous tool that should only be used in places where you’re intentionally introducing and using concurrency. They’re also incredibly useful when you’re trying to wrap longer-running operations in a way that makes them thread-safe. Actors don’t block execution which means that you’re completely fine with having “slower” code on an actor.

When in doubt, I like to try both for a bit and then I stick with the option that’s most convenient to work with (and often that’s the Mutex...).

In Summary

In this post, you've learned about mutexes and how you can use them to protect mutable state. I showed you how they’re used, when they’re useful, and how a Mutex compares to an actor.

You also learned a little bit about how you can choose between an actor or a property that's protected by a mutex.

Making a choice between an actor or a Mutex is, in my opinion, not always easy but experimenting with both and seeing which version of your code comes out easier to work with is a good start when you’re trying to decide between a Mutex and an actor.

Using singletons in Swift 6

Singletons generally speaking get a bad rep. People don’t like them, they cause issues, and generally speaking it’s just not great practice to rely on globally accessible mutable state in your apps. Instead, it’s more favorable to practice explicit dependency passing which makes your code more testable and reliable overall.

That said, sometimes you’ll have singletons. Or, more likely, you’ll want to have a a shared instance of something that you need in a handful of places in your app:

class AuthProvider {
  static let shared = AuthProvider()

  // ...
}

In Swift 6, this will lead to issues because Swift 6 doesn’t like non-Sendable types, and it also doesn’t like global mutable state.

In this post, you’ll learn about the reasons that Swift 6 will flag your singletons and shared instances as problematic, and we’ll see what you can do to satisfy the Swift 6 compiler. We’ll run through several different errors that you can get for your shared instances depending on how you’ve structured your code.

Static property 'shared' is not concurrency-safe because it is nonisolated global shared mutable state

We’ll start off with an error that you’ll get for any static property that’s mutable regardless of whether this property is used for a shared instance or not.

For example:

class AuthProvider {
  // Static property 'shared' is not concurrency-safe because it 
  // is nonisolated global shared mutable state
  static var shared = AuthProvider()

  private init() {}
}

class GamePiece {
  // Static property 'power' is not concurrency-safe because it 
  // is nonisolated global shared mutable state
  static var power = 100
}

As you can see, both GamePiece and AuthProvider get the exact same error. They’re not concurrency-safe because they’re not isolated and they’re mutable. That means we might mutate this static let from multiple tasks and that would lead to data races (and crashes).

To resolve this error, we can take different approaches depending on the usage of our static var. If we really need our static member to be mutable, we should make sure that we can safely mutate and that means we need to isolate our mutable state somehow.

Resolving the error when our static var needs to be mutable

We’ll start off by looking at our GamePiece; it really needs power to be mutable because we can upgrade its value throughout the imaginary game I have in mind.

Isolating GamePiece to the main actor

One approach is to isolate our GamePiece or static var power to the main actor:

// we can isolate our GamePiece to the main actor
@MainActor
class GamePiece {
  static var power = 100
}

// or we isolate the static var to the main actor
class GamePiece {
  @MainActor
  static var power = 100
}

The first option makes sense when GamePiece is a class that’s designed to closely work with our UI layer. When we only ever work with GamePiece from the UI, it makes sense to isolate the entire object to the main actor. This simplifies our code and makes it so that we’re not going from the main actor’s isolation to some other isolation and back all the time.

Alternatively, if we don’t want or need the entire GamePiece to be isolated to the main actor we can also choose to only isolate our static var to the main actor. This means that we’re reading and writing power from the main actor at all times, but we can work with other methods an properties on GamePiece from other isolation contexts too. This approach generally leads to more concurrency in your app, and it will make your code more complex overall.

There’s a second option that we can reach for, but it’s one that you should only use if constraining your type to a global actor makes no sense.

It’s nonisolated(unsafe).

Allowing static var with nonisolated(unsafe)

Sometimes you’ll know that your code is safe. For example, you might know that power is only accessed from a single task at a time, but you don’t want to encode this into the type by making the property main actor isolated. This makes sense because maybe you’re not accessing it from the main actor but you’re using a global dispatch queue or a detached task.

In these kinds of situations the only real correct solution would be to make GamePiece an actor. But this is often non-trivial, introduces a lot of concurrency, and overall makes things more complex. When you’re working on a new codebase, the consequences wouldn’t be too bad and your code would be more “correct” overall.

In an existing app, you usually want to be very careful about introducing new actors. And if constraining to the main actor isn’t an option you might need an escape hatch that tells the compiler “I know you don’t like this, but it’s okay. Trust me.”. That escape hatch is nonisolated(unsafe):

class GamePiece {
  nonisolated(unsafe) static var power = 100
}

When you mark a static var as nonisolated(unsafe) the compiler will no longer perform data-race protection checks for that property and you’re free to use it however you please.

When things are working well, that’s great. But it’s also risky; you’re now taking on the manual responsibility of prevent data races. And that’s a shame because Swift 6 aims to help us catch potential data races at compile time!

So use nonisolated(unsafe) sparingly, mindfully, and try to get rid of it as soon as possible in favor of isolating your global mutable state to an actor.

Note that in Swift 6.1 you could make GamePiece an actor and the Swift compiler will allow you to have static var power = 100 without issues. This is a bug in the compiler and still counts as a potential data race. A fix has already been merged to Swift's main branch so I would expect that Swift 6.2 emits an appropriate error for having a static var on an actor.

Resolving the error for shared instances

When you’re working with a shared instance, you typically don’t need the static var to be a var at all. When that’s the case, you can actually resolve the original error quite easily:

class AuthProvider {
  static let shared = AuthProvider()

  private init() {}
}

Make the property a let instead of a var and Static property 'shared' is not concurrency-safe because it is nonisolated global shared mutable state goes away.

A new error will appear though…

Static property 'shared' is not concurrency-safe because non-'Sendable' type 'AuthProvider' may have shared mutable state

Let’s dig into that error next.

Static property 'shared' is not concurrency-safe because non-'Sendable' type may have shared mutable state

While the new error sounds a lot like the one we had before, it’s quite different. The first error complained that the static var itself wasn’t concurrency-safe, this new error isn’t complaining about the static let itself. It’s complaining that we have a globally accessible instance of our type (AuthProvider) which might not be safe to interact with from multiple tasks.

If multiple tasks attempt to read or mutate state on our instance of AuthProvider, every task would interact with the exact same instance. So if AuthProvider can’t handle that correctly, we’re in trouble.

The way to fix this, is to make AuthProvider a Sendable type. If you’re not sure that you fully understand Sendable just yet, make sure to read this post about Sendable so you’re caught up.

The short version of Sendable is that a Sendable type is a type that is safe to interact with from multiple isolation contexts.

Making AuthProvider Sendable

For reference types like our AuthProvider being Sendable would mean that:

  • AuthProvider can’t have any mutable state
  • All members of AuthProvider must also be Sendable
  • AuthProvider must be a final class
  • We manually conform AuthProvider to the Sendable protocol

In the sample code, AuthProvider didn’t have any state at all. So if we’d fix the error for our sample, I would be able to do the following:

final class AuthProvider: Sendable {
  static let shared = AuthProvider()

  private init() {}
}

By making AuthProvider a Sendable type, the compiler will allow us to have a shared instance without any issues because the compiler knows that AuthProvider can safely be used from multiple isolation contexts.

But what if we add some mutable state to our AuthProvider?

final class AuthProvider: Sendable {
  static let shared = AuthProvider()

  // Stored property 'currentToken' of 
  // 'Sendable'-conforming class 'AuthProvider' is mutable
  private var currentToken: String?

  private init() {}
}

The compiler does not allow our Sendable type to have mutable state. It doesn’t matter that this state is private, it’s simply not allowed.

Using nonisolated(unsafe) as an escape hatch again

If we have a shared instance with mutable state, we have several options available to us. We could remove the Sendable conformance and make our static let a nonisolated(unsafe) property:

class AuthProvider {
  nonisolated(unsafe) static let shared = AuthProvider()

  private var currentToken: String?

  private init() {}
}

This works but it’s probably the worst option we have because it doesn’t protect our mutable state from data races.

Leveraging a global actor to make AuthProvider Sendable

Alternatively, we could apply isolate our type to the main actor just like we did with our static var:

// we can isolate our class
@MainActor
class AuthProvider {
  static let shared = AuthProvider()

  private var currentToken: String?

  private init() {}
}

// or just the shared instance
class AuthProvider {
  @MainActor
  static let shared = AuthProvider()

  private var currentToken: String?

  private init() {}
}

The pros and cons of this solutions are the same as they were for the static var. If we mostly use AuthProvider from the main actor this is fine, but if we frequently need to work with AuthProvider from other isolation contexts it becomes a bit of a pain.

Making AuthProvider an actor

My preferred solution is to either make AuthProvider conform to Sendable like I showed earlier, or to make AuthProvider into an actor:

actor AuthProvider {
  static let shared = AuthProvider()

  private var currentToken: String?

  private init() {}
}

Actors in Swift are always Sendable which means that an actor can always be used as a static let.

There’s one more escape hatch…

Let’s say we can’t make AuthProvider an actor because we’re working with existing code and we’re not ready to pay the price of introducing loads of actor-related concurrency into our codebase.

Maybe you’ve had AuthProvider in your project for a while and you’ve taken appropriate measures to ensure its concurrency-safe.

If that’s the case, @unchecked Sendable can help you bridge the gap.

Using @unchecked Sendable as an escape hatch

Marking our class as @unchecked Sendable can be done as follows:

final class AuthProvider: @unchecked Sendable {
  static let shared = AuthProvider()

  private var currentToken: String?

  private init() {}
}

An escape hatch like this should be used carefully and should ideally be considered a temporary fix. The compiler won’t complain but you’re open to data-races that the compiler can help prevent altogether; it’s like a sendability force-unwrap.

In Summary

Swift 6 allows singletons, there’s no doubt about that. It does, however, impose pretty strict rules on how you define them, and Swift 6 requires you to make sure that your singletons and shared instances are safe to use from multiple tasks (isolation contexts) at the same time.

In this post, you’ve seen several ways to get rid of two shared instance related errors.

First, you saw how you can have static var members in a way that’s concurrency-safe by leveraging actor isolation.

Next, you saw that static let is another way to have a concurrency-safe static member as long as the type of your static let is concurrency-safe. This is what you’ll typically use for your shared instances.

I hope this post has helped you grasp static members and Swift 6 a bit better, and that you’re now able to leverage actor isolation where needed to correctly have global state in your apps.

Using Instruments to profile a SwiftUI app

A key skill for every app developer is being able to profile your app's performance. Your app might look great on the surface, but if it doesn’t perform well, it’s going to feel off—sometimes subtly, sometimes very noticeably. Beautiful animations, slick interactions, and large data sets all fall flat if the app feels sluggish or unresponsive.

Great apps respond instantly. They show that you’ve tapped something right away, and they make interactions feel smooth and satisfying.

To make sure your app behaves like that, you’ll need to keep an eye on its performance. In this post, we’ll look at how you can use Instruments to profile your SwiftUI app. We’ll cover how to detect slow code, track view redraws, and understand when and why your UI updates. If you're interested in a deeper dive into SwiftUI redraws or profiling slow code, check out these posts:

We’ll start by building your app for profiling, then look at how to use Instruments effectively—both for SwiftUI specifics and general performance tracking.

Building an app for profiling

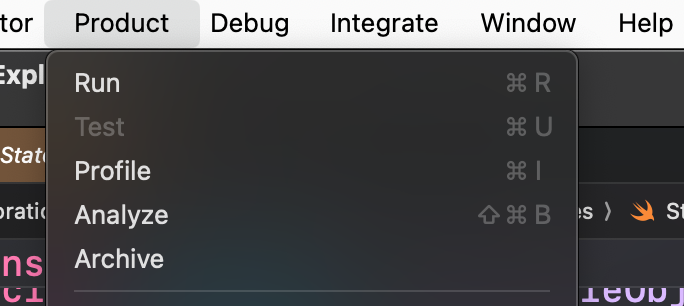
The first step is to build your app using Product > Profile, or by pressing Cmd + I (sidenote: I highly recommend learning shortcuts for command you use frequently).

Use Product->Profile or cmd+i

This builds your app in Release mode, using the same optimizations and configurations as your production build.

This is important because your development build (Debug mode) isn’t optimized. You might see performance issues in Debug that don’t exist in Release. I recently had this happen while working with large data sets—code ran pretty horrible in Debug was optimized in Release to the point of no longer being a problem at all.

When this happens, it usually means there’s some inefficiency under the hood, but I wouldn’t spend too much time on issues that disappear in Release mode when you have bigger issues to work on.

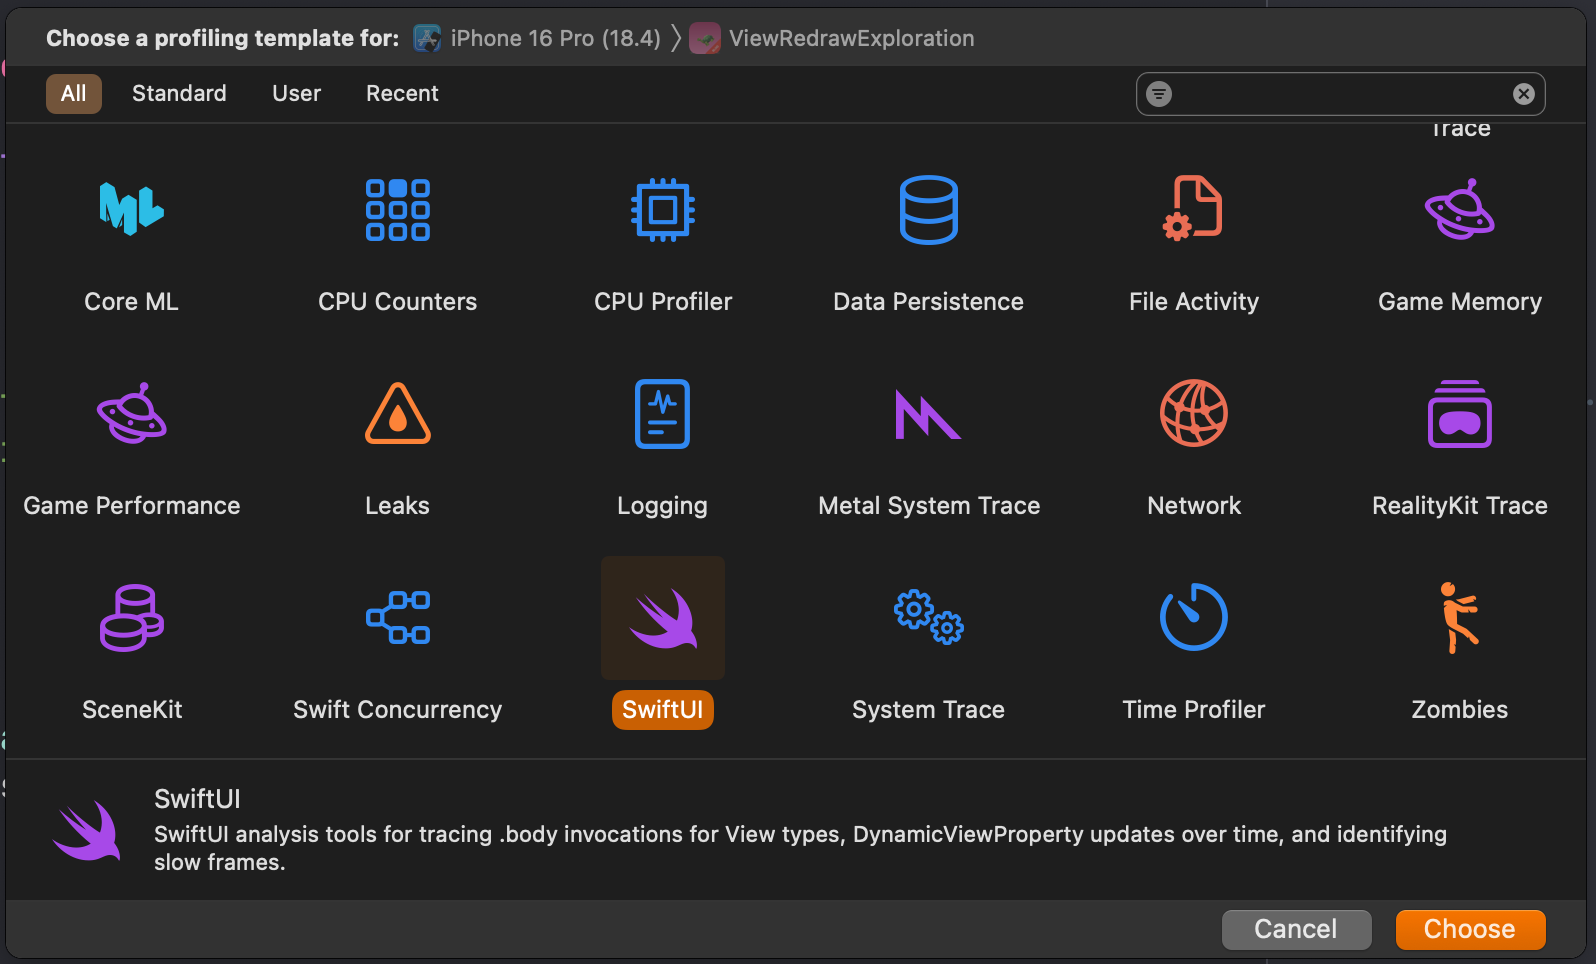
Once your app is built and Instruments launches, you’ll see a bunch of templates. For SwiftUI apps, the SwiftUI template is usually the right choice—even if you’re not profiling SwiftUI-specific issues. It includes everything you need for a typical SwiftUI app.

Choosing a template

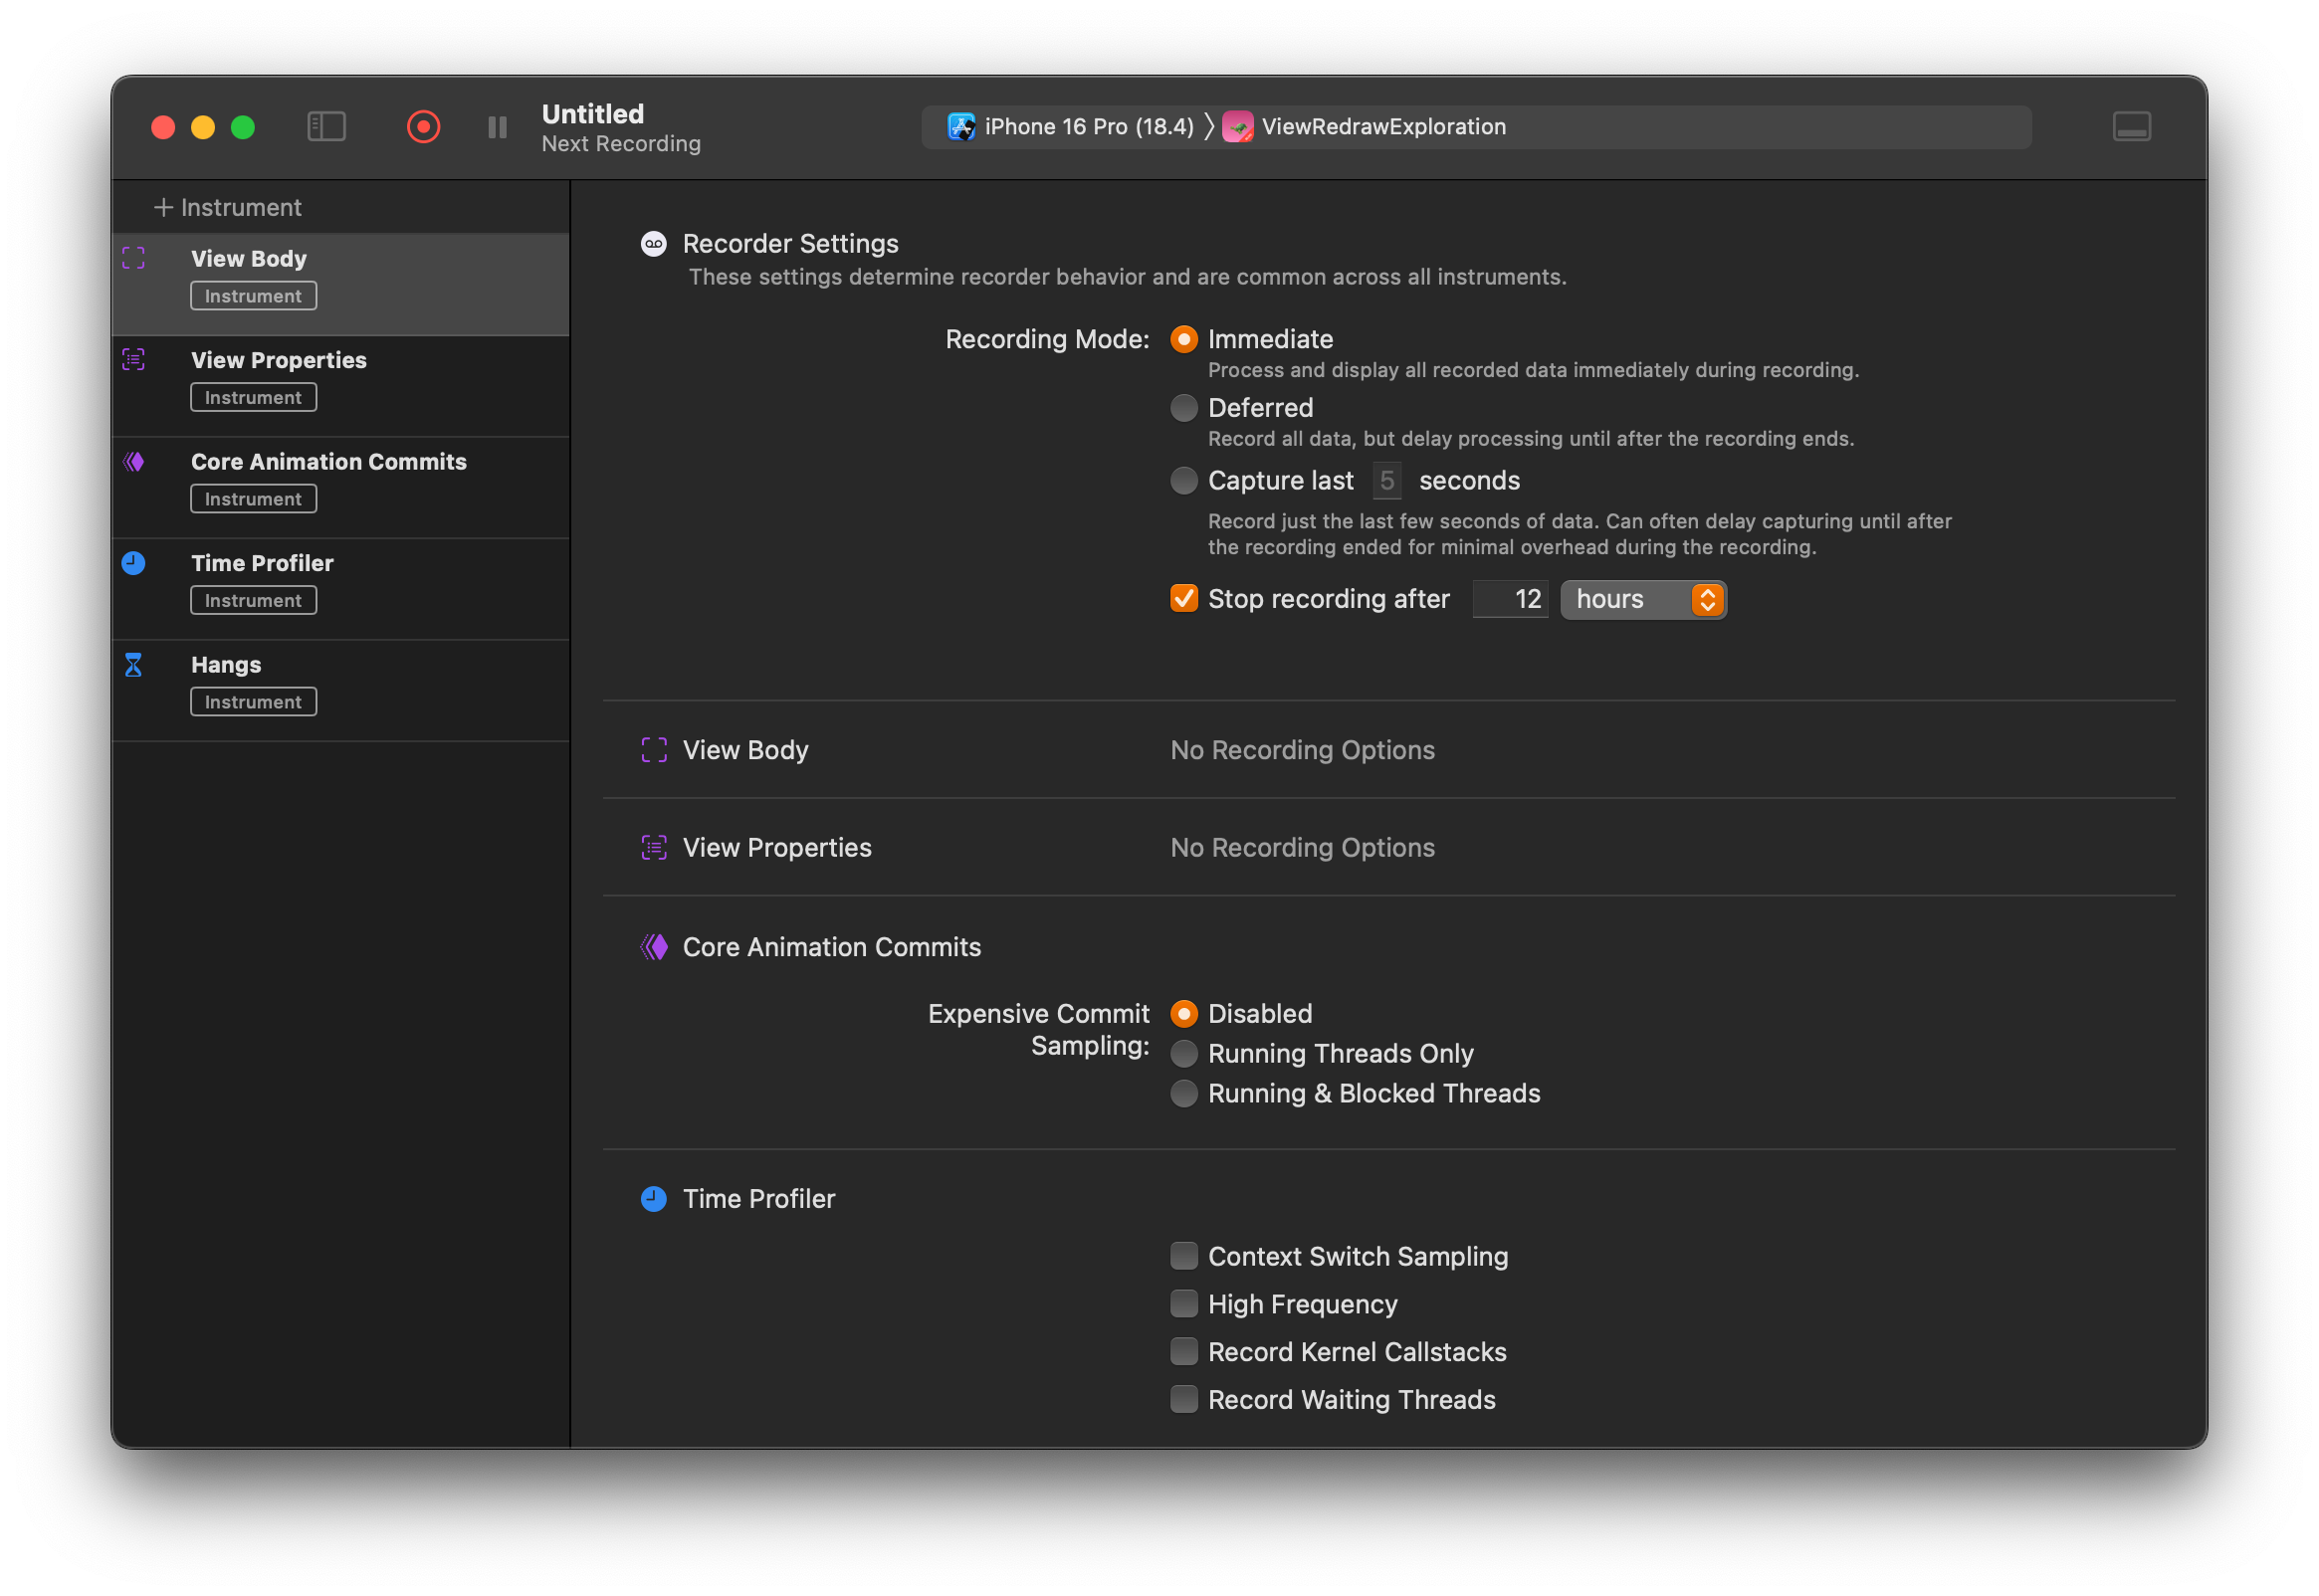
After picking your template, Instruments opens its main window. Hit the red record button to start profiling. Your app will launch, and Instruments will start collecting data in real-time based on the instruments you selected. The SwiftUI template collects everything in real-time.

Instruments overview

Reading the collected data

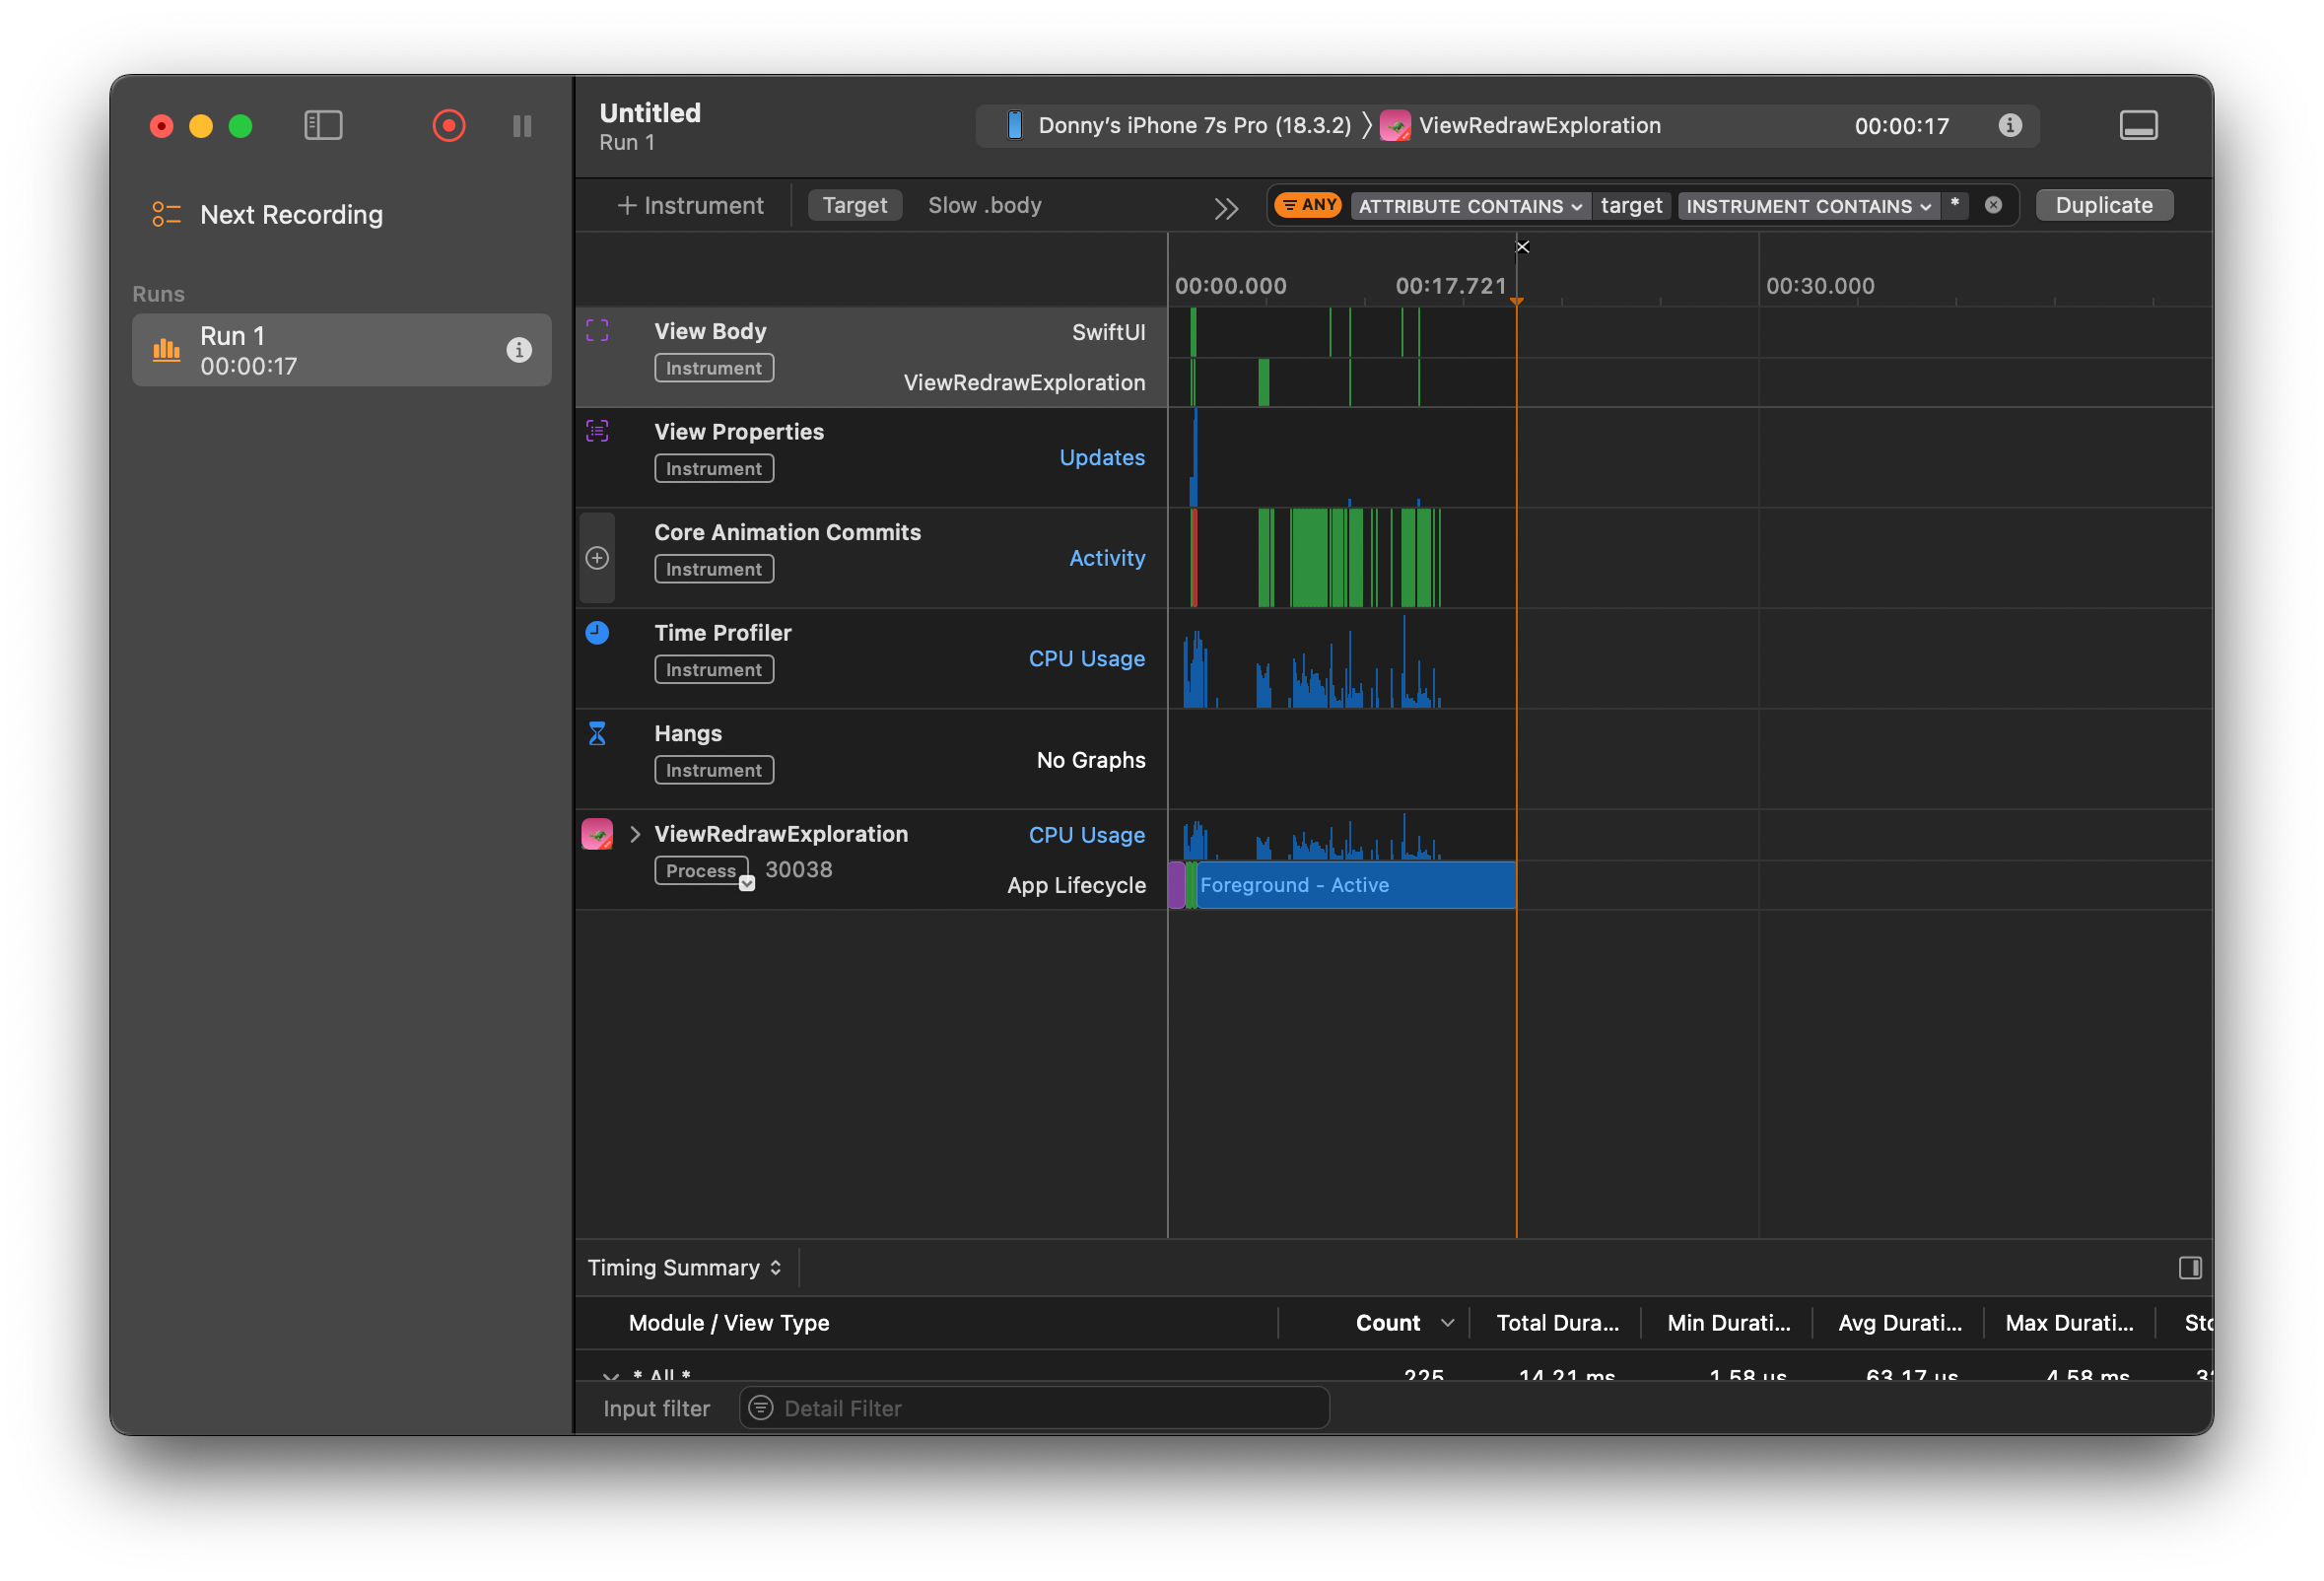
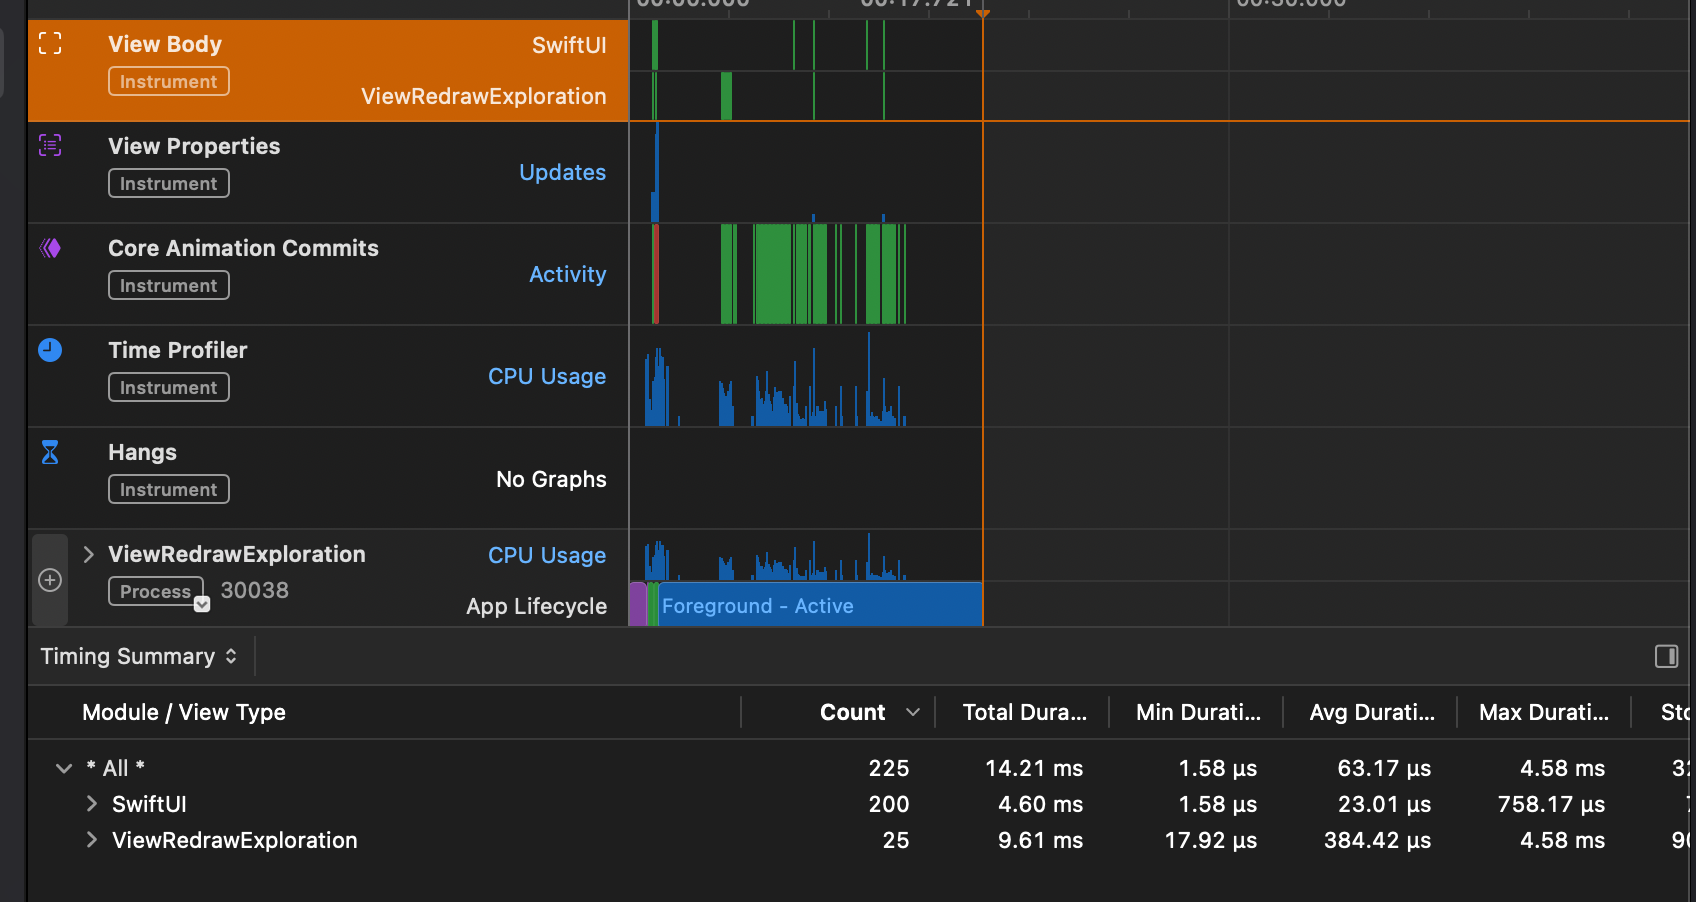
Instruments organizes its data into several lanes. You’ll see lanes like View Body, View Properties, and Core Animation Commits. Let’s go through them from top to bottom.

Viewing recorded data

Note that I’m testing on a physical device. Testing on the simulator can work okay for some use cases but results can vary wildly between simulators and devices due to the resources available to each. It’s always recommended to use a device when testing for performance.

The View Body lane

This lane shows how often a SwiftUI view’s body is evaluated. Whenever SwiftUI detects a change in your app’s data, it re-evaluates the body of any views that depend on that data. It then determines whether any child views need to be redrawn.

So, this lane essentially shows you which views are being redrawn and how often. If you click the timing summary, you’ll see how long these evaluations take—total, min, max, and average durations. This helps you identify whether a view’s body is quick or expensive to evaluate.

Exploring the view body lane

By default, Instruments shows data for the entire profiling session. That means a view that was evaluated multiple times may have been triggered by different interactions over time.

Usually, you’ll want to profile a specific interaction. You can do this by dragging across a timeframe in the lane. This lets you zoom in on a specific window of activity—like what happens when you tap a button.

Once you’ve zoomed in, you can start to form a mental model.

For example, if tapping a button increases a counter, you’d expect the counter view’s body to be evaluated. If other views like the button’s parent also redraw, that might be unexpected. Ask yourself: did I expect this body to be re-evaluated? If not, it’s time to look into your code.

In my post on SwiftUI view redraws, I explain more about what can cause SwiftUI to re-evaluate views. It’s worth a read if you want to dig deeper.

View Properties and Core Animation Commits

The View Properties and Core Animation Commits lanes are ones I don’t use very often.

In View Properties, you can see which pieces of state SwiftUI tracked for your views and what their values were. In theory, you can figure out how your data model changed between body evaluations—but in practice, it’s not always easy to read.

Core Animation Commits shows how much work Core Animation or the GPU had to do when redrawing views. Usually, it’s not too heavy, but if your view body takes a long time to evaluate, the commit tends to be heavier too.

I don’t look at this lane in isolation, but it helps to get a sense of how expensive redrawing became after a body evaluation.

Reading the Time Profiler

The Time Profiler might be the most useful lane in the SwiftUI Instruments template. It shows you which code was running on which thread, and how long it was running.

You’re essentially seeing snapshots of the CPU at short intervals. This gives you insight into how long specific functions were active.

When profiling SwiftUI apps, you’ll usually be interested in code related to your data model or views. If a function updates your data and appears slow, or if it’s called from a view body, that might explain a performance issue.

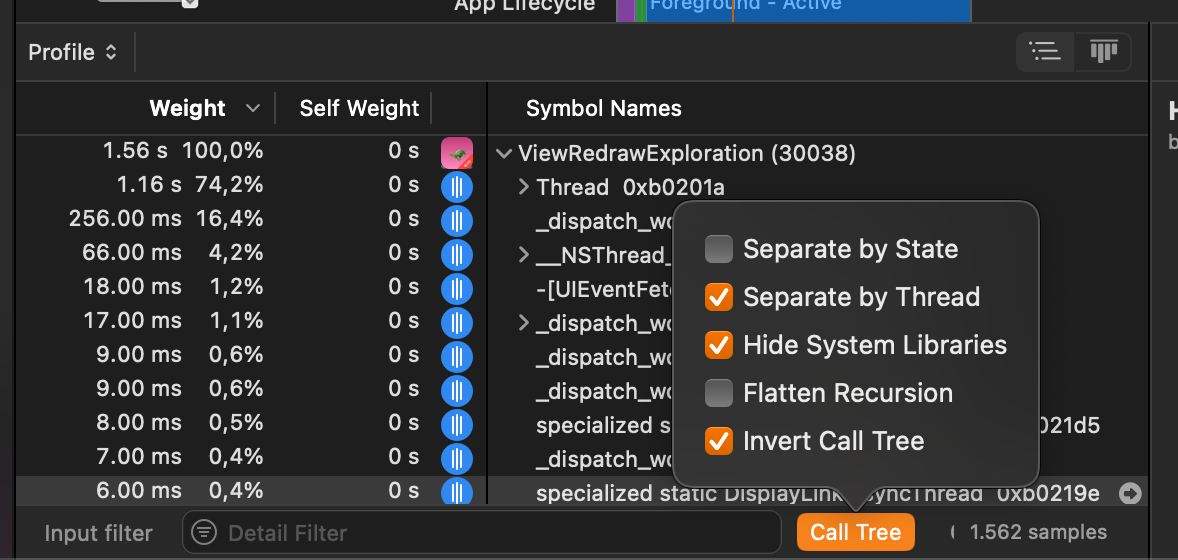
Configuring the time profiler

Getting comfortable with the time profiler takes a bit of practice. I recommend playing around with the call tree settings. I usually:

  • Separate by thread
  • Invert the call tree
  • Hide system libraries

Sometimes, I tweak these settings depending on what I’m trying to find. It’s worth exploring.

In summary

Profiling your code and understanding how to use Instruments is essential if you want to build responsive, high-quality apps. As your app grows, it gets harder to mentally track what should happen during an interaction.

The tricky part about using Instruments is that even with a ton of data, you need to understand what your app is supposed to be doing. Without that, it’s hard to tell which parts of the data matter. Something might be slow—but that might be okay if it’s processing a lot of data.

Still, getting into the habit of profiling your app regularly helps you build a sense of what’s normal and what’s not. The earlier and more often you do this, the better your understanding becomes.

Staying productive as an indie developer

Okay. I’m using the term indie developer loosely here. I don’t consider myself to be an indie developer. But I am independent, mostly. I run my own business where I work on client apps, workshops, my books, this website, my YouTube channel, and more. So I think I qualify as indie, partially.

Either way, in this post I’d like to explore something that I don’t write or talk about much. How do I, as someone that manages my own time and work, make sure that I stay productive (in a sustainable way).

A lot of folks that I’ve talked to over the years have their own systems that help them plan, structure, and execute work. Some folks are just so eager to always be working that they have no problems staying busy at all. Others, myself included, struggle with maintaining a rhythm, finding balance, and avoid procrastinating.

Over the last half year or so I’ve been very actively trying to figure out what works for me, and in this blog post I’d like to share some of the things that I’ve learned in that time.

It all starts with a plan

The quality of work that I’ll do in a day, week, or month, all depends on my plans for a given timeframe. If I leave my Friday afternoon with unfinished business, and I spend my Monday on trying to figure out where I’ve left off and I don’t make a plan for the week, it’s likely that the week will not be very productive.

That’s because once I start working without a plan I’m in a constant mode of trying to figure out what’s next. I’ll find something to do, do it, and then spend a lot of time wondering about “what’s next?”.

Usually that means I take a break, go on social media, or watch some YouTube videos. Basically, I start to procrastinate.

I’ve tried to manage this by allocating every morning and afternoon to a type of work. I started off by separating “client” work and “blog” work. This kind of worked but it was too ambiguous. I’d spend a lot of time trying to figure out which client to work for, and what to work on. Or I’d be thinking about whether I wanted to work on an app, a YouTube video, my blog, or something else.

The result?

I’d end up doing far less than I wanted to. Especially when it came to “blog” work because there’s virtually no accountability there.

So, I solved this problem by planning differently. Instead of allocating stuff to days I’d have a list of things to do for the week. In my calendar I would still block some times for types of work, but my list is leading.

When it’s time to do client work, I look at my list. Who’s on top (the list is sorted by urgency)? That’s what I’ll work on. It’s simple yet effective.

I thought that this system would be too loose for me to allow me to properly plan but I think it’s working well. I started doing this about three months ago and I can definitely tell that my output is getting better. I’m also feeling better about my work than I did half a year ago.

So, start with a plan. Make sure you always know what’s next. Knowing what you’re supposed to do makes doing it more straightforward.

Find the right environment

I know, we’re all supposed to love working from home. I’m not great at it. I love the idea of it, but I’m really not good at it.

Whenever I work from home, there’s loads of distractions. I can hang around and watch TV for a bit. Do some work in the garden. Run a quick errand. Fold laundry. Cook.

These are all things I either enjoy doing, or things that need to get done one way or another.

Focusing while working from home can be quite a challenge for me, and I’m finding out more and more that my desk isn’t always the place where I’m most productive.

Going some place that’s not the same desk every day can be a big boost for my productivity. I’m not sure whether a change of environment just keeps my brain active, or I’m better at performing certain tasks from a different location (sometimes it’s just a different place in my house), but changing it up works for me.

If you’re feeling unproductive and you feel like you’ve got a handle on knowing what you’re supposed to do but doing it seems hard, try and switch things up a bit. Work from a coffee shop, a co-working space, a library, or your dinner table instead of your desk and see how it feels. Maybe it can help you focus on different things.

Track your work

I used to think that having rigid systems for work would suck the joy out of doing the work. The more I rely on systems and routines the more I find that I enjoy the work I’m doing because it allows me to be more focused, less stressed, and feel more in control.

By making tickets for everything I do, I have a really good sense of where I should focus my attention. I can easily measure how productive I’ve been over time just by looking at the tickets I’ve closed.

I’m using GitHub projects for tracking my work, and I’m enjoying it a lot. I can link my tickets to issues which makes it easy to link everything together. By ordering my tickets based on their priority I’m basically able to run through my list from top to bottom throughout the week and know that I’m always doing the right thing.

In addition to tracking my work through tickets, I’ve created a utility app for myself to track with Chrona I can track pomodoro timers throughout my workday. Every timer gets a description of what I’ve worked on and a rating for how well I think I did productivity-wise.

The idea is that Chrona will eventually help me gain more understanding regarding the way I do my work, and whether I have any times of day where my productivity drops significantly. If there’s any patterns in my productivity or the type of work I do I can anticipate for that when I make my plans, or I could decide to structure my work week around times and days that work well for me.

Chrona is one of four apps that I intend to ship this year with the main thought being that these apps should be useful for myself before thinking about how to make them into products. That’s why Chrona was build to be a simple app that only does a few things. It’s not configurable nor customizable and that’s on purpose. I might add more features in the future if enough folks use the app.

In Summary

Productivity is a complex topic, and if there’s one thing I’ve learned over time it’s that anybody that claims to have the answer for all your productivity woes is lying to you. Yes, there are proven systems out there. But the effectiveness of these systems isn’t guaranteed for everybody. Some folks work different form others, and that’s completely fine.

If you’re struggling to keep yourself motivated and focused, I highly recommend to actively try and understand what’s making things hard for you. When and why are you procrastinating, and what can you do to fix that. For me, knowing what’s next (planning), where I work (environment), and having objective insights (tracking) seem to be having a positive impact.

The key factor for me seems to be that there’s no point in trying to force any particular system on myself. If it doesn’t work, I try and understand why, and then I make changes to my routines to see whether things improve. It’s an iterative process, and its not a quick one.

Implementing Task timeout with Swift Concurrency

Swift Concurrency provides us with loads of cool and interesting capabilities. For example, Structured Concurrency allows us to write a hierarchy of tasks that always ensures all child tasks are completed before the parent task can complete. We also have features like cooperative cancellation in Swift Concurrency which means that whenever we want to cancel a task, that task must proactively check for cancellation, and exit when needed.

One API that Swift Concurrency doesn't provide out of the box is an API to have tasks that timeout when they take too long. More generally speaking, we don't have an API that allows us to "race" two or more tasks.

In this post, I'd like to explore how we can implement a feature like this using Swift's Task Group. If you're looking for a full-blown implementation of timeouts in Swift Concurrency, I've found this package to handle it well, and in a way that covers most (if not all edge cases).

Racing two tasks with a Task Group

At the core of implementing a timeout mechanism is the ability to race two tasks:

  1. A task with the work you're looking to perform
  2. A task that handles the timeout

whichever task completes first is the task that dictates the outcome of our operation. If the task with the work completes first, we return the result of that work. If the task with the timeout completes first, then we might throw an error or return some default value.

We could also say that we don't implement a timeout but we implement a race mechanism where we either take data from one source or the other, whichever one comes back fastest.

We could abstract this into a function that has a signature that looks a little bit like this:

func race<T>(
  _ lhs: sending @escaping () async throws -> T,
  _ rhs: sending @escaping () async throws -> T
) async throws -> T {
  // ...
}

Our race function take two asynchronous closures that are sending which means that these closures closely mimic the API provided by, for example, Task and TaskGroup. To learn more about sending, you can read my post where I compare sending and @Sendable.

The implementation of our race method can be relatively straightforward:

func race<T>(
  _ lhs: sending @escaping () async throws -> T,
  _ rhs: sending @escaping () async throws -> T
) async throws -> T {
  return try await withThrowingTaskGroup(of: T.self) { group in
    group.addTask { try await lhs() }
    group.addTask { try await rhs() }

    defer { group.cancelAll() }

    return try await group.next()!
  }
}

We're creating a TaskGroup and add both closures to it. This means that both closures will start making progress as soon as possible (usually immediately). Then, I wrote return try await group.next()!. This line will wait for the next result in our group. In other words, the first task to complete (either by returning something or throwing an error) is the task that "wins".

The other task, the one that's still running, will be marked as cancelled and we ignore its result.

There are some caveats around cancellation that I'll get to in a moment. First, I'd like to show you how we can use this race function to implement a timeout.

Implementing timeout

Using our race function to implement a timeout means that we should pass two closures to race that do the following:

  1. One closure should perform our work (for example load a URL)
  2. The other closure should throw an error after a specified amount of time

We'll define our own TimeoutError for the second closure:

enum TimeoutError: Error {
  case timeout
}

Next, we can call race as follows:

let result = try await race({ () -> String in
  let url = URL(string: "https://www.donnywals.com")!
  let (data, _) = try await URLSession.shared.data(from: url)
  return String(data: data, encoding: .utf8)!
}, {
  try await Task.sleep(for: .seconds(0.3))
  throw TimeoutError.timeout
})

print(result)

In this case, we either load content from the web, or we throw a TimeoutError after 0.3 seconds.

This approach to implementing a timeout doesn't look very nice. We can define another function to wrap up our timeout pattern, and we can improve our Task.sleep by setting a deadline instead of duration. A deadline will ensure that our task never sleeps longer than we intended.

The key difference here is that if our timeout task starts running "late", it will still sleep for 0.3 seconds which means it might take a but longer than 0.3 second for the timeout to hit. When we specify a deadline, we will make sure that the timeout hits 0.3 seconds from now, which means the task might effectively sleep a bit shorter than 0.3 seconds if it started late.

It's a subtle difference, but it's one worth pointing out.

Let's wrap our call to race and update our timeout logic:

func performWithTimeout<T>(
  of timeout: Duration,
  _ work: sending @escaping () async throws -> T
) async throws -> T {
  return try await race(work, {
    try await Task.sleep(until: .now + timeout)
    throw TimeoutError.timeout
  })
}

We're now using Task.sleep(until:) to make sure we set a deadline for our timeout.

Running the same operation as before now looks as follows:

let result = try await performWithTimeout(of: .seconds(0.5)) {
  let url = URL(string: "https://www.donnywals.com")!
  let (data, _) = try await URLSession.shared.data(from: url)
  return String(data: data, encoding: .utf8)!
}

It's a little bit nicer this way since we don't have to pass two closures anymore.

There's one last thing to take into account here, and that's cancellation.

Respecting cancellation

Taks cancellation in Swift Concurrency is cooperative. This means that any task that gets cancelled must "accept" that cancellation by actively checking for cancellation, and then exiting early when cancellation has occured.

At the same time, TaskGroup leverages Structured Concurrency. This means that a TaskGroup cannot return until all of its child tasks have completed.

When we reach a timeout scenario in the code above, we make the closure that runs our timeout an error. In our race function, the TaskGroup receives this error on try await group.next() line. This means that the we want to throw an error from our TaskGroup closure which signals that our work is done. However, we can't do this until the other task has also ended.

As soon as we want our error to be thrown, the group cancels all its child tasks. Built in methods like URLSession's data and Task.sleep respect cancellation and exit early. However, let's say you've already loaded data from the network and the CPU is crunching a huge amount of JSON, that process will not be aborted automatically. This could mean that even though your work timed out, you won't receive a timeout until after your heavy processing has completed.

And at that point you might have still waited for a long time, and you're throwing out the result of that slow work. That would be pretty wasteful.

When you're implementing timeout behavior, you'll want to be aware of this. And if you're performing expensive processing in a loop, you might want to sprinkle some calls to try Task.checkCancellation() throughout your loop:

for item in veryLongList {
  await process(item)
  // stop doing the work if we're cancelled
  try Task.checkCancellation()
}

// no point in checking here, the work is already done...

Note that adding a check after the work is already done and just before you return results doesn't really do much. You've already paid the price and you might as well use the results.

In Summary

Swift Concurrency comes with a lot of built-in mechanisms but it's missing a timeout or task racing API.

In this post, we implemented a simple race function that we then used to implement a timeout mechanism. You saw how we can use Task.sleep to set a deadline for when our timeout should occur, and how we can use a task group to race two tasks.

We ended this post with a brief overview of task cancellation, and how not handling cancellation can lead to a less effective timeout mechanism. Cooperative cancellation is great but, in my opinion, it makes implementing features like task racing and timeouts a lot harder due to the guarantees made by Structured Concurrency.