Building a token refresh flow using async await in Swift
Published on: August 16, 2021Updated on: July 4, 2025
One of my favorite concurrency problems to solve is building concurrency-proof token refresh flows. Refreshing authentication tokens is something that a lot of us deal with regularly, and doing it correctly can be a pretty challenging task. Especially when you want to make sure you only issue a single token refresh request even if multiple network calls encounter the need to refresh a token.
Furthermore, you want to make sure that you automatically retry a request that failed due to a token expiration after you've obtained a new (valid) authentication token.
I wrote about a flow that does this before, except that post covered token refreshes with Combine rather than async await.
In this post, we'll build the exact same flow, except it'll use Swift Concurrency rather than Combine.
Understanding the flow
Before I dive into the implementation details, I want to outline the requirements of the token refresh flow that we'll build. The following chart outlines the flow of the network object that I want to build in this post:
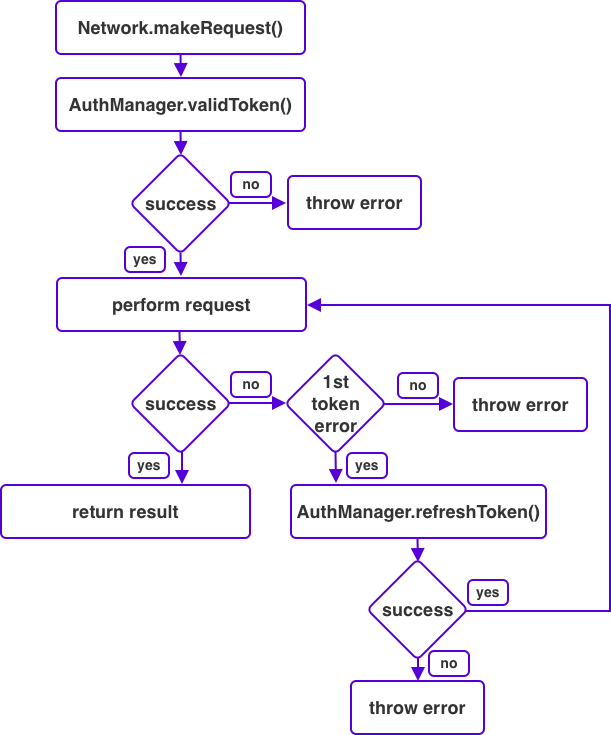
Whenever a network request is made, we ask an AuthManager object for a valid token. If a valid token was obtained, we can proceed with the network call. If no valid token was obtained we should present a login screen. When the request itself succeeds, we're all good and we'll return the result of the request. If the request fails due to a token error, we'll attempt to refresh the token. If the refresh succeeds, we'll retry the original request. If we couldn't refresh the token, an error is thrown. When the request is retried and it fails again we'll also throw an error even if the error is related to the token. Clearly something is wrong and it doesn't make sense to refresh and retry endlessly.
The AuthManager itself is pro-active about how it deals with tokens as shown in the following diagram:
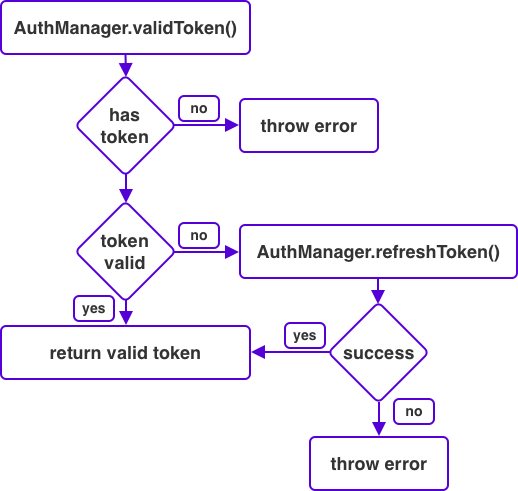
When the AuthManager is asked for a valid token, we'll check if a token exists locally. If not, we'll throw an error. If it does exist, we check if the token is valid. If it isn't, a refresh is attempted so we can obtain a valid token. If this succeeds the valid token is returned. In cases where the token refresh fails we'll throw an error so the user can authenticate again.
This flow is complex enough as it is, but when we add the requirement that we should only have one request in progress at any given time, things can get a little hairy.
Luckily, Swift's concurrency features are incredibly helpful when building a flow like this.
We'll implement the AuthManager object first, and after that I'll show you how it can be used in the Network object.
Note that all of this is somewhat simplified from how you might structure things in the real world. For example, you should always store tokens in the keychain, and your objects are probably a lot more complex than the ones I'm working with in this post.
None of that changes the flow and principles of what I intend to describe, hence why I chose to go with a simplified representation because it allows you to focus on the relevant parts for this post.
Implementing the AuthManager
Because we want to make sure that our AuthManager handles concurrent calls to validToken() in such a way that we only have one refresh request in flight at any time, we should make it an actor. Actors ensure that their internal state is always accessed in a serial fashion rather than concurrently. This means that we can keep track of a currently in-flight token refresh call and check whether one exists safely as long as the manager is an actor.
If you want to learn more about Swift's actors and how they are used, I recommend you take a look at my post on actors before moving on with the implementation of AuthManager.
Now that we know we're going to make AuthManager an actor, and we already know that it needs a validToken() and a refreshToken() method, we can implement a starting point for the manager as follows:
actor AuthManager {
    private var currentToken: Token?
    private var refreshTask: Task<Token, Error>?

    func validToken() async throws -> Token {

    }

    func refreshToken() async throws -> Token {

    }
}
This skeleton shouldn't be too surprising. Note that I'm storing the token as an instance variable on AuthManager. Do not do this in your own implementation. You should store the token in the user's Keychain, and read it from there when needed. I'm only storing it as an instance variable for convenience, not because it's good practice (because it's not).
Before we move on, I want to show you the error I might throw from within the AuthManager:
enum AuthError: Error {
    case missingToken
}
The validToken() implementation is probably the simplest implementation in this post, so let's look at that first:
func validToken() async throws -> Token {
    if let handle = refreshTask {
        return try await handle.value
    }

    guard let token = currentToken else {
        throw AuthError.missingToken
    }

    if token.isValid {
        return token
    }

    return try await refreshToken()
}
In this method, I cover four scenarios in the following order:
- If we're currently refreshing a token, await the value for our refresh task to make sure we return the refreshed token.
- We're not refreshing a token, and we don't have a persisted token. The user should log in. Note that you'd normally replace
currentTokenwith reading the current token from the user's keychain. - We found a token, and we can reasonably assume the token is valid because we haven't reached the expiration threshold yet.
- None of the above applies so we'll need to refresh the token.
I didn't define a network nor a keychain property in my skeleton because we won't be using them for the purposes of this post, but I can't stress enough that tokens should always be stored in the user's keychain and nowhere else.
Let's start building out the refreshToken() method next. We'll do this in two steps. First, we'll handle the case where refreshToken() is called concurrently multiple times:
func refreshToken() async throws -> Token {
    if let refreshTask = refreshTask {
        return try await refreshTask.value
    }

    // initiate a refresh...
}
Because AuthManager is an actor, this first step is relatively simple. Normally you might need a sync queue or a lock to make sure concurrent calls to refreshToken() don't cause data races on refreshTask. Actors don't have this issue because they make sure that their state is always accessed in a safe way.
We can return the result of our existing refresh task by awaiting and returning the task handle's value. We can await this value in multiple places which means that all concurrent calls to refreshToken() can (and will) await the same refresh task.
The next step is to initiate a new token refresh and store the refresh task on AuthManager. We'll also return the result of our new refresh task in this step:
func refreshToken() async throws -> Token {
    if let refreshTask = refreshTask {
        return try await refreshTask.value
    }

    let task = Task { () throws -> Token in
        defer { refreshTask = nil }

        // Normally you'd make a network call here. Could look like this:
        // return await networking.refreshToken(withRefreshToken: token.refreshToken)

        // I'm just generating a dummy token
        let tokenExpiresAt = Date().addingTimeInterval(10)
        let newToken = Token(validUntil: tokenExpiresAt, id: UUID())
        currentToken = newToken

        return newToken
    }

    self.refreshTask = task

    return try await task.value
}
In this code, I create a new Task instance so that we can store it in our AuthManager. This task can throw if refreshing the token fails, and it will update the current token when the refresh succeeds. I'm using defer to make sure that I always set my refreshTask to nil before completing the task. Note that I don't need to await access to refreshTask because this newly created Task will run on the AuthManager actor automatically due to the way Structured Concurrency works in Swift.
I assign the newly created task to my refreshTask property, and I await and return its value like I explained before showing you the code.
Even though our flow is relatively complex, it wasn't very complicated to implement this in a concurrency-proof way thanks to the way actors work in Swift.
If actors are still somewhat of a mystery to you after reading this, take a look at my post on actors to learn more.
As a next step, let's see how we can build the networking part of this flow by creating a Networking object that uses the AuthManager to obtain and refresh a valid access token and retry requests if needed.
Using the AuthManager in a Networking object
Now that we have a means of obtaining a valid token, we can use the AuthManager to add authorization to our network calls. Let's look at a skeleton of the Networking object so we have a nice starting point for the implementation:
class Networking {

    let authManager: AuthManager

    init(authManager: AuthManager) {
        self.authManager = authManager
    }

    func loadAuthorized<T: Decodable>(_ url: URL) async throws -> T {
        // we'll make the request here
    }

    private func authorizedRequest(from url: URL) async throws -> URLRequest {
        var urlRequest = URLRequest(url: url)
        let token = try await authManager.validToken()
        urlRequest.setValue("Bearer \(token.value)", forHTTPHeaderField: "Authorization")
        return urlRequest
    }
}
The code in this snippet is fairly straightforward. The Networking object depends on an AuthManager. I added a convenient function to create an authorized URLRequest from within the Networking class. We'll use this method in loadAuthorized to fetch data from an endpoint that requires authorization and we'll decode the fetched data into decodable model T. This method uses generics so we can use it to fetch decoded data from any URL that requires authorization.
If you're not familiar with generics, you can read more about them here and here.
Let's implement the happy path for our loadAuthorized method next:
func loadAuthorized<T: Decodable>(_ url: URL) async throws -> T {
    let request = try await authorizedRequest(from: url)
    let (data, _) = try await URLSession.shared.data(for: request)

    let decoder = JSONDecoder()
    let response = try decoder.decode(T.self, from: data)

    return response
}
This code should, again, be fairly straightfoward. First, I create an authorized URLRequest for the URL we need to load by calling authorizedRequest(from:). As you saw earlier, this method will ask the AuthManager for a valid token and configure an authorization header that contains an access token. We prefix the call to this method with try await because this operation can fail, and could require us to be suspended in the case that we need to perform a token refresh proactively.
If we can't authorize a request, this means that AuthManager's validToken method threw an error. This, in turn, means that we either don't have an access token at all, or we couldn't refresh our expired token. If this happens it makes sense for loadAuthorized to forward this error to its callers so they can present a login screen or handle the missing token in another appropriate way.
Next, I perform the URLRequest. A URLRequest can fail for various reason so this call needs to be prefixed with try as well. Any network related errors that get thrown from this line are forwarded to our caller.
Once we've obtained Data from the URLRequest we decode it into the appropriate type T and we return this decoded data to the caller.
Before we move on, please take a moment to appreciate how much more straightforward this code looks with async/await when compared to a traditional callback based approach or even a reactive approach that you might implement with RxSwift or Combine.
As it stands, we've implemented about half of the request flow. I've made the implemented steps green in the image below:
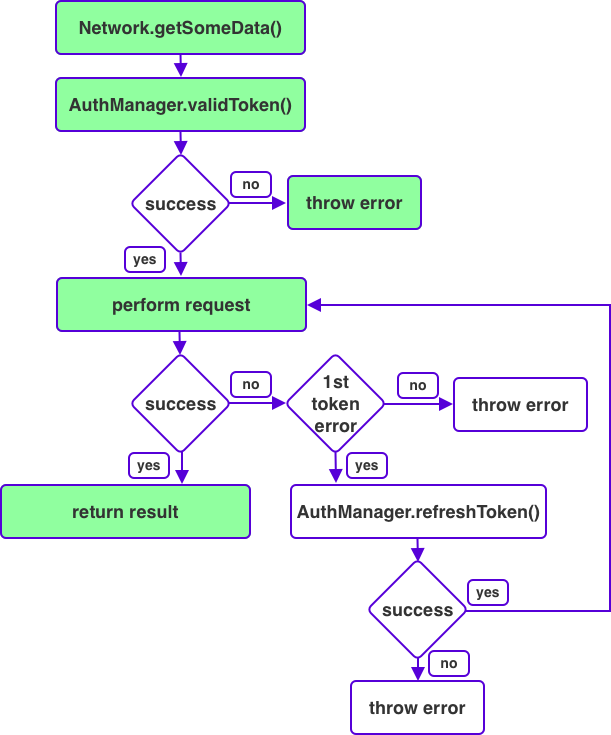
To implement the last couple of steps we need to make a small change to the signature of loadAuthorized so it can take an allowRetry argument that we'll use to limit our number of retries to a single retry. We'll also need to check whether the response we received from URLSession is an HTTP 401: Unauthorized response that would indicate we ran into an authorization error so we can explicitly refresh our token one time and retry the original request.
While this should not be a common situation to be in, it's entirely possible that we believe our persisted token is valid since the device clock is pretty far from the token's expiration date while the token is, in fact, expired. One reason is that all tokens in the back-end were manually set to be expired for security reasons. It's also possible that your user's device clock was changed (either by the user or by travelling through timezones) which led to our calculations being incorrect.
In any event, we'll want to attempt a token refresh and retry the request once if this happens.
Here's what the updated loadAuthorized method looks like:
func loadAuthorized<T: Decodable>(_ url: URL, allowRetry: Bool = true) async throws -> T {
    let request = try await authorizedRequest(from: url)
    let (data, urlResponse) = try await URLSession.shared.data(for: request)

    // check the http status code and refresh + retry if we received 401 Unauthorized
    if let httpResponse = urlResponse as? HTTPURLResponse, httpResponse.statusCode == 401 {
        if allowRetry {
            _ = try await authManager.refreshToken()
            return try await loadAuthorized(url, allowRetry: false)
        }

        throw AuthError.invalidToken
    }

    let decoder = JSONDecoder()
    let response = try decoder.decode(T.self, from: data)

    return response
}
These couple of lines of code that I added implement the last part of our flow. If we couldn't make the request due to a token error we'll refresh the token explicitly and we retry the request once. If we're not allowed to retry the request I throw an invalidToken error to signal that we've attempted to make a request with a token that we believe is valid yet we received an HTTP 401: Unauthorized.
Of course, this is a somewhat simplified approach. You might want to take the HTTP body for any non-200 response and decode it into an Error object that you throw from your loadAuthorized method instead of doing what I did here. The core principle of implementing a mechanism that will proactively refresh your auth tokens and authorize your network requests shouldn't change no matter how you decide to deal with specific status codes.
All in all, Swift Concurrency's actors combined with async/await allowed us to build a complex asynchronous flow by writing code that looks like it's imperative code while there's actually a ton of asynchronisity and even synchronization happening under the hood. Pretty cool, right?
In Summary
In this post, you saw how I implemented one of my favorite networking and concurrency related examples with async/await and actors. First, you learned what the flow we wanted to implement looks like. Next, I showed you how we can leverage Swift's actors to build a concurrency proof token provider that I called an AuthManager. No matter how many token related methods we call concurrently on this object, it will always make sure that we only have one refresh call in progress at any given time.
After that, you saw how you can leverage this AuthManager in a Networking object to authorize network calls and even explicitly refresh a token and retry the original request whenever we encounter an unexpected token related error.
Flows like these are a really nice way to experiment with, and learn about, Swift Concurrency features because they can be applied in the real world immediately, and they force you to mix and match different concurrency features so you'll immediately see how things fit together in the real world.