Dependency injection with Storyboards and Xcode 11
Published on: December 23, 2019Updated on: February 10, 2020
For years I have had a bit of a love and hate relationship with Storyboards. I love how easy they make it for me to set up my AutoLayout constraints, but they can quickly grow unwieldy and for large projects with multiple developers Storyboards are hard to use because of merge conflicts that occur when multiple developers update the UI. For personal projects, however, my Storyboards tend to be small enough to manage. And since I'm the only developer working on them I never have merge conflicts. Yet still, I've never been completely happy with them.
The main reason for that is that Storyboards used to make it impossible to use dependency injection. So what you end up with is a view controller with tons of optional properties that you have to set in prepare(for:sender:) when a segue is about to be performed. That all changed with Xcode 11 and iOS 13.
In today's article, I will show you how you can use the new @IBSegueAction attribute and the Instantion segue action to add proper dependency injection to your Storyboard based view controllers.
Understanding the problem that @IBSegueAction solves
The following code should look familiar to anybody who's used storyboards before and had to pass data from one view controller to the next:
override func prepare(for segue: UIStoryboardSegue, sender: Any?) {
  switch segue.identifier {
  case "ShowDetailPage":
    guard let indexPath = collectionView.indexPathsForSelectedItems?.first,
      let detailViewController = segue.destination as? DetailViewController else {
      break
    }

    detailViewController.item = viewModel.item(for: indexPath)
  default:
    break
  }
}
The problem with this code is that it's fiddly and the DetailViewController needs to have multiple optional properties while they really shouldn't be. In the example above, the DetailViewController needs an item to display. If no item exists, it makes no sense to display the view controller. In fact, we really want to enforce this on a compiler level; we shouldn't be able to create an instance of DetailViewController if we don't have a selected item.
Unfortunately, the only way to enforce something like this at the compiler level has always been to ditch storyboards and to manually instantiate your view controllers. This is far from ideal and is the main reason that I've been avoiding Storyboards in my projects. Luckily, Xcode 11 and iOS 13 introduced a new feature that resolves this problem. It's called @IBSegueAction.
Using @IBSegueAction in an app
When you use @IBSegueAction, your Storyboard can defer the creation of a destination view controller to you entirely. This means that you are able to create an instance of the destination view controller and inject any required dependencies directly. In other words, you regain full control over how an object is initialized and what dependencies it has. Let's look at an example:
@IBSegueAction
func createDetailViewController(coder: NSCoder, sender: Any?, segueIdentifier: String?) -> DetailViewController? {
  guard let indexPath = collectionView.indexPathsForSelectedItems?.first else {
    return nil
  }

  return DetailViewController(coder: coder, item: viewModel.item(for: indexPath))
}
Every segue action you define can be named however you please. I chose createDetailViewController for my action name, but you can pick any name you want. It also must accept three parameters: coder: NSCoder, sender: Any? and segueIdentifier: String?. The return type of the action is always an Optional<UIViewController> or UIViewController?. You should substitute UIViewController with your own view controller subclass.
In the body of your action @IBSegueAction method, you create the view controller that should be used as the destination of the segue that the action belongs to. Since Storyboards use the required initializer init?(coder: NSCoder), the coder must be passed along to the target view controller's initializer.
Let's have a look at DetailViewController now to see what it's initializer looks like:
class DetailViewController: UIViewController {
  let item: DetailItem

  required init?(coder: NSCoder, item: DetailItem) {
    self.item = item
    super.init(coder: coder)
  }

  required init?(coder: NSCoder) {
    fatalError("init(coder:) has not been implemented")
  }
}
The definition for DetailViewController now has an initializer that accepts the DetailItem. And because we can assign the item property during initialization, it doesn't have to be optional. And because we don't want anybody to initialize the DetailViewController without a DetailItem, the default initializer contains a fatalError. This will enforce that we can only initialize this view controller with the init?(coder:item:) initializer.
Since @IBSegueAction works slightly different for regular segues than it does for relationship segues I will explain each separately in the next subsections.
Using @IBSegueAction with a regular segue
When you're using a regular segue in your Storyboard, for example when you navigate from a table view to a detail page, you can create your Segue like you normally would by ctrl+dragging from your table view cell to the destination view controller. After doing this, click the segue and give it a Segue Identifier. So far, nothing special. If you use Storyboards regularly you have done this many times before.
Next, open the Connections Inspector and behold. There's a new option:
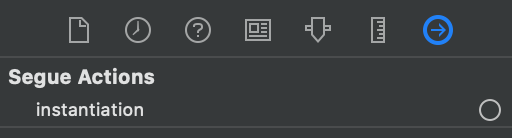
The Connections Inspector now contains an Instantiation connection for segues. Drag from the circle to the view controller that implements the @IBSegueAction for the target view controller that your segue points to. When you use it to navigate to a detail view controller, you will typically want your list view controller to be the target. When you release your drag action on the correct view controller, you will see the option to pick an appropriate @IBSegueAction method. You can use the same method for multiple segues, and you can have multiple @IBSegueAction methods for one view controller.
After connecting the Instantiation action, there's nothing else for you to do. If you run your app, your segue action will now be called whenever the segue it's attached to is called.
Using @IBSegueAction with a relationship segue
While regular master -> detail segues work pretty reliably, there seems to be something strange going on for relationship segues. A relationship segue is a connection between a navigation controller and its root view controller. Or the connection between a tab bar controller and its view controllers.
When you execute a segue where you present a navigation controller with a root controller modally, it's possible to use an @IBSegueAction to configure the navigation controller's root controller. The way this works is a little bit counter-intuitive though. Imagine an app where you have the ability to add items to a list:

If you tap the add button in the app from the screenshot above, a modal view controller is presented. The view controller is contained in a navigation controller so we can add a Save and Cancel button in the view controller's navigation item.
When you want to use an @IBSegueAction for the view controller, you should add the action to the list view controller. When you connect the Instantiation action, Interface Builder will automatically move the connection from your list view controller to the navigation controller. Don't be fooled however, at runtime, the system will look for the @IBSegueAction on the list view controller. This is even the case if you add the @IBSegueAction to a navigation controller subclass. No matter what you do, the system will look for the segue action on the source of the presentation. This has definitely cost me an hour or two to figure out so keep this in mind.
In Summary
Today, you've learned that with Xcode 11 and iOS 13 you can finally implement proper dependency injection when using Storyboards. You saw what the problem is with the old state of affairs, and how the new @IBSegueAction makes everything better. You also saw how to set up segue actions in Interface Builder connecting the Instantiation action to your @IBSegueAction methods. And to wrap it up, you learned about a strange little quirk that you might encounter with modal presentations and relationship segues.
I'm certainly going to give storyboards another chance in the coming months because I think this new feature looks very promising. What are your thoughts? Does this convince you to give Storyboards another try? Let me know on Twitter.