Handling deeplinks in your app
Published on: December 11, 2019Updated on: July 6, 2020
iOS 14 introduced a new way to build apps where you no longer need an App- and SceneDelegate for SwiftUI apps. Learn how to handle deeplinks for these apps in this article.
On iOS, it's possible to send users from one app to the next or to send them from a webpage into an app. A link that's used to send a user to an app is typically called a deeplink. Often, there is more than one way for a deeplink to be passed to your app. Because of this, it's not always trivial to handle deeplinks. In today's article, I will go over two kinds of deeplinks that you can support in your apps, and I will show you how you can create a deeplink handler that can handle virtually any deeplink you throw at it. This article is divided into the following topics:
- Using a custom URL scheme to handle deeplinks
- Adding Universal Links to your app
- Interpreting a deeplink and navigating to the correct view
Ready to level up your deeplink knowledge? Let's get going with custom URL schemes!
Using a custom scheme to handle deeplinks
A popular way for apps to support deeplinks is through custom URL schemes. A URL scheme is a prefix that is placed before your url. For example, if you make a request a webserver, the scheme is typically https:// or if you make user of websockets in your app, you might use the wss:// scheme. It's also possible to define your own, custom URL scheme. For example: deeplink-example:// or myapplication://. These schemes won't mean anything on devices that don't have your app installed. Using a custom scheme in a web browser like Safari won't work. Only your app knows how to handle your custom URL scheme, and iOS knows how to forward URLs that use your scheme to your app.
Before you can handle custom URL schemes in your app, you must register the URL schemes you want to support in your Info.plist file. Registering your URL scheme helps iOS determine what app it should ask to open a deeplink, but it's also used to protect the privacy of users. Apps cannot check whether iOS can handle URL schemes that they haven't registered in their Info.plist. If you could check for any URL scheme, at any time, it would be possible for apps to detect other installed apps by random asking iOS whether it can open as many URL schemes as possible. Luckily for your users, iOS limits the amount of attempts apps have to check whether a certain scheme is supported, and they must specify the schemes that they wish to support upfront.
To register a custom URL scheme for your app, you can either add entries to your Info.plist by hand, or you can go through the Info tab in your project's settings. I prefer the latter. The Info tab has a section called URL Types. This is where you register your custom URLs. An example of a custom scheme looks as shown in the following screenshot:
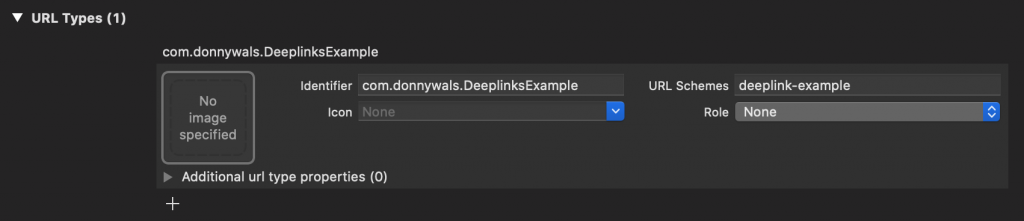
The identifier field is equal to our app's bundle identifier, the URLSchemes field contains a custom scheme, in this case, deeplink-example and the other fields are empty. Adding a scheme here will automatically update the Info.plist as shown in the following screenshot:
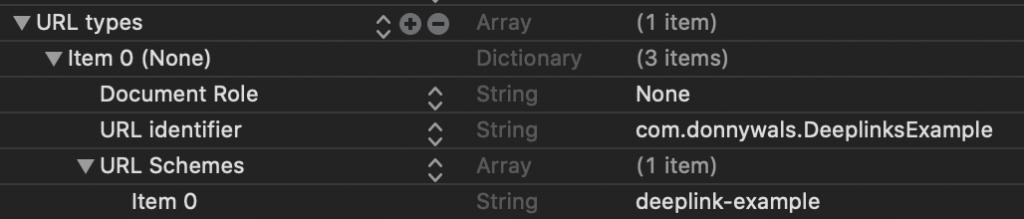
Because I added the deeplink-example scheme to this app's Info.plist it can now handle URLs that look as follows:
deeplink-example://some.host/a/pathWhen your app is asked to handle this deeplink, the scene(_:openURLContexts:) method is called on your scene delegate. If you're using the older app delegate rather than a scene delegate, the application(_:open:options:) method would be called on your app delegate object.
You can validate whether your scheme was added and works correctly by creating a simple view controller, adding a button to it and making it call a method that does the following:
let url = URL(string: "deeplink-example://donnywals.com/")!
UIApplication.shared.open(url, options: [:], completionHandler: nil)
And in your open URL method (scene(_:openURLContexts:) if you're using a scene delegate and application(_:open:options:) if you're only using an app delegate) you could print the following:
func scene(_ scene: UIScene, openURLContexts URLContexts: Set<UIOpenURLContext>) {
  for context in URLContexts {
    print("url: \(context.url.absoluteURL)")
    print("scheme: \(context.url.scheme)")
    print("host: \(context.url.host)")
    print("path: \(context.url.path)")
    print("components: \(context.url.pathComponents)")
  }
}
Note:
All examples used for URL handling will be based on the scene delegate. The only major difference between the app delegate and scene delegate is that the app delegate receives a single URL that it can use directly. The scene delegate receives aSetofURLContextobjects where the URL has to be extracted from the context.
The preceding code takes the URL that should be opened and prints several of its components, I will explain more about these components later in the interpreting a deeplink and navigating to the correct view section.
For now, you know all you need to know about custom URL schemes. Let's take a short look at Universal Links before we move on to handling deeplinks.
Adding Universal Links to your app
In the previous section, you saw how easy it is to add any URL scheme to your app. The example I just showed you is fine, but it's also possible to register schemes for apps you don't own. Like for example uber:// or facebook://. When you claim a URL scheme like this, and you're not using the scene delegate, you can easily call UIApplication.shared.canOpenURL(_:) to figure out whether a user has certain apps installed. It also means that anybody can potentially hijack your custom URL scheme, which is not ideal. You can get around these issues by using Universal Links instead of URL schemes.
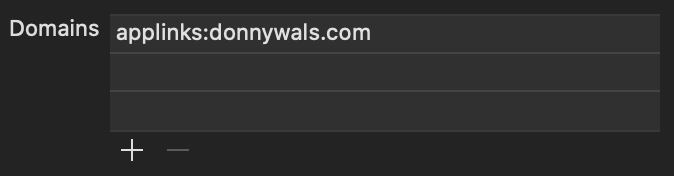
To add Universal Links to your app, you need to add the Associated Domains capability to your app. In your project settings, go to the Signing & Capabilities tab and click the + icon in the top left corner. Look for the Associated Domains capability and add it. After doing this you need to add your domains to the capability. When you add domains for Universal Links, you should use the following format: applinks:<your domain name>. The following screenshot shows the entry for donnywals.com:
After doing this, you need to upload a file to the server that you serve your website from. This file is called the apple-app-site-association file and it's used to verify that your app and domain belong together. Apple will look for this file on the root of your domain. In my case, that would be https://donnywals.com/apple-app-site-association. The apple-app-site-association file should use a JSON format and contain the following contents:
{
  "applinks": {
    "apps": ["A4VDH56G8B.com.donnywals.deeplinks"]
  }
}
The apps array contains all apps that belong to this domain. The format of each app in the apps array is as follows: <team identifier>.<app bundle id>.
Important:
Once you've added this file to your domain, make sure to reinstall your app if you're running it from Xcode. The system appears to only download yourapple-app-site-associationfile when your app is installed or updated.
Once the system has matched your app and domain to each other, all links found in iOS that point to the domain you're using for Universal Links will be sent to your app unless the user chooses otherwise. If you only want to open very specific URLs in your app, consider using a subdomain for Universal Links rather than using your website's regular domain name. Make sure to update the domain in your app capability settings and make sure that your server can serve the apple-app-site-association file.
When the system decides that your app should open a Universal Link, it calls scene(_:continue:) on your scene delegate, or application(_:continue:restorationHandler:) on the app delegate. This method receives an instance of NSUserActivity with NSUserActivityTypeBrowsingWeb set as its activityType, and the URL that needs to be opened as the webpageURL of the user activity. The following shows how you could extract the target URL from a user activity:
func scene(_ scene: UIScene, continue userActivity: NSUserActivity) {
  guard userActivity.activityType == NSUserActivityTypeBrowsingWeb,
    let urlToOpen = userActivity.webpageURL else {
      return
  }

  print(url)
}
Interpreting a deeplink and navigating to the correct view
Probably the most interesting part of implementing deeplinks is determining how your app will handle them. Since the implementation that's best for you is dependent on a lot of things, I will show you a simple implementation that should be possible to adopt for most applications somehow. I'm not going to show you how this might work in a coordinator pattern and I won't be using any complex helper objects. Both are very suited for handling deeplinks but I want to make sure you understand how you can handle deeplinks with a very plain setup rather than get bogged down into the details of a specific architecture.
Note:
In the code examples I will be working from the scene delegate, keep in mind that if you don't have a scene delegate, all code should go in your app delegate andapplication(_:open:options:)will be the entry point for all deeplinks that use a custom URL scheme, andapplication(_:continue:restorationHandler:)is the entry point for Universal links.
So far, I have shown you the following code:
func scene(_ scene: UIScene, openURLContexts URLContexts: Set<UIOpenURLContext>) {
  for context in URLContexts {
    print("url: \(context.url.absoluteURL)")
    print("scheme: \(context.url.scheme)")
    print("host: \(context.url.host)")
    print("path: \(context.url.path)")
    print("components: \(context.url.pathComponents)")
  }
}

func scene(_ scene: UIScene, continue userActivity: NSUserActivity) {
  guard userActivity.activityType == NSUserActivityTypeBrowsingWeb,
    let urlToOpen = userActivity.webpageURL else {
      return
  }

  print(url)
}
The scene delegate can be asked to open multiple URLs. In practice, this shouldn't happen if you're handling normal deeplinks, so let's simplify this code a little bit.
guard let context = URLContexts.first else { return }

print("url: \(context.url.absoluteURL)") // https://app.donnywals.com/post/10
print("scheme: \(context.url.scheme)") // https
print("host: \(context.url.host)") // app.donnywals.com
print("path: \(context.url.path)") // /post/10
print("components: \(context.url.pathComponents)") // ["/", "posts", "10"]
Every URL is constructed using components. The preceding code lists the most important components. I added some comments to show you how any URL can be deconstructed into components. When you're handling a deeplink, you're usually most interested in the pathComponents array because that contains the most useful information in your URL. For this reason, it's often not needed to distinguish between Universal Links or custom schemes when you're handling deeplinks, unless you absolutely have to. It this is the case, the scheme property of the URL should contain the information you need to make the distinction between Universal Links and custom schemes. Let's see how we could implement a deeplink handling strategy to handle two different links:
https://app.donnywals.com/post/10https://app.donnywals.com/settings/profile
Since a lot of apps use tab bars for their main navigation and navigation controllers for their sub-navigation, I will do the same in my example of handling deeplinks.
The following code passes a URL from each of the URL handling entry points to a new method that picks apart the path components and determines whether we're showing a settings page or a post.
func scene(_ scene: UIScene, continue userActivity: NSUserActivity) {
  guard userActivity.activityType == NSUserActivityTypeBrowsingWeb,
    let urlToOpen = userActivity.webpageURL else {
      return
  }

  handleURL(urlToOpen)
}

func scene(_ scene: UIScene, openURLContexts URLContexts: Set<UIOpenURLContext>) {
  guard let urlToOpen = URLContexts.first?.url else { return }

  handleURL(urlToOpen)
}

func handleURL(_ url: URL) {
  guard url.pathComponents.count >= 3 else { return }

  let section = url.pathComponents[1]
  let detail = url.pathComponents[2]

  switch section {
  case "post":
    guard let id = Int(detail) else { break }
    navigateToItem(id)
  case "settings":
    navigateToSettings(detail)
  default: break
  }
}
Since the first component in the path components array is always "/", we need to look at the second and third entries to retrieve the section of the app we need to show, and the detail page we need to show. Depending on the section, we then call different methods to handle navigating to the appropriate page. The reason for this is mostly so the code remains clear, concise and easy to read. Let's look at navigateToItem(_:):
func navigateToItem(_ id: Int) {
  // 1
  guard let tabBarController = window?.rootViewController as? UITabBarController else {
    return
  }

  // 2
  guard let viewControllers = tabBarController.viewControllers,
    let listIndex = viewControllers.firstIndex(where: { $0 is ListNavigationController }),
    let listViewController = viewControllers[listIndex] as? ListNavigationController else { return }

  // 3
  listViewController.popToRootViewController(animated: false)
  tabBarController.selectedIndex = listIndex

  // 4
  let detailViewController = ListDetailViewController(item: id)
  listViewController.pushViewController(detailViewController, animated: true)
}
This method grabs the window's root view controller and casts it to a tab bar controller. This is really only done so we can access the tab bar controller's viewControllers property. We then look for the position of the ListNavigationController that shows our posts, and we make sure that we can extract the ListNavigationController from the view controllers array.
The purpose of steps one and two is to obtain the view controller that will show the post detail and to find its position within the tab bar controller's tab bar items. In step three, the tab bar controller's selectedIndex is set to the index of our list view controller, and since the list view controller is a navigation controller, we pop it to its root view controller.
Depending on whether this is needed for your app, you might not need to pop to the root view controller. Or maybe your app shows modal view controllers. If that's the case you might want to call dismiss() on both your tab bar and your navigation controller.
In step four, the target view controller is created and the navigation controller is told to present the view controller.
Let's look at the implementation of navigateToSettings(_:) to see if it's any different:
func navigateToSettings(_ detailType: SettingsDetailViewController.DetailType) {
  guard let tabBarController = window?.rootViewController as? UITabBarController else {
    return
  }

  guard let viewControllers = tabBarController.viewControllers,
    let settingsIndex = viewControllers.firstIndex(where: { $0 is SettingsNavigationController }),
    let settingsViewController = viewControllers[settingsIndex] as? SettingsNavigationController else { return }

  settingsViewController.popToRootViewController(animated: false)
  tabBarController.selectedIndex = settingsIndex

  settingsViewController.popToRootViewController(animated: false)

  let detailViewController = SettingsDetailViewController(type: detailType)
  settingsViewController.pushViewController(detailViewController, animated: true)
}
Examine this code closely, and you'll find that the process of showing the settings page is pretty much the same as it is for the posts page.
At this point, your app will happily open links as long as your app is active in the background. When it's not active in the background and your user is sent to your app through a deeplink, the logic you have implemented currently won't work.
If your app is launched because to open a deeplink, the link is passed to the connectionOptions in your scene(_:willConnectTo:options:) method in the SceneDelegate and it can be accessed through the connection options' urlContexts property. To handle the link, you can call scene(_:openURLContexts:) with the contexts that are present on the connectionOptions:
func scene(_ scene: UIScene, willConnectTo session: UISceneSession, options connectionOptions: UIScene.ConnectionOptions) {
  self.scene(scene, openURLContexts: connectionOptions.urlContexts)
}
Similarly, if your app is launched to open a Universal Link, you can inspect connectionOptions.userActivities to see if there are any user activities for your app to handle. If this is the case, you might grab the first user activity and pass it to scene(_:continue:):
func scene(_ scene: UIScene, willConnectTo session: UISceneSession, options connectionOptions: UIScene.ConnectionOptions) {
  if let userActivity = connectionOptions.userActivities.first {
    self.scene(scene, continue: userActivity)
  } else {
    self.scene(scene, openURLContexts: connectionOptions.urlContexts)
  }
}
Note that you might receive several user activities so the URL that you're supposed to open could very well be the second or third item in the user activities set. Make sure to account for this in your app if needed.
You need to make sure that you call this method after you've set up and configured your scene and layout because your UI won't be available otherwise which means that you can't activate the correct screen in your app.
Note:
If you're using theAppDelegateinstead of theSceneDelegate, the link is passed along with thelaunchOptionsdictionary inapplication(_:didFinishLaunchingWithOptions:)under theUIApplication.LaunchOptionsKey.urlkey.
The way of handling deeplinks I have just shown you should contain enough information to give an idea of how deeplink handling might fit in your app. If you're using Storyboards, you could obtain a reference to your Storyboard, make it instantiate view controllers or ask the storyboard to perform segues depending on the path components in the URL you're handling. When you're implementing deeplinks in your app, it's important to try and keep your implementation flexible and avoid hardcoding things like indexes of tabs in a tab bar controller. If your tab bar items or ordering ever change, your deeplinking logic might have to change too, which is typically not what you want. It's better to look up appropriate indices and view controllers dynamically like I've shown in my example.
In Summary
Deeplink functionality is something a lot of apps need but it's not always easy to get started with adding deeplinks for your app. Do you use a custom URL scheme? Or are Universal Links a better fit for you? Or maybe a combination of both?
In today's article, I have shown you how to add support for both Universal Links and URL schemes. You know how each behaves and what you need to do to register each type of deeplink on your app so iOS knows where to send users when they encounter one of your links.
You also saw an example of deeplink handling code. Again, you might want to adapt this to fit better in your architecture or you might have to make some changes to make this example work with Storyboards, but the idea remains the same. Extract the path, determine what the user should see and find a good path to get there. Usually, this involves setting a selected tab on a tab bar controller and pushing a view controller on a navigation controller.
If you have any questions, feedback or additions for me about this article, don't hesitate to contact me on Twitter.
Thanks to Mat Gadd for making me realize Universal Links are handled in a different way than custom url schemes.
