Measuring performance with os_signpost
Published on: December 10, 2019One of the features that got screen time at WWDC 2018 but never really took off is the signposting API, also known as os_signpost. Built on top of Apple’s unified logging system, signposts are a fantastic way for you to gain insight into how your code behaves during certain operations.
In this post, I will show you how to add signpost logging to your app, and how you can analyze the signpost output using Instruments.
Adding signposts to your code
If you’re familiar with OSLog and already use it in your app, adding signpost logging should be fairly simple for you. If you have never used OSLog before, don’t worry, you can follow along with this post just fine.
Once you have determined what operation in your code you want to measure exactly, you need to create a so-called log handle that you can use as an entry point for your signpost logging. Recently I wanted to measure the difference in execution speed of certain quality of service settings on an operation queue. I built a simple sample app and added my log handle to my view controller. In your code, you should add it near the operation you want to measure. For example by making the log handle a property on your networking object, view model, view controller or anything else. What’s important is that it’s an instance property since you want to make sure the log handle can be accessed from anywhere within the code you’re measuring.
You can create a log handle as follows:
import os.log

let logHandler = OSLog(subsystem: "com.dw.networking", category: "qos-measuring")
A log handler always belongs to a subsystem, you might consider your entire app to be a subsystem, or maybe you consider different components in your app to be their own subsystem. You should name your subsystem some unique for your app, and it’s good practice to use reverse DNS notation for the naming. You also need to specify a category, in this case, I chose one that describes the thing I’m measuring with the signpost we’ll add next. Note that the preceding code imports the os.log framework. The signpost API is part of this framework so we need to import it in order to use signposts.
In a very simple example, you might want to add signposts in a way similar to what the following code snippet shows:
func processItem(_ item: Item) {
  os_signpost(.begin, log: logHandler, name: "Processing", "begin processing for %{public}s", item.id)

  // do some work
  os_signpost(.event, log: pointsOfInterestHandler, name: "Processing", "reached halfway point for %{public}s", label)
  // do some more work

  os_signpost(.end, log: logHandler, name: "Processing", "finished processing for %{public}s", item.id)
}
Note that there are three different event types used in the preceding code:
.begin.event.end
The .begin event is used to mark the start of an operation, and the .end event is used to mark the end of an operation. In this example, the system will use the name as a way of identifying each operation to link up the operation start and end events. We can also add points of interest that occur during an event, for example when you reach the halfway point. You add points of interest using the .event event type.
In order to log .event events, you need a special log handler that specializes in points of interest. You create such a log handler as follows:
let pointsOfInterestHandler = OSLog(subsystem: "dw.qostest", category: .pointsOfInterest)
It works pretty much the same as the normal logger, except you use a predefined category.
Also note the final two arguments passed to os_signpost: "finished processing for %{public}s", item.id. The first of these two arguments is a format string. Depending on the number of placeholders in the format string, the first, second, third, etc. arguments after the format string will be used to fill the placeholders. You can specify placeholders as either {public} or {private}. Specifying neither will default to {private}. Values passed to public placeholders are visible in the console, even if your app is running without the Xcode debugger attached. So if you’re handling sensitive data, make sure to mark your placeholders as private.
The s after the placeholder’s access level specifier marks that the value that’s used to fill the placeholder will be a string. You could also use a number instead of a string if you replace s with a d. Apple recommends that you only use strings and numbers for your placeholders in order to keep your logs simple and lightweight.
This example is very simple, everything occurs in the same method and we could use a string to link our signpost begin and end. But what if we have multiple operations running that all use signposts. If they all have the same name, they will start interfering with each other. In that case, you can use a SignpostID. You can create SignpostID objects in two ways:
let uniqueID = OSSignpostID(log: logHandler)
let idBasedOnObject = OSSignpostID(log: logHandler, object: anObject)
If you use the first method, you need to keep a reference to the identifier around so you can use it to correctly link .begin and .end events together. If your operation is strongly related to an instance of a class, for example, if each instance only runs one operation, or if you’re manipulating an object that’s a class in your operation, you can use the second method to obtain a SignpostID. When you create an identifier using an object, you always get the same SignpostID back as long as you’re using the same instance of the object. Note that the object must be a class. You can’t use value types for this.
You can use SignpostID in your code as follows:
class ImageManipulator {
  // other properties, like the logHandle
  let signpostID = SignpostID(log: logHandler, object: self)

  func start() {
    os_signpost(.begin, log: logHandler, name: "Processing", signpostID: signpostID, "begin processing for %{public}s", item.id)
    // do things
  }

  func end() {
    os_signpost(.end, log: logHandler, name: "Processing", signpostID: signpostID, "finished processing for %{public}s", item.id)
  }
}
Our signposts are now uniquely identified through the signpostID that gets generated based on the ImageManipulator itself. Note that this object is now expected to only work on one image at a time. If you would use this object for multiple operations in parallel, you’d need to either create a unique SignpostID for each operation or, for example, generate the identifier based on the image.
Reading signposts with instruments
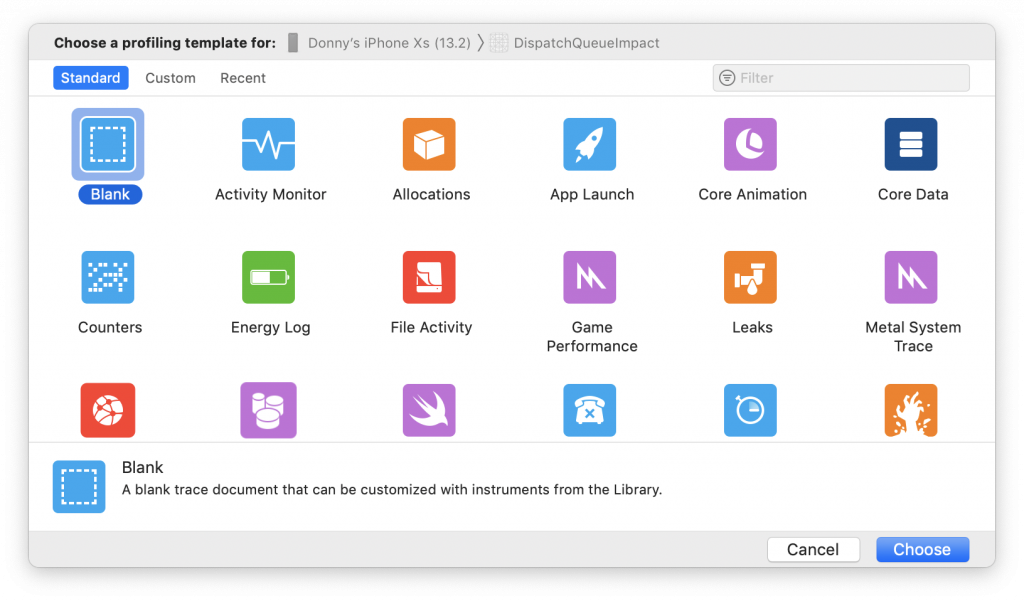
Once you’ve added signposts to your code, you can view them in Console.app, or you can analyze them with Instruments. To do this, run your app with Instruments like you normally would (cmd + i or Product -> Profile) and select a blank Instruments template:
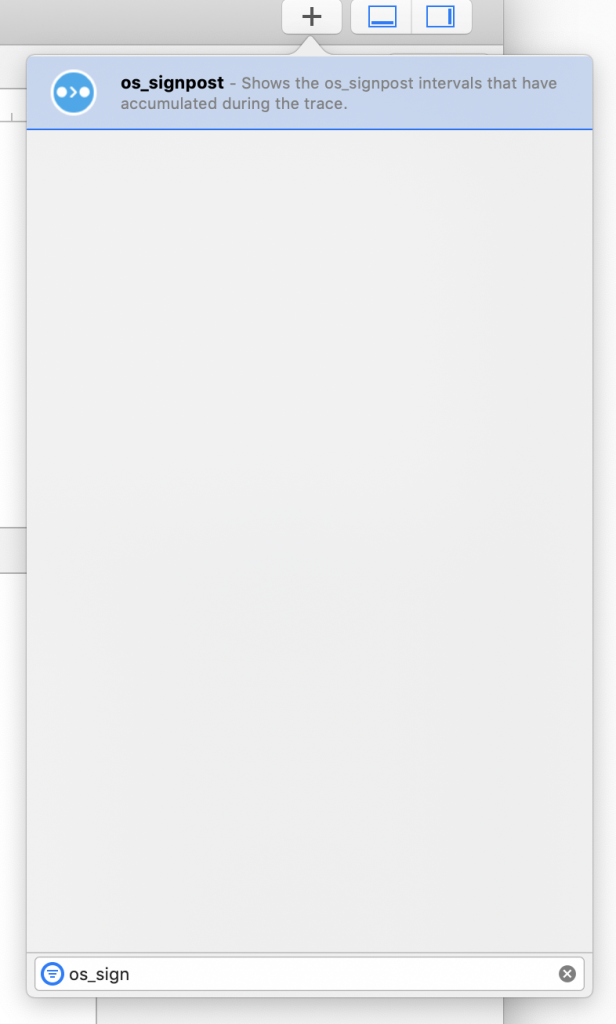
In the blank Instrument window, click the + icon in the top right, find the os_signpost instrument and double click it to add it to your Instruments session. Also, add the points of interest instrument from the same menu.
After doing that, hit record and use your app so a bunch of signposts are logged, and you have some data to look at:
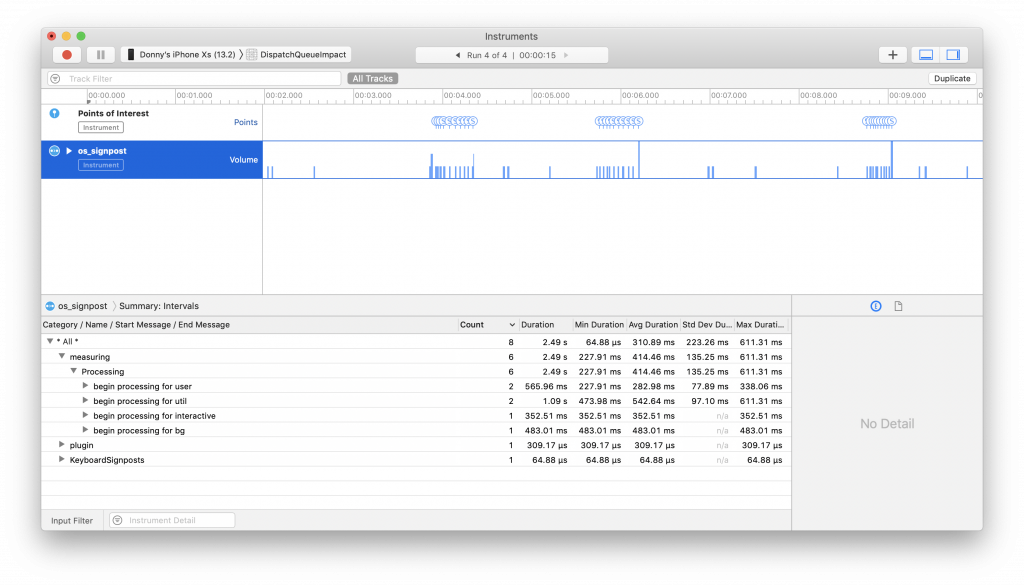
If you have the os_signpost track selected, Instruments will group measurements for each of its begin and end signposts based on your signpost message. So if you’re using the same message for operations, as we have in the earlier examples, performing the same operation over and over will cause Instruments to group those operations. And more importantly, Instruments will tell you the maximum duration, minimum duration, average duration and more for each operation. That way, you can easily measure the performance of the things your app does, without relying on print statements or date calculations that might negatively impact your code!
In summary
In this post, you’ve seen that Instruments and os_signpost are a powerful team that can help you gain insight into your code. You can use signposts as a way of regular logging to Console.app, but it’s also very well suited to do low-impact performance measuring of your code if you combine signposts with Instruments. Both signposts and Instruments are tools you might not need or use all the time, but knowing they exist, what they do and when you use them is essential to learning more about the code you write, and ultimately to becoming a better developer.
If you have feedback, questions or anything else regarding this post for me, please reach out on Twitter. I love hearing from you.
