Clean derived data from Xcode, the simple way

Update for Xcode 11:
Unfortunately, it appears that this method of cleaning derived data no longer works😕. Looks like we're stuck purging ~/Library/Developer/Xcode/DerivedData/ by hand again. If you do know of a workaround similar to the one described here, send me a tweet and I'll update this post!

Any iOS developer that has spent significant time with Xcode is familiar with at least a couple of it's caveats. Random crashes, slowness, autocomplete not working for a few seconds and build errors right after you've added or removed a library. Or, just a random appearance of 200+ warnings like I had just now. The solution for quite a few problems with Xcode's building process can be found in clearing out your derived data. In the past I would always fire up a new terminal window, type in something like open ~/Library/Developer/Xcode/DerivedData/ and then manually clearing out the folders I think aren't needed. But today I found out that Xcode has a built in fix-me button, right in your project organizer!

cleanup

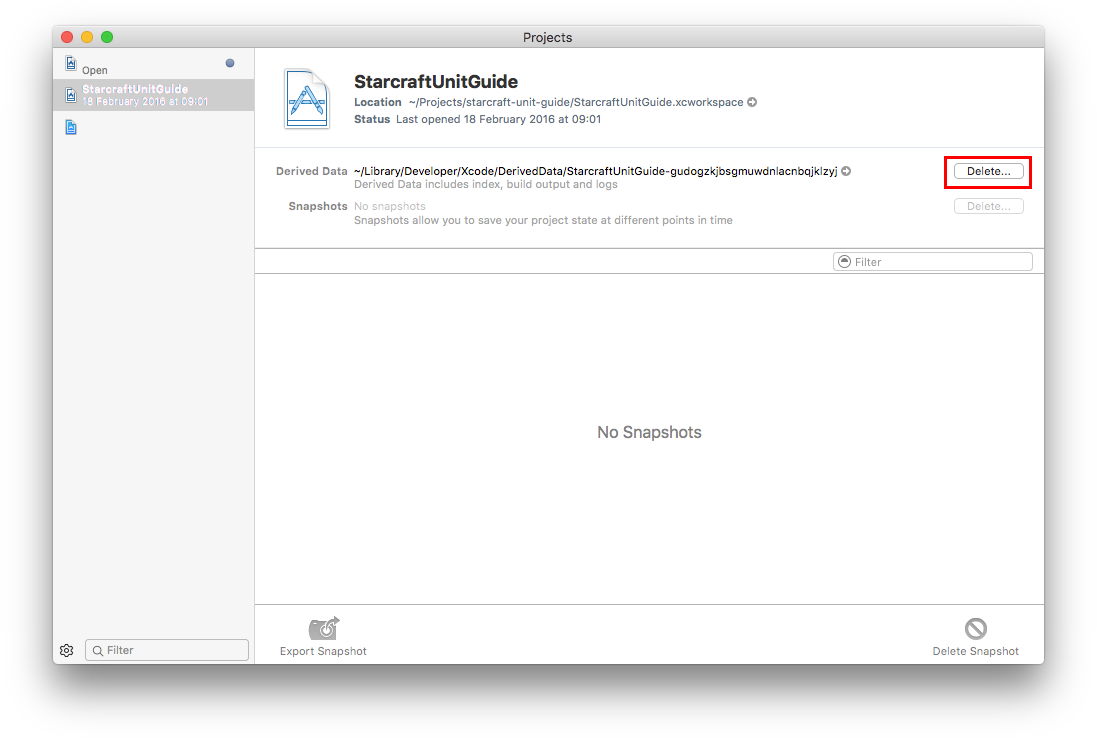
All you have to do is go to the project organizer (window -> projects) click the button that's outlined and you're done. Any issues with your derived data should be cleaned up (for now) and your Xcode should stop complaining about silly things for a while now.

Happy coding!

The dangers of forcefully unwrapping values

Whenever I'm programming, I have a goal in mind, generally a problem to solve. I want my solutions to be simple, yet elegant and reliable. Thankfully, Swift is a great language for this. The language is safe, its syntax is beautiful with great readability. The way Swift handles nullability contributes greatly to its safety.

If you want to declare a variable in Swift you can use either the let or var keyword. If you don't want to assign a value to one of your properties right away you could write something like var episodeName: String?. This informs the Swift compiler that episodeName might not have a value when we're accessing it. If we don't add the question mark and write var episodeName: String, the episodeName will need to be assigned a value when we initialize the object that contains this property. A third way to declare episodeName is to implicitly unwrap the value: var episodeName: String!. This tells the compiler that we are 100% sure that episodeName will get a value before we attempt to access it.

These question mark / exclamation mark semantics also apply to using variables in your code. When you've declared your variable with a questionmark (var episodeName: String?) we are never sure if episodeName is nil or a String. So whenever we want to use this variable we need to unwrap it. The safest way to do this is as follows:

if let name = episodeName {
    println(name) // prints episodeName's value
}

However, if you're 100% sure you've set a value, you can tell the Swift compiler to stop complaining because you know what you're doing and you just want to get your episode’s name:

println(episodeName!)

By adding the exclamation mark after episodeName, we force unwrapping it and we can use it's value straight away without an extra if statement.

Where's the danger?

If you're writing an application you're sometimes sure that you assign a value to something. For example, you might have written something like:

var show = TVShow()
show.episodeName = apiData.name
show.printEpisodeName()

This code should usually be safe. Before we ask the show for it's episodeName we actually set it so we're always sure that episodeName has a value before we access it. So the implementation of printEpisodeName might be:

func printEpisodeName() {
    println(episodeName!)
}

This shouldn’t throw errors. After all, we know what we're doing! We always set the episodeName right after we instantiate our class. What could go wrong, right? Well... besides the fact that we probably should have created an initializer that takes the episodeName, a lot can go wrong.

Honeymoon's over..

So, our project has been ongoing for a few weeks and we're changing the API. Before, we were guaranteed that the API would always return properly formatted JSON but we've decided that things like the name for an episode isn't guaranteed anymore. In other words, the name can be nil.
We test our app, everything still works when we're navigation to our show page so we're happy. But then.. crash reports come in. Users are livid and to add insult to injury, your manager is suddenly next to your desk. The app is crashing. Hard.

What's going on!? Everything was fine before! So we start searching and debugging. And once we manage to reproduce the error we see what's going on:

Unexpectedly found nil while unwrapping an optional value

And then we remember. The forcefully unwrapped optional in our TVShow class:

func printEpisodeName() {
    println(episodeName!)
}

When we set the episodeName on our tv show, the name we get from the API can be nil. And that's alright because we declared our episodeName like this: var episodeName: String?. Which means that episodeName can be either nil or a String. Luckily, our bug is easily fixed:

func printEpisodeName() {
    if let name = episodeName {
        println(name)
    } else {
        println("model id is nil")
    }
}

Now we handle the optional value properly, we avoid crashes and an angry manager. Time to get yourself a cup of coffee and tell your manager that you've fixed the error.

The takeaway 🙂

As we saw in this post it can be tempting to force the unwrappin of a variable when we're pretty sure that we will set it before we use it. But as requirements change it can be easy to overlook situations where a variable can suddenly be nil when we try to access it.

My advice is to (almost) always unwrap optionals properly with an if let construction. It's the only way to be 100% sure that you're not accidentally accessing a variable whose value is actually nil. More importantly, this will help to prevent future crashes.

So remember kids, always unwrap your optionals in a safe way.

High performance shadows for UIView

No app is truly complete without some subtle shadows. Especially now that Google's Material Design is showing us that shadows are cool again we need a way to properly add them in our apps. In my previous post I wrote about a way to create a custom UICollectionView layout. There was one problem with that post though, that shadows are incredibly heavy on the iPhone and scrolling stutters.

So can we fix this? The answer is yes and the solution is (surprisingly) easy. A Google search led me to this Stackoverflow question about shadows. The solution I tried first was to simple rasterize my layer but that wasn't what I was looking for. Images started to look very bad and I didn't want that. Another solution that was proposed is to supply the layer with a shadowPath.

What is shadowPath and what does it do?

If you set the shadowPath property it will function as a guide to the shadow that ends up underneath your view. If you don't set this, the view need to be analyzed at runtime to determine where the view is transparent and where it isn't which will result in the eventual shadow shape. This is a pretty costly operation, especially if you do this for about 20 views at a time in a UICollectionView. And even more so if you start scrolling in this view.

Implementing shadowPath

Assuming we're using the code from my previous post there isn't much we have to do. We have to create a circular path that has the same size as the imageView. We know that our imageView get's rendered at 80px by 80px so we can use UIBezierPath with rounded corners to generate a circular path. Let's add this line before we specify the shadows in the CustomCollectionViewCell class:

layer.shadowPath = UIBezierPath(roundedRect: CGRectMake(0, 0, 80, 80), cornerRadius: 40).CGPath

Build and run the project and you should now see butter smooth scrolling instead of the bad scrolling we had before.

Summary

If you want to use shadows on your views then you should probably also set the shadowPath on your view to ensure proper performance. By doing this you can speed up rendering a great deal because otherwise the view will be analyzed at runtime to find out what shape the view has, this is a lot slower than just providing the proper shadow path. Setting the path does not only increase performance but it also allows you to create many fun effects with shadows.

Creating a custom UICollectionViewLayout in Swift

Note:
This blog post has been updated for Xcode 11 and Swift 5 👍🏼
If you’re looking to learn more about the new collection view layout techniques that were introduced in iOS 13, this post should contain everything you need.

If you've ever built an iOS app that uses some kind of grid layout or displays a list in a way that doesn't fit a UITableView you have probably used a UICollectionView. This component allows for very simple grid layout creation and it even allows you to dynamically change layouts with beautiful animations. UICollectionView becomes even more powerful and flexible if you create your own layout by subclassing UICollectionViewLayout.

Recently I had to build a kind of playful, almost grid-like layout. To me, this seemed like the best time to dive straight into subclassing UICollectionViewLayout and create a nice layout. In this post, I will explain how I did it and I'll provide you with a little bit of code so you can start building your own layouts in no-time.

The end result

Since I'm a great fan of cats, we'll be building a collection of cat images. The images will be rounded, they'll have a nice shadow so they look kind of nice and the magic bit is, of course, the slightly offset rows that are provided by the custom UICollectionViewLayout.

Schermafbeelding 2015-07-07 om 20.57.24

The image above illustrates what we'll end up with when we're done. It's quite something, isn't it?

Creating your custom layout

Before we get to build our layout we have to do some set up. Create a new Xcode project and use the Single View Application template. I named my project "CustomCollectionViewLayout" because I'm not very good at coming up with clever names. You can name your project anything you like. Make sure that you pick Storyboard for the layout, we won't be using SwiftUI in this post.

Step one: setting up the interface

Creating the UICollectionView

The first thing you should do is open up the Main.storyboard and drag a UICollectionView out to your View Controller. When you've done this give the collection view a white background color and add constraints to it so it will fit your view nicely. If you're unsure how to do this, size the collection view so that it touches the left, bottom and right edges of the view and it should be aligned underneath the status bar. XCode should provide you with some helpful guides for this. Once your view is sized like this, click in the bottom right corner of your canvas and choose Reset to suggested constraints.

Schermafbeelding 2015-07-07 om 21.07.21

Next, we should connect the collection view to our ViewController class. Open up the assistant editor by pressing the two overlapping circles in your XCode window and make sure that the editor is set automatically use an appropriate file.

Schermafbeelding 2015-07-07 om 21.25.52

Select the UICollectionView, hold ctrl and drag over to the code editor to create an outlet for the UICollectionView. I named mine "collectionView". That's all the setup we need for now.

Creating a UICollectionViewCell

To display our cat images we need to have a UICollectionViewCell with an image inside of it. To do this we can simply create our own UICollectionViewCell and put a UIImageView inside of it.

First, create a new CocoaTouch Class (either press cmd+n or by navigating through the file menu). Name your file CustomCollectionViewCell, make it subclass UICollectionViewCell and check "Also create xib file".

Schermafbeelding 2015-07-07 om 21.14.25

XCode should have created a .swift and .xib file for you. Let's open up the .xib file first and then press the assistant editor button so we have both the .xib and .swift file open at the same time. Drag a UIImageView out into your custom cell and size it so that it fills up the cell exactly. Since we'll be resizing the cell later we should "Reset to suggested constraints" again, just like we did with the UICollectionView earlier. Now select the image, press and hold ctrl and then drag to your swift file to create an outlet for the imageView. I named mine "imageView".

Our example image had rounded corners and a shadow applied so let's write some code to make this happen. All you need is a few lines inside awakeFromNib().

override func awakeFromNib() {
  imageView.layer.cornerRadius = 40
  imageView.clipsToBounds = true
  
  layer.shadowColor = UIColor.black.cgColor
  layer.shadowOffset = CGSize(width: 0, height: 2)
  layer.shadowRadius = 2
  layer.shadowOpacity = 0.8
}

This code is fairly straightforward. First, we apply rounded corners to our imageView. Then we apply a shadow to the cell itself. You can tweak the numbers to change how the cell looks. Did you notice the magic number 40? In an actual app, you might want to find a better solution for this because 40 is half of the cell's eventual size but there's no way to know that unless you came up with all the sizings yourself.

The last thing we have to do is register this custom cell to our UICollectionView. We created an IBOutlet for the UICollectionView earlier by ctrl+dragging from the UICollectionView to the ViewController. Open up ViewController.swift  and add this line to the viewDidLoad method:

collectionView.register(UINib(nibName: "CustomCollectionViewCell", bundle: nil), forCellWithReuseIdentifier:cellIdentifier)

We're using a cellIdentifier  variable here, let's define that as well. Place this code right below your collectionView  outlet:

private let cellIdentifier = "collectionCell"

Allright, that's all. Our UI is fully prepared now. The code you've added to ViewController.swift  should look like this:

@IBOutlet weak var collectionView: UICollectionView!
    
private let cellIdentifier = "collectionCell"

override func viewDidLoad() {
    super.viewDidLoad()
        
    collectionView.register(UINib(nibName: "CustomCollectionViewCell", bundle: nil), forCellWithReuseIdentifier:cellIdentifier)
}

Step two: setting up the UICollectionView dataSource

To get our UICollectionView to display our collection of cat pictures we will need to make sure our UICollectionView knows where to go for its data. To do this, select the connections inspector in the right drawer of XCode and drag the dataSource connector to the ViewController class.

To actually implement the dataSource we should make our ViewController  comply to the UICollectionViewDataSource  protocol. Open up ViewController.swift  and change it's class definition to this:

class ViewController: UIViewController, UICollectionViewDataSource

By adding UICollectionViewDataSource  after the superclass we tell Swift that this class implements the UICollectionViewDataSource protocol. This protocol dictates that we should at least provide our UICollectionView with:

  • the amount of sections it should contain
  • the amount of items there are in each sections
  • cells to display

The following code takes care of all this:

func numberOfSectionsInCollectionView(collectionView: UICollectionView) -> Int {
  return 1
}

func collectionView(_ collectionView: UICollectionView, numberOfItemsInSection section: Int) -> Int {
  return 50
}

func collectionView(_ collectionView: UICollectionView, cellForItemAt indexPath: IndexPath) -> UICollectionViewCell {
  let cell = collectionView.dequeueReusableCell(withReuseIdentifier: cellIdentifier, for: indexPath) as! CustomCollectionViewCell
  
  cell.imageView.image = UIImage(named: "cat_\(indexPath.row%10)")
  
  return cell
}

The collection view will contain a single section with 50 items. Our cell creation code is also fairly straightforward, we dequeue the cell that we've registered before and we forcefully cast it to be a CustomCollectionViewCell. Then we set the imageView.image to one of the cat images you've added to the project earlier. I only added 10 images so I reuse them. To use the next code snippet in your own project, you should add 10 images to your Images.xcassets and name them cat_0.jpg - cat_9.jpg.

If we were to run our app now we'd end up with something like this:

Schermafbeelding 2015-07-07 om 21.42.30

Not quite what we wanted.. but don't worry, we're going to implement our custom layout right now!

Step three: implementing the custom layout

Now that we're all set up it's time to get to hard part; the custom layout! First, create a now Cocoa Touch Class and call it "CustomCollectionViewLayout". It should subclass UICollectionViewFlowLayout. To avoid many small chunks of code I've grouped together some code in sensible groups, I'll show you code first and then explain what it does right after that. Here's the first chunk:

let itemWidth: CGFloat = 80
let itemSpacing: CGFloat = 15
var layoutInfo = [IndexPath: UICollectionViewLayoutAttributes]()
var maxXPos: CGFloat = 0

override init() {
  super.init()
  setup()
}

required init?(coder aDecoder: NSCoder) {
  super.init(coder: aDecoder)
  setup()
}

func setup() {
  // setting up some inherited values
  self.itemSize = CGSize(width: itemWidth, height: itemWidth)
  self.minimumInteritemSpacing = itemSpacing
  self.minimumLineSpacing = itemSpacing
  self.scrollDirection = .horizontal
}

This first section is responsible for the initial setup. It sets up some sizing values (remember that magic number 40 in our cell?) and it creates an array that we'll use to store our layout in. When you're creating a collection view that changes often or contains a lot of items you might not want to use this technique but since we have a relatively small collection that doesn't change often we can cache our entire layout. There's also a variable to hold the maxXPos , we'll use that to calculate the collectionView's content size later. In the setup() function we configure the layout, these properties are inherited from the UICollectionViewFlowLayout and allow us to set up spacings and a scrollDirection. In this case we're not really using the spacings but I think it's good practice to set them up anyway.

override func prepare() {
  layoutInfo = [IndexPath: UICollectionViewLayoutAttributes]()
  for i in (0..<(self.collectionView?.numberOfItems(inSection: 0) ?? 0)) {
    let indexPath = IndexPath(row: i, section: 0)
    let itemAttributes = UICollectionViewLayoutAttributes(forCellWith: indexPath)
    itemAttributes.frame = frameForItemAtIndexPath(indexPath)
    if itemAttributes.frame.origin.x > maxXPos {
      maxXPos = itemAttributes.frame.origin.x
    }
    layoutInfo[indexPath] = itemAttributes
  }
}

func frameForItemAtIndexPath(_ indexPath: IndexPath) -> CGRect {
  let maxHeight = self.collectionView!.frame.height - 20
  let numRows = floor((maxHeight+self.minimumLineSpacing)/(itemWidth+self.minimumLineSpacing))
  
  let currentColumn = floor(CGFloat(indexPath.row)/numRows)
  let currentRow = CGFloat(indexPath.row).truncatingRemainder(dividingBy: numRows)
  
  let xPos = currentRow.truncatingRemainder(dividingBy: 2) == 0 ? currentColumn*(itemWidth+self.minimumInteritemSpacing) : currentColumn*(itemWidth+self.minimumInteritemSpacing)+itemWidth*0.25
  let yPos = currentRow*(itemWidth+self.minimumLineSpacing)+10

  return CGRect(x: xPos, y: yPos, width: itemWidth, height: itemWidth)
}

This piece of code comes after our initial setup, it overrides the prepareLayout  function which is called before the cells are actually going to need their layout. This allows us to pre-calculate our entire layout. Which is exactly what we want to do for this use case. There's a loop inside this function that uses the collectionView.numberOfItemsInSection function to find out how many items it is going to display. It then initializes layoutAttributes for the item at the current NSIndexPath and it calls frameForItemAtIndexPath. To calculate the item's frame. Next up is a check to determine of the x position for this item is the largest x position in our collection and then it stores the itemAttributes in our layout cache.

The frameForItemAtIndexPath function uses the height of our collectionView to determine the amount of cells it can fit into a single column, then it determines how many rows there will be in our collection and based on that it calculates the x and y position for the item. Every other item will be offset somewhat to the right, we use the % operator and a ternary for that. If currentRow % 2 == 0 the xPos is equal to currentColumn(itemWidth+self.minimumInteritemSpacing), otherwise it will be equal to currentColumn(itemWidth+self.minimumInteritemSpacing)+itemWidth*0.25. And finally we return a CGRect with the correct size and position values.

This last snippet of code actually provides our collection with the layout:

override func layoutAttributesForItem(at indexPath: IndexPath) -> UICollectionViewLayoutAttributes? {
  return layoutInfo[indexPath]
}

override func layoutAttributesForElements(in rect: CGRect) -> [UICollectionViewLayoutAttributes]? {
  var allAttributes: [UICollectionViewLayoutAttributes] = [UICollectionViewLayoutAttributes]()
  
  for (_, attributes) in layoutInfo {
    if rect.intersects(attributes.frame) {
      allAttributes.append(attributes)
    }
  }
  
  return allAttributes
}

override var collectionViewContentSize: CGSize {
  let collectionViewHeight = self.collectionView!.frame.height
  let contentWidth: CGFloat = maxXPos + itemWidth
  
  return CGSize(width: contentWidth, height: collectionViewHeight)
}

The first method, layoutAttributesForItemAtIndexPath simply returns the layout attributes that belong to the passed IndexPath. Fairly straightforward. Next, we have layoutAttributesForElementsInRect. This method is somewhat more complex because we get passed a CGRect and we have to determine which items are inside of that area. To do this we loop over our layoutInfo object, we compare the rects and we return all intersecting items.

Finally, we calculate the collectionView's contentSize. The contentWidth is equal to our maxXPos + itemWidth and the height is the same as the collectionView's height.

Step four: using the custom layout

The final step in this tutorial is to actually make the UICollectionView use our custom layout. To make this happen, select the Collection View Flow Layout object that is associated with your UICollectionView in your Main.storyboard and change it's class to CustomCollectionViewLayout.

Schermafbeelding 2015-07-07 om 22.14.33

Now build and run your app, you should see something like the image I showed you at the beginning of this post.

borat_great_success

In conclusion

I hope this post is helpful to some of you out there. I had a lot of fun today figuring out how to do this myself and I figured there's probably more people out there who are looking for cool ways to implement UICollectionView and use custom layouts.

If you want to learn more about collection view layouts, check out my post called Using compositional collection view layouts in iOS 13.

The code for this project can be found on GitHub and if you want to reach out to me, I'm on Twitter.

Exploring protocols and protocol extensions in Swift

In 2015 Apple announced Protocol extensions at WWDC and went on to explain the idea of Protocol Oriented Programming (video here), I think every iOS developer got really exited when they saw this.

The ability to add default implementations to protocol methods through extensions makes it seem like everything we will ever build can and should be protocol based instead of inheritance based like we do in classical OOP. In this post, we'll explore protocols and protocol extensions to see what we can make them do.

Taking advantage of Protocols today

To take advantage of the awesomeness of Protocols we could think of a Protocol as a mixin more than an interface. I've seen people compare Protocols to interfaces in, for instance, Java. While they are similar they will become quite different once we get to use protocol extensions.

If we can provide default implementations for our Protocol methods we should look at Protocol as little mixins of functionality that can be used to enhance existing types. Mixins are not exactly new in programming and if you look at functional programming mixins are considered pretty important. The cool thing about a mixin (or Protocol) driven approach is that it avoids complex, confusing and inflexible class hierarchies. Instead you can provide multiple Protocols, or mixins, to compile an object with. By doing this, the object will be very explicit about what it can and can't do and the object type itself won't matter throughout your code. What does matter throughout your code is the fact that an object contains certain functionality. And to make sure that an object has certain functionality it conforms to a protocol you wrote. Since this could be pretty confusing if you don't use Protocol oriented programming yet, or if you've never heard of mixin based programming (or even Python's multiple inheritance model), we should probably look at an example now.

An example

So let's imagine that we're mapping out some part of the animal kingdom, let's start with an Animal class. This class will only contain the name of the animal and it's size:

class Animal {
  var name: String?
  var size: AnimalSize?
}

A subclass of animal will be Bird. A Bird will have an amount of legs and it will have a number of wings:

class Bird: Animal {
  var legs = 2
  var wings = 2
}

Now we'll also create a Reptile class which will have a favoriteTemperature property so we know when the Reptile will be nice and comfortable.

class Reptile: Animal {
  var favoriteTemperature = 37.0
}

A subclass of Reptile is a Crocodile, technically this is probably very incorrect, but that's okay, in our imaginary animal kingdom anything goes. The Crocodile will get a number of legs property, just like the bird. It won't get the wings though, flying crocodiles would be too scary for me.

class Crocodile: Reptile {
  var legs = 4
}

As you might have noticed both Bird and Crocodile have a legs property. But if we were to create an application where somebody could pass any Animal they'd like and we'd try to make it walk we could do a check similar to this:

func walk(animal: Animal) {
  if let a = animal as? Bird {
    print("walking an animal with \(a.legs) legs")
  } else if let a = animal as? Crocodile {
    print("walking an animal with \(a.legs) legs")
  }
}

But this approach is prone to error because if we add a new animal with legs we will need to add a new section to our if statement to make sure that we allow that legged animal to walk. Not very developer friendly and basically a bug waiting to happen. We can do better than this by using protocols. Let's refactor the Bird and Crocodile to implement a LeggedAnimal protocol:

protocol LeggedAnimal {
  var legs: Int { get set }
}

class BetterBird: Animal, LeggedAnimal {
  var legs = 2
  var wings = 2
}

class BetterCrocodile: Reptile, LeggedAnimal {
  var legs = 4
}

All I did was define a protocol that forces implementers of that protocol to add a legs property to their object that can be get and set. That's exactly what Bird and Crocodile already did so all we need to do is tell the outside world that we have implemented the LeggedAnimal protocol. Now we can also refactor the walk function:

func betterWalk(animal: LeggedAnimal) {
  print("walking an animal with \(animal.legs) legs")
}

Now that we have a protocol we can just make sure that anything we pass to the function is an implementer of the protocol we just wrote. Much cleaner and a lot less error prone. If we add new animals we just need to make sure that we make them comply with the LeggedAnimal protocol if we want them to be able to walk.

Wrapping up

In my own programs I only started making more use of protocols recently. I usually use them to make completely unrelated things relate to each other just like we did with the LeggedAnimal example. It's a small protocols like this that allow for very flexible modeling and less worrying about subclasses and superclasses. Less inheritance usually means less unused code in classes and that's a good thing.

The only downside at this moment is that you still have to provide an implementation of the required properties and methods. In swift 2.0 this will change because then you will be able to provide a default implementation via protocol extensions. These extensions will allow for even more flexible, DRY and powerful code. I'm looking forward to using those in my projects soon.

You can get the example code from this blogpost from my GitHub.