Enforcing modular code with frameworks in Xcode

Every iOS developer I know dreams of writing code that’s DRY, modular, testable and reusable. While this is a great goal to strive for it’s often quite hard to write code that is completely modular. It just takes one oversight to blow most of the modularity you have achieved right out the window.

One technique that people use to make it easier to write modular code is to try and ensure that a certain part of their code, for instance the networking logic or their models, know nothing about other parts of the app. Again, a great idea but this isn’t really enforced by anything other than you and your team.

Wouldn’t it be great if there was a way to enforce this level of modularity automatically? Well, I have some great news for you. This is entirely possible and once I tried it for myself it was amazing how straightforward the solution actually is to implement. You can add multiple targets to your Xcode project. This can be used to turn certain parts of your code into frameworks which means that these parts of your code live in isolation from the rest of your code.

The outline of setting this up is as follows:
1. Identify code that should live in a framework
2. Add a new framework target to your project
3. Transfer relevant existing code to the framework target
4. Optional if you use Cocoapods: add dependencies to your new target
5. Write code independent from your app
6. Write tests for your framework
7. Use the framework in your app

We’ll go over each of these steps briefly so you get a good feel of how you can adopt this workflow in your own apps.

Identifying code for your framework

The first step to creating a framework is figuring out what code should live in the framework. It isn’t always obvious which parts of your app could be a framework and which parts can’t be. A good way to figure this out is to think about putting a group of files together in a folder. Can you find a couple of related classes that could happily be put together in a folder where they could only be aware of other classes in the same folder? If you can, it’s probably a good idea to put those files together in a framework.

Another way of finding code that could be better off in a framework is by looking at your code. Are there certain parts of your code that are littered throughout your project that would make changing certain things really hard? That could be a problem in the long run and it might very well be that you actually made some decisions along the way that have destroyed the modularity of your code. Moving some of this tightly coupled functionality into a framework could help you rethink the structure of this tight coupling and it could improve your code drastically.

Adding a framework target in Xcode

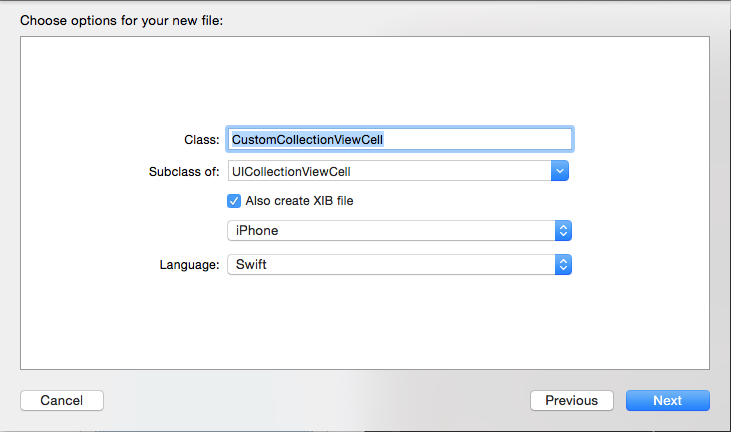
Once you have figured out which part of your app you want to put in a framework you need to add a new framework target in Xcode. The easiest way to do this is by going to your project’s settings by clicking on your project name in the Project navigator. Next, look for the + button at the bottom of the panel that lists your targets. This will present you with the same dialog that is presented when you create a new project. In the left sidebar pick the Framework & Library option and select Cocoa Touch Framework.

Now confirm your choice and create the framework by following the on screen steps. If you want to write tests for this target, which you should, make sure to select the Add Unit Tests checkbox. After creating your framework, it is automatically linked to your main app and two new folders were created. One for the framework and one the framework tests.

Adding code to your framework

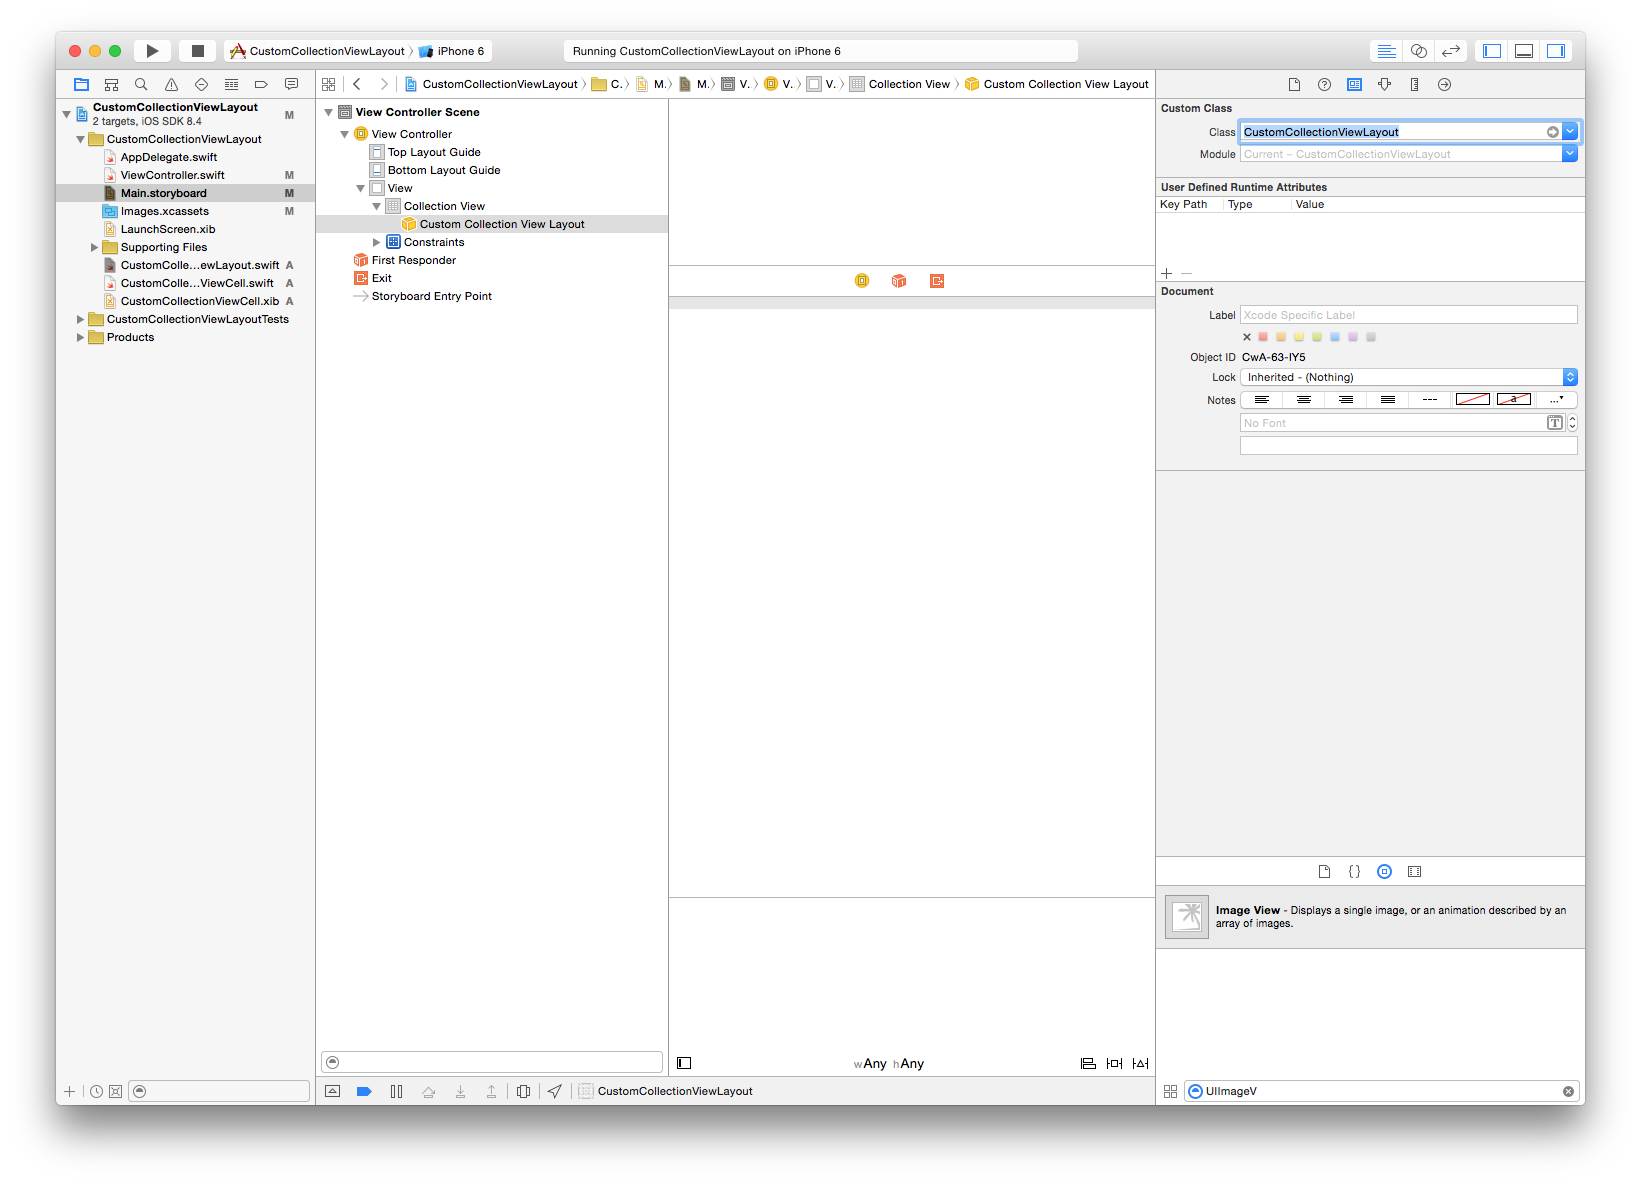
If you are transferring existing code to your framework, drag the files from your main project folder to the framework folder so your code is logically organised. Next, select the files you just transferred and open the sidebar on the right side of Xcode. Look for the Target Membership header in the File Inspector. You’ll see that the checkbox next to your app is checked. Uncheck this checkbox and check the one next to your framework’s name. This will link the code to your framework instead of your main app.

When you create new files, make sure that the Target Membership is set correctly. Usually Xcode is smart enough to see which folder is currently active and it will add the code to the correct target. It’s always a good idea to double check because you don’t want to go hunting for issues only to find out you forget to correctly set the target for your files.

Integrating with Cocoapods

There’s a good chance your framework has some dependencies. If you’re writing an API framework, you could have a dependency on Alamofire or maybe SwiftyJSON. Cocoapods only links to one framework at a time so your Podfile needs to be updated so it can handle your new framework target. Setting up a Podfile with multiple targets can be done with the following skeleton.

target 'MyApp' do
    PODS GO HERE
end

target 'MyFramework' do
    PODS GO HERE
end

This is very similar to the Podfile you probably already have, expect it has one more target; your framework. Cocoapods will set up your framework target just like it sets up your app, you don’t need to do anything special if you’re adding Cocoapods to a framework.

Writing code independent from your app

Now that you’re all set up, you can start writing your framework code. You do this the same way you’re used to except there is one major difference. In a framework, any code you want to expose to your main application should be marked as public. Code that isn’t marked as public is considered internal and can only be accessed by your framework. Code marked as private still works the same, it can only be accessed by code that lives in the same file.

The big upside of this is that your app can’t know more about the framework then it should. That’s already a big win in terms of modularity.

Writing tests for your framework

Because your tests can only access the public code in your API it’s wise to use your tests as the place where you develop and test your framework. By this I mean that your tests will be the first client that uses your framework. Developing your framework like this makes sure that your framework has great test coverage and you’re testing your framework in isolation from the rest of your app. This forces you to think about your framework instead of the entire app.

Using the framework in your app

Since Xcode has already linked your framework to your app, using your framework works just the same as using any other framework you’ve used. Any file that uses your framework needs to add an import for the framework at the top of the file and from that point out your framework is available to rest of your code.

In conclusion

As you’ve seen, adding your own frameworks to your project isn’t very complex and it forces you to think of your app in a different way. Instead of creating an app where any object can use and access almost any other object you’re creating an app and one or more frameworks. Each of the frameworks you create can function independent from the rest of your app. This means that you could eventually add the framework to other projects or even open source it if you’d like.

Testing your framework is also a lot easier because you know which parts of codes are the API that’s public and those should be the first parts you test. If all you write tests for is your public API, you know that using your framework should work as expected and intended before you even use it in your app.

The approach outlined in this post is especially useful if you only want to use your frameworks in a single app. Using them in multiple apps would require a slightly different approach because you would want the frameworks to live outside of your main project but the benefits and most steps should be very similar.

If you have any feedback, questions or want to discuss this post with men feel free to reach out on Twitter or in the ios developers slack channel

On variable naming when teaching

One of the hardest things a programmer has to do on a daily basis is naming things. Anything that we name will stay with us for a while and it's very likely that other programmers will have to use the thing we just named as well. So naming something properly is very important. It's often said that the two hardest problems in programming are naming things and cache invalidation. I tend to agree with that statement.

A lot of times when I struggled with a piece of code, naming could have made my struggle easier. A function name like fetchData might make sense at the time of writing. But a few weeks later you look at that code and you start wondering.. what data does that function fetch, exactly? Couldn't it have been named fetch just as well? I mean, the fact that it fetches data is implied. Or is it? Almost always there's room for discussion on the naming of things in code. However, that's not the point I want to make in this post. This post is about naming things in the context of tutorials and books. In other words, code snippets that have a teaching purpose.

When you write code that is intended or teaching you should make sure that you keep two things in mind.

  1. You want to get a certain point or concept across to the reader. The code should make this point as clear as possible.
  2. You want to stick to best practices so you're not teaching bad habits.

I have found that these two goals can easily be in conflict.

An example

Let me show you an example I have found in the Functional Swift book by the folks over at objc.io.

struct Times<T, U> {
    let fst: T
    let snd: U
}

These four lines won't look very scary to somebody who is familiar with Generics in Swift. They will know that T and U are just placeholders for types. Any value could go there, we could have defined them as A and B or Hello and World just as well. However, the best practice is that generic naming starts at T and seems to work it's way up through the alphabet from there. So that's why this snippet uses the T and U as type names for the generic portion of this struct. For beginners this might be confusing so you could argue that more descriptive type names would be better. For example, FirstType and SecondType are a lot clearer. They don't follow best practices though, so picking between the two can prove to be quite tough and in my opinion it depends on the point you're trying to get across. In the above snippet the concept of generics is already explained in previous chapters, so T and U are just fine in this snippet. If this snippet was about explaining generics it might have been better to help the reader out a little bit by breaking best practices for the sake of readability and introducing the proper way after explaining how generics work.

What does bother me about the way the Times struct is defined is the way fst and snd are named. The author chose to sacrifice readability in order to save a few keystrokes. In production code this happens all the the time. Loops like for u in users or [obj.name for obj in res] are not uncommon in Swift and Python. One might even argue that using short names like this is actually some sort of convention and while that might be true, if you're explaining something in code you do not want the reader to have a single doubt about what something does because of the name. For example, fst and snd in the Times struct could have been named first and second or left and right. A loop like for u in users could be for user in users. [obj.name for obj in res] could be clarified by writing [user.name for user in fetched_users]. These more verbose versions of code might not be fully in line with best practices or common in production code, but when you're using code to explain something you need to make sure that your code is as readable as possible.

In conclusion

Naming things is hard, there's no doubt about it. What might be clear one day could look like gibberish the next. What might be obvious to me could be nonsense to you. Conventions help ease the pain. If everybody uses the same rules for naming things it becomes a little bit easier for programmers to come up with good naming. However, we should not forget that people who read our code to learn more about a certain topic might not be fully aware of certain conventions. Or they might not be very good at understanding what i, j and k mean when we're nesting loops. And let's be honest, those single letter variables lack all kinds of meaning. Even though it's convention and we all do it, it's just not a good convention follow when teaching. At least not all of the time.

Next time you write code that's intended for explaining something, ask yourself if breaking a convention will make your snippet simpler or easier to follow. If the answer is yes, it just might be a good idea to break the convention and save your readers some brainpower.

Clean derived data from Xcode, the simple way

Update for Xcode 11:
Unfortunately, it appears that this method of cleaning derived data no longer works😕. Looks like we're stuck purging ~/Library/Developer/Xcode/DerivedData/ by hand again. If you do know of a workaround similar to the one described here, send me a tweet and I'll update this post!

Any iOS developer that has spent significant time with Xcode is familiar with at least a couple of it's caveats. Random crashes, slowness, autocomplete not working for a few seconds and build errors right after you've added or removed a library. Or, just a random appearance of 200+ warnings like I had just now. The solution for quite a few problems with Xcode's building process can be found in clearing out your derived data. In the past I would always fire up a new terminal window, type in something like open ~/Library/Developer/Xcode/DerivedData/ and then manually clearing out the folders I think aren't needed. But today I found out that Xcode has a built in fix-me button, right in your project organizer!

cleanup

All you have to do is go to the project organizer (window -> projects) click the button that's outlined and you're done. Any issues with your derived data should be cleaned up (for now) and your Xcode should stop complaining about silly things for a while now.

Happy coding!

Wrapping your callbacks in Promises

callbacks_promises

A little while ago I wrote a post about PromiseKit. In this post I wrote mainly about how you could wrap API calls in Promises using the NSURLConnection extension that the creator of PromiseKit provides. Since writing that article I've had a bunch of people asking me more about PromiseKit. More specifically, some people wanted to know how they could wrap their existing code in Promises. To illustrate this I'm going to use Parse as an example.

A regular save action in Parse

Before we start making Promises, let's have a look at how you'd normally do something with Parse. An example that any Parse user probably has seen before is one where we save a PFUser.

let user = PFUser()
user.email = email
user.password = password
user.username = email

user.signUpInBackgroundWithBlock {(succeeded: Bool, error: NSError?) -> Void in
    guard error == nil else {
        // handle the error
    }

    // handle the succesful save
}

Above code should be fairly straightfowards. First we create a user, then we call signUpInBackgroundWithBlock and then we specify the block that should be executed after the user has been signed up. A lot of Parse's save and fetch actions follow this pattern where you use callbacks as a means to handle success and error cases. In my previous post I explained that Promises are a cleaner method to deal with asynchronous operations, but wrapping something like signUpInBackgroundWithBlock in a Promise isn't very straightforward.

Creating a custom Promise

Setting up a Promise isn't very hard. What you're going to need to decide on in advance is what your Promise is going to return. After that you're going to need to figure out the conditions for a fulfilled Promise, and the conditions for a rejected Promise. How about a simple example?

func doSomething(willSucceed: Bool) -> Promise {
    return Promise { fulfill, reject in
        if(willSucceed) {
            fulfill("Hello world")
        } else {
            reject(NSError(domain: "Custom Domain", code: 0, userInfo: nil))
        }
    }
}

The function above returns a Promise for a String. When you create a Promise you get a fulfill and reject object. When you create your own Promise it's your responsibility to make sure that you call those objects when appropriate. The doSomething function receives a Bool this flags if the Promise in this example will succeed. In reality this should be dependent on if the action you're trying to perform succeeds. I'll show this in an example a little bit later. If we want this Promise to succeed we call fulfill and pass it a String because that's what our Promise is supposed to return when it's succesful. When the Promise should be rejected we call the reject function and pass it an ErrorType object. In this example I chose to create an NSError.

Now that we have explored a very basic, but not useful example, let's move on to actually wrapping a Parse call in a Promise.

Combining Parse and PromiseKit

When you're doing asynchronous operations in Parse you call functions like 'signUpUserInBackgroundWithBlock'. This function takes a callback that will be executed when the user has signed up for your service. Let's see how we can transform this callback oriented approach to a Promise oriented one.

func signUpUser(withName name: String, email: String, password: String) -> Promise {
    let user = PFUser()
    user.email = email
    user.password = password
    user.username = name

    return Promise { fulfill, reject in
        user.signUpInBackgroundWithBlock { (succeeded: Bool, error: NSError?) -> Void in
            guard error == nil else {
                reject(error)
                return
            }

            fulfill(succeeded)
        }
    }
}

In the example above a function is defined signUpUser, it takes some parameters that are used to set up a PFUser object and it returns a Promise. The next few lines set up the PFUser and then we create (and return) the Promise object. Inside of the Promise's body we call signUpInBackgroundWithBlock on the PFUser. The callback for this function isn't entirely avoidable because it's just how Parse works. So what we can do, is just use the callback to either call reject if there's an error or call fulfill when the operation succeeded.

That's all there is to it, not too complex right? It's basically wrapping the callback inside of a Promise and calling reject or fulfill based on the result of your Parse request. One last snippet to demonstrate how to use this new function? Sure, let's do it!

signUpUser(withName: "Donny", email: "[email protected]", password: "secret").then { succeeded in
    // promise was fulfilled! :D
}.error { error in
    // promise was rejected.. :(
}

The way this works is basically identical to how I described in my previous post. You call the function that returns a Promsie and use the then and error (report in an earlier PromiseKit release) to handle the results of the Promise.

Wrapping up

In this post I've showed you how to take something that takes a callback and wrap it in such a way that it becomes compatible with PromiseKit. The example was about Parse but this principle should apply to just about anything with a callback.

The only thing I didn't cover is where to actually implement this. I did that on purpose because it really depends on your architecture and partially on preference. You could opt to put the wrapping functions in a ViewModel. Or you could create some kind of Singleton mediator. Or maybe, and I think I prefer this method, you could write some extensions on the original objects to provide them with functions like saveUserInBackgroundWithPromise so you can actually call that function on a PFUser instance.

If you'd like to know more, have questions or have feedback, you can find me on Twitter or in the (amazing) iOS Developers Slack community.

Step up your async game with PromiseKit

Some of the most engaging apps we use today are apps that require network connectivity of some kind. They communicate with an API somewhere to fetch and store data for example. Or they use an API to search through a huge amount of data. The point is, you don't want your application to sit around and wait while an API call is happening. The same is true for a computing task that's heavy, for example resizing an image or storing it to disk. You want your UI to be snappy and fast. In other words, you don't want to do your heavy lifting on the main (UI) thread of a device.

Taking something off of the main thread

There's several ways to take something away from the main thread. An NSURLConnection automatically performs requests in the background and uses delegates to make callbacks about progress or completion for example. You can also use the dispatch_async function to make something happen on a different thread. While this works perfectly fine it's not very ideal. When an NSURLConnection performs it's delegate callbacks it has to be coupled to that delegate. Also, imagine you want to chain together a couple of network requests; it will start to become kind of messy to keep track of everything.

Now imagine an object that you can pass around, it will automatically perform a task once it's done what it's supposed to do. These tasks can be chained so if you want to chain multiple things together it's very simple. Or maybe you want your callback to fire only if a couple of tasks are complete. Imagine implementing that with multiple NSURLConnections. You would probably have multiple instances and whenever one is complete you check the status of the others and then when all are complete you can actually execute the code you've been meaning to execute. That sounds a lot more complicated than just writing:

wait(request1, request2, request3).then { (result1: NSData, result2: NSData, result3: NSData) in }

The above snippet is actually really close to how PromiseKit works. Let's explore that a bit further, shall we?

Note: I am going to apply PromiseKit to network requests for this post. The concepts actually apply to anything that you want to do asynchronously.

A simple Promise example

To demonstrate a simple Promise we'll make a network request. First we create an NSURLRequest that we'll pass to an NSURLConnection. Then we kick off the loading with a Promise so we can use the result once the request is done:

var req =  NSURLRequest(URL: NSURL(string: "http://example.com/api/feed/")!))
NSURLConnection.promise(req).then{ (data: NSDictionary) in
  // use the data we just received
}

PromiseKit has provided us with an extension on NSURLConnection that allows us to call promise(req:NSURLRequest) on it. After that we call then. The code that's inside of this closure gets called once the Promise is fulfilled. This happens whenever the request completed with success. If the request fails we can add a report ('catch' in swift 1.2) as well to make sure we catch that error:

var req =  NSURLRequest(URL: NSURL(string: "http://example.com/api/feed/")!))
NSURLConnection.promise(req).then{(data: NSDictionary) in
  // use the data we just received
}.report{ error in
  // do something with the error
}

And if there's code we want to execute regardless of error or success we can use ensure (defer in swift 1.2) like this:

var req =  NSURLRequest(URL: NSURL(string: "http://example.com/api/feed/")!))
NSURLConnection.promise(req).then{ (data: NSDictionary) in
  // use the data we just received
}.report{ error in
  // do something with the error
}.ensure{
  // perform action regardless of result
}

If you understand this, you basically understand all you need to know to start using Promises in a very basic way. But let's get a little bit more advanced and start returning our own Promise objects.

Returning Promises

Imagine this, we're building an application that uses an API. We want to ask the API for a user's feed and we want to use PromiseKit for this. A nice implementation might be to have an API instance that has a method on it called fetchUserFeed. That method will return a Promise so we can easily use the result from the API in the class that actually wants the API to fetch data, a ViewModel for example. The fetchUserFeed function might look something like this:

func fetchUserFeed() -> Promise<Feed>
  var req =  NSURLRequest(URL: NSURL(string: "http://example.com/api/feed/")!))
  return NSURLConnection.promise(req).then{(data: NSDictionary) -> Feed in
    return Feed(dataDict: data)
  }
}

Note: Feed is a just a data object not included in the sample for brevity. It is used to illustrate how you would return something from a Promise

The function above is very similar to what we had before except now it returns NSURLConnection.promise which is a Promise. The then of that Promise now returns a Feed and the fetchUserFeed function now returns Promise<Feed>. What this means is that fetchUserFeed now returns a Promise that will resolve with a Feed. So if we use this function it looks like this:

let api = DWApi()
api.fetchUserFeed().then{ feed in 
  // use the feed
}

That's pretty clean, right? Now let's say that we not only want to fetch the Feed but also a user's Profile. And we want to wait until both of these requests are done (and successful). We can use the when function for that:

let api = DWApi()
when(api.fetchUserFeed(), api.fetchUserInfo()).then {feed, info in 
  // both requests succeeded, time to use the feed and info
}.report { error in
  // one or both of the requests have failed
}

Let's make this this a little bit more complicated shall we? Currently we're able to use an API to fetch stuff, and we're able to do multiple requests and wait until they're all complete. Now we're going to wrap that into a function we can call from somewhere else. The function will return a single object that uses both a Feed and UserInfo to create itself. Let's call it ProfileModel.

func fetchProfileModel() -> Promise<ProfileModel> {
  let api = DWApi()
  return when(api.fetchUserFeed(), api.fetchUserInfo()).then {(feed: Feed, info: UserInfo) -> ProfileModel in 
    return ProfileModel(feed: feed, info: info)
  }
}

And when we want to use this function we would write something like this:

let viewModel = DWViewModel()
viewModel.fetchProfileModel().then{ profileModel in 
  // use profile model
}.report { error in
  // handle errors
}

That's pretty cool isn't it? Pretty complicated logic wrapped in promises to make it simple and enjoyable again.

Wrapping it up

In this post we've touched up on the basics of PromiseKit, a library that makes asynchronous programming cleaner and easier. I've shown you how to use them in a very simple and basic setting and in a situation where you wait for multiple operations/promises and return a single promise with both results. Promises can help you to build a very clean API for your async operations and they help you to keep your code clean and readable. I highly suggest to try using promises in your own projects, they're really cool and easy to use. To find out more about PromiseKit you should check out their github.

If you have questions or feedback for me on this subject make sure to hit me up on Twitter or look for me in the ios-developers slack community.

Why you should avoid force unwrapping in Swift

Whenever I'm programming, I have a goal in mind, generally a problem to solve. I want my solutions to be simple, yet elegant and reliable. Thankfully, Swift is a great language for this. The language is safe, its syntax is beautiful with great readability. The way Swift handles nullability with Optional contributes greatly to its safety. Can you imagine having a language where you don't know whether something could be nil? Well... languages like Objective-C and Java required developers to constantly check for null or nil values to prevent crashes.

I'm sure you can imagine that this would go wrong all the time and if you Google for a term like null pointer exception you'll hit loads of results.

Null pointer exceptions are a class or errors that Swift has completely eliminated by having Optional as a type. So let's dig into Optional a bit, and see why that tempting ! operator is so dangerous, shall we?

If you want to declare a variable in Swift you can use either the let or var keyword. If you don't want to assign a value to one of your properties right away you could write something like var episodeName: String? or var episeodeName: Optional<String> (these are equivalent; the former is syntactic sugar for the latter).

This informs the Swift compiler that episodeName might not have a value when we're accessing it. If we don't add the question mark and write var episodeName: String, the episodeName will need to be assigned a value when we initialize the object that contains this property. A third way to declare episodeName is to implicitly unwrap the value: var episodeName: String!. This tells the compiler that the value might be nil after initialization but we are 100% sure that episodeName will get a value before we attempt to access it.

These question mark / exclamation mark semantics also apply to using variables in your code. When you've declared your variable with a questionmark (var episodeName: String?) we are never sure if episodeName is nil or a String. So whenever we want to use this variable we need to unwrap it. The safest way to do this is as follows:

// if let
if let episodeName {
    println(episodeName) // prints episodeName's value
}

// or guard...
guard let episodeName else {
  // episodeName is nil
  return
}

print(episodeName)

However, if you're 100% sure you've set a value, you can tell the Swift compiler that you don't want to explicitly unwrap your value because you know what you're doing and you just want to get your episode’s name by forcing an unwrap:

println(episodeName!)

By adding the exclamation mark after episodeName, we force unwrap it and we can use it's value straight away without an extra if or guard statement. Sounds great, right?

Well.. not quite!

Where's the danger?

If you're writing an application you're sometimes sure that you assign a value to something. For example, you might have written something like:

var show = TVShow()
show.episodeName = apiData.name
show.printEpisodeName()

This code should usually be safe. Before we ask the show for it's episodeName we actually set it so we're always sure that episodeName has a value before we access it. So the implementation of printEpisodeName might be:

func printEpisodeName() {
    println(episodeName!)
}

This shouldn’t crash when we run it. After all, we know what we're doing! We always set the episodeName right after we instantiate our class. What could go wrong, right? Well... besides the fact that we probably should have created an initializer that takes the episodeName, a lot can go wrong.

But then your project matures...

So, our project has been ongoing for a few weeks and we're changing the API. Before, we were guaranteed that the API would always return properly formatted JSON but we've decided that things like the name for an episode isn't guaranteed anymore. In other words, the name can be nil.
We test our app, everything still works when we're navigation to our show page so we're happy. But then.. crash reports come in. Users are livid and to add insult to injury, your manager is suddenly at your desk "What's going on" they ask. The app is crashing. Hard.

What's going on!? Everything was fine before! So we start searching and debugging. And once we manage to reproduce the crash we see what's going on:

Unexpectedly found nil while unwrapping an optional value

And then we remember. The forcefully unwrapped optional in our TVShow class:

func printEpisodeName() {
    println(episodeName!)
}

When we set the episodeName on our tv show, the name we get from the API can be nil. And that's alright because we declared our episodeName like this: var episodeName: String?. Which means that episodeName can be either nil or a String. Luckily, our bug is easily fixed:

func printEpisodeName() {
    if let episodeName {
        println(episodeName)
    } else {
        println("model id is nil")
    }
}

Now we handle the optional value properly, we avoid crashes and an angry manager. Time to get yourself a cup of coffee and tell your manager that you've fixed the error.

In Summary

As we saw in this post it can be tempting to force the unwrappin of a variable when we're pretty sure that we will set it before we use it. But as requirements change it can be easy to overlook situations where a variable can suddenly be nil when we try to access it.

My advice is to (almost) always unwrap optionals properly with an if let or guard let construction. It's the only way to be 100% sure that you're not accidentally accessing a variable whose value is actually nil. More importantly, this will help to prevent future crashes.

So remember kids, always unwrap your optionals in a safe way.

High performance shadows for UIView

No app is truly complete without some subtle shadows. Especially now that Google's Material Design is showing us that shadows are cool again we need a way to properly add them in our apps. In my previous post I wrote about a way to create a custom UICollectionView layout. There was one problem with that post though, that shadows are incredibly heavy on the iPhone and scrolling stutters.

So can we fix this? The answer is yes and the solution is (surprisingly) easy. A Google search led me to this Stackoverflow question about shadows. The solution I tried first was to simple rasterize my layer but that wasn't what I was looking for. Images started to look very bad and I didn't want that. Another solution that was proposed is to supply the layer with a shadowPath.

What is shadowPath and what does it do?

If you set the shadowPath property it will function as a guide to the shadow that ends up underneath your view. If you don't set this, the view need to be analyzed at runtime to determine where the view is transparent and where it isn't which will result in the eventual shadow shape. This is a pretty costly operation, especially if you do this for about 20 views at a time in a UICollectionView. And even more so if you start scrolling in this view.

Implementing shadowPath

Assuming we're using the code from my previous post there isn't much we have to do. We have to create a circular path that has the same size as the imageView. We know that our imageView get's rendered at 80px by 80px so we can use UIBezierPath with rounded corners to generate a circular path. Let's add this line before we specify the shadows in the CustomCollectionViewCell class:

layer.shadowPath = UIBezierPath(roundedRect: CGRectMake(0, 0, 80, 80), cornerRadius: 40).CGPath

Build and run the project and you should now see butter smooth scrolling instead of the bad scrolling we had before.

Summary

If you want to use shadows on your views then you should probably also set the shadowPath on your view to ensure proper performance. By doing this you can speed up rendering a great deal because otherwise the view will be analyzed at runtime to find out what shape the view has, this is a lot slower than just providing the proper shadow path. Setting the path does not only increase performance but it also allows you to create many fun effects with shadows.

Creating a custom UICollectionViewLayout in Swift

Note:
This blog post has been updated for Xcode 11 and Swift 5 👍🏼
If you’re looking to learn more about the new collection view layout techniques that were introduced in iOS 13, this post should contain everything you need.

If you've ever built an iOS app that uses some kind of grid layout or displays a list in a way that doesn't fit a UITableView you have probably used a UICollectionView. This component allows for very simple grid layout creation and it even allows you to dynamically change layouts with beautiful animations. UICollectionView becomes even more powerful and flexible if you create your own layout by subclassing UICollectionViewLayout.

Recently I had to build a kind of playful, almost grid-like layout. To me, this seemed like the best time to dive straight into subclassing UICollectionViewLayout and create a nice layout. In this post, I will explain how I did it and I'll provide you with a little bit of code so you can start building your own layouts in no-time.

The end result

Since I'm a great fan of cats, we'll be building a collection of cat images. The images will be rounded, they'll have a nice shadow so they look kind of nice and the magic bit is, of course, the slightly offset rows that are provided by the custom UICollectionViewLayout.

Schermafbeelding 2015-07-07 om 20.57.24

The image above illustrates what we'll end up with when we're done. It's quite something, isn't it?

Creating your custom layout

Before we get to build our layout we have to do some set up. Create a new Xcode project and use the Single View Application template. I named my project "CustomCollectionViewLayout" because I'm not very good at coming up with clever names. You can name your project anything you like. Make sure that you pick Storyboard for the layout, we won't be using SwiftUI in this post.

Step one: setting up the interface

Creating the UICollectionView

The first thing you should do is open up the Main.storyboard and drag a UICollectionView out to your View Controller. When you've done this give the collection view a white background color and add constraints to it so it will fit your view nicely. If you're unsure how to do this, size the collection view so that it touches the left, bottom and right edges of the view and it should be aligned underneath the status bar. XCode should provide you with some helpful guides for this. Once your view is sized like this, click in the bottom right corner of your canvas and choose Reset to suggested constraints.

Schermafbeelding 2015-07-07 om 21.07.21

Next, we should connect the collection view to our ViewController class. Open up the assistant editor by pressing the two overlapping circles in your XCode window and make sure that the editor is set automatically use an appropriate file.

Schermafbeelding 2015-07-07 om 21.25.52

Select the UICollectionView, hold ctrl and drag over to the code editor to create an outlet for the UICollectionView. I named mine "collectionView". That's all the setup we need for now.

Creating a UICollectionViewCell

To display our cat images we need to have a UICollectionViewCell with an image inside of it. To do this we can simply create our own UICollectionViewCell and put a UIImageView inside of it.

First, create a new CocoaTouch Class (either press cmd+n or by navigating through the file menu). Name your file CustomCollectionViewCell, make it subclass UICollectionViewCell and check "Also create xib file".

Schermafbeelding 2015-07-07 om 21.14.25

XCode should have created a .swift and .xib file for you. Let's open up the .xib file first and then press the assistant editor button so we have both the .xib and .swift file open at the same time. Drag a UIImageView out into your custom cell and size it so that it fills up the cell exactly. Since we'll be resizing the cell later we should "Reset to suggested constraints" again, just like we did with the UICollectionView earlier. Now select the image, press and hold ctrl and then drag to your swift file to create an outlet for the imageView. I named mine "imageView".

Our example image had rounded corners and a shadow applied so let's write some code to make this happen. All you need is a few lines inside awakeFromNib().

override func awakeFromNib() {
  imageView.layer.cornerRadius = 40
  imageView.clipsToBounds = true
  
  layer.shadowColor = UIColor.black.cgColor
  layer.shadowOffset = CGSize(width: 0, height: 2)
  layer.shadowRadius = 2
  layer.shadowOpacity = 0.8
}

This code is fairly straightforward. First, we apply rounded corners to our imageView. Then we apply a shadow to the cell itself. You can tweak the numbers to change how the cell looks. Did you notice the magic number 40? In an actual app, you might want to find a better solution for this because 40 is half of the cell's eventual size but there's no way to know that unless you came up with all the sizings yourself.

The last thing we have to do is register this custom cell to our UICollectionView. We created an IBOutlet for the UICollectionView earlier by ctrl+dragging from the UICollectionView to the ViewController. Open up ViewController.swift  and add this line to the viewDidLoad method:

collectionView.register(UINib(nibName: "CustomCollectionViewCell", bundle: nil), forCellWithReuseIdentifier:cellIdentifier)

We're using a cellIdentifier  variable here, let's define that as well. Place this code right below your collectionView  outlet:

private let cellIdentifier = "collectionCell"

Allright, that's all. Our UI is fully prepared now. The code you've added to ViewController.swift  should look like this:

@IBOutlet weak var collectionView: UICollectionView!
    
private let cellIdentifier = "collectionCell"

override func viewDidLoad() {
    super.viewDidLoad()
        
    collectionView.register(UINib(nibName: "CustomCollectionViewCell", bundle: nil), forCellWithReuseIdentifier:cellIdentifier)
}

Step two: setting up the UICollectionView dataSource

To get our UICollectionView to display our collection of cat pictures we will need to make sure our UICollectionView knows where to go for its data. To do this, select the connections inspector in the right drawer of XCode and drag the dataSource connector to the ViewController class.

To actually implement the dataSource we should make our ViewController  comply to the UICollectionViewDataSource  protocol. Open up ViewController.swift  and change it's class definition to this:

class ViewController: UIViewController, UICollectionViewDataSource

By adding UICollectionViewDataSource  after the superclass we tell Swift that this class implements the UICollectionViewDataSource protocol. This protocol dictates that we should at least provide our UICollectionView with:

  • the amount of sections it should contain
  • the amount of items there are in each sections
  • cells to display

The following code takes care of all this:

func numberOfSectionsInCollectionView(collectionView: UICollectionView) -> Int {
  return 1
}

func collectionView(_ collectionView: UICollectionView, numberOfItemsInSection section: Int) -> Int {
  return 50
}

func collectionView(_ collectionView: UICollectionView, cellForItemAt indexPath: IndexPath) -> UICollectionViewCell {
  let cell = collectionView.dequeueReusableCell(withReuseIdentifier: cellIdentifier, for: indexPath) as! CustomCollectionViewCell
  
  cell.imageView.image = UIImage(named: "cat_\(indexPath.row%10)")
  
  return cell
}

The collection view will contain a single section with 50 items. Our cell creation code is also fairly straightforward, we dequeue the cell that we've registered before and we forcefully cast it to be a CustomCollectionViewCell. Then we set the imageView.image to one of the cat images you've added to the project earlier. I only added 10 images so I reuse them. To use the next code snippet in your own project, you should add 10 images to your Images.xcassets and name them cat_0.jpg - cat_9.jpg.

If we were to run our app now we'd end up with something like this:

Schermafbeelding 2015-07-07 om 21.42.30

Not quite what we wanted.. but don't worry, we're going to implement our custom layout right now!

Step three: implementing the custom layout

Now that we're all set up it's time to get to hard part; the custom layout! First, create a now Cocoa Touch Class and call it "CustomCollectionViewLayout". It should subclass UICollectionViewFlowLayout. To avoid many small chunks of code I've grouped together some code in sensible groups, I'll show you code first and then explain what it does right after that. Here's the first chunk:

let itemWidth: CGFloat = 80
let itemSpacing: CGFloat = 15
var layoutInfo = [IndexPath: UICollectionViewLayoutAttributes]()
var maxXPos: CGFloat = 0

override init() {
  super.init()
  setup()
}

required init?(coder aDecoder: NSCoder) {
  super.init(coder: aDecoder)
  setup()
}

func setup() {
  // setting up some inherited values
  self.itemSize = CGSize(width: itemWidth, height: itemWidth)
  self.minimumInteritemSpacing = itemSpacing
  self.minimumLineSpacing = itemSpacing
  self.scrollDirection = .horizontal
}

This first section is responsible for the initial setup. It sets up some sizing values (remember that magic number 40 in our cell?) and it creates an array that we'll use to store our layout in. When you're creating a collection view that changes often or contains a lot of items you might not want to use this technique but since we have a relatively small collection that doesn't change often we can cache our entire layout. There's also a variable to hold the maxXPos , we'll use that to calculate the collectionView's content size later. In the setup() function we configure the layout, these properties are inherited from the UICollectionViewFlowLayout and allow us to set up spacings and a scrollDirection. In this case we're not really using the spacings but I think it's good practice to set them up anyway.

override func prepare() {
  layoutInfo = [IndexPath: UICollectionViewLayoutAttributes]()
  for i in (0..<(self.collectionView?.numberOfItems(inSection: 0) ?? 0)) {
    let indexPath = IndexPath(row: i, section: 0)
    let itemAttributes = UICollectionViewLayoutAttributes(forCellWith: indexPath)
    itemAttributes.frame = frameForItemAtIndexPath(indexPath)
    if itemAttributes.frame.origin.x > maxXPos {
      maxXPos = itemAttributes.frame.origin.x
    }
    layoutInfo[indexPath] = itemAttributes
  }
}

func frameForItemAtIndexPath(_ indexPath: IndexPath) -> CGRect {
  let maxHeight = self.collectionView!.frame.height - 20
  let numRows = floor((maxHeight+self.minimumLineSpacing)/(itemWidth+self.minimumLineSpacing))
  
  let currentColumn = floor(CGFloat(indexPath.row)/numRows)
  let currentRow = CGFloat(indexPath.row).truncatingRemainder(dividingBy: numRows)
  
  let xPos = currentRow.truncatingRemainder(dividingBy: 2) == 0 ? currentColumn*(itemWidth+self.minimumInteritemSpacing) : currentColumn*(itemWidth+self.minimumInteritemSpacing)+itemWidth*0.25
  let yPos = currentRow*(itemWidth+self.minimumLineSpacing)+10

  return CGRect(x: xPos, y: yPos, width: itemWidth, height: itemWidth)
}

This piece of code comes after our initial setup, it overrides the prepareLayout  function which is called before the cells are actually going to need their layout. This allows us to pre-calculate our entire layout. Which is exactly what we want to do for this use case. There's a loop inside this function that uses the collectionView.numberOfItemsInSection function to find out how many items it is going to display. It then initializes layoutAttributes for the item at the current NSIndexPath and it calls frameForItemAtIndexPath. To calculate the item's frame. Next up is a check to determine of the x position for this item is the largest x position in our collection and then it stores the itemAttributes in our layout cache.

The frameForItemAtIndexPath function uses the height of our collectionView to determine the amount of cells it can fit into a single column, then it determines how many rows there will be in our collection and based on that it calculates the x and y position for the item. Every other item will be offset somewhat to the right, we use the % operator and a ternary for that. If currentRow % 2 == 0 the xPos is equal to currentColumn(itemWidth+self.minimumInteritemSpacing), otherwise it will be equal to currentColumn(itemWidth+self.minimumInteritemSpacing)+itemWidth*0.25. And finally we return a CGRect with the correct size and position values.

This last snippet of code actually provides our collection with the layout:

override func layoutAttributesForItem(at indexPath: IndexPath) -> UICollectionViewLayoutAttributes? {
  return layoutInfo[indexPath]
}

override func layoutAttributesForElements(in rect: CGRect) -> [UICollectionViewLayoutAttributes]? {
  var allAttributes: [UICollectionViewLayoutAttributes] = [UICollectionViewLayoutAttributes]()
  
  for (_, attributes) in layoutInfo {
    if rect.intersects(attributes.frame) {
      allAttributes.append(attributes)
    }
  }
  
  return allAttributes
}

override var collectionViewContentSize: CGSize {
  let collectionViewHeight = self.collectionView!.frame.height
  let contentWidth: CGFloat = maxXPos + itemWidth
  
  return CGSize(width: contentWidth, height: collectionViewHeight)
}

The first method, layoutAttributesForItemAtIndexPath simply returns the layout attributes that belong to the passed IndexPath. Fairly straightforward. Next, we have layoutAttributesForElementsInRect. This method is somewhat more complex because we get passed a CGRect and we have to determine which items are inside of that area. To do this we loop over our layoutInfo object, we compare the rects and we return all intersecting items.

Finally, we calculate the collectionView's contentSize. The contentWidth is equal to our maxXPos + itemWidth and the height is the same as the collectionView's height.

Step four: using the custom layout

The final step in this tutorial is to actually make the UICollectionView use our custom layout. To make this happen, select the Collection View Flow Layout object that is associated with your UICollectionView in your Main.storyboard and change it's class to CustomCollectionViewLayout.

Schermafbeelding 2015-07-07 om 22.14.33

Now build and run your app, you should see something like the image I showed you at the beginning of this post.

borat_great_success

In conclusion

I hope this post is helpful to some of you out there. I had a lot of fun today figuring out how to do this myself and I figured there's probably more people out there who are looking for cool ways to implement UICollectionView and use custom layouts.

If you want to learn more about collection view layouts, check out my post called Using compositional collection view layouts in iOS 13.

The code for this project can be found on GitHub and if you want to reach out to me, I'm on Twitter.

Find every other element in an array with Swift

There are times when you need to extract a subset of an array. For example, you might need to find all elements in an array at an odd index. Or maybe you need all items at an even index. In other words, you're looking for every "other" element in an array. This might seem like a non-trivial task and you may have tried this before using a for loop as follows:

var itemsAtEvenIndices = [Int]()
let allItems = [1, 2, 3, 4, 5, 6, 7]

var index = 0
for item in allItems {
  if index % 2 == 0 {
    itemsAtEvenIndices.append(item)
  }
  index += 1
}

This isn't a bad approach, but we can do better. A slightly nicer way would be to use the enumerated() method that is defined on Sequence:

var itemsAtEvenIndices = [Int]()
let allItems = [1, 2, 3, 4, 5, 6, 7]

for (index, item) in allItems.enumerated() {
  if index.isMultiple(of: 2) {
    itemsAtEvenIndices.append(item)
  }
}

This works and saves you some bookkeeping because you don't have to increment the index in every iteration of the loop but you still have to define a mutable array that you append items to. Let's take a look at one last way to extract all items at even indices without any mutable arrays and without unneeded bookkeeping:

let allItems = [1, 2, 3, 4, 5, 6, 7]
let itemsAtEvenIndices = allItems.enumerated().compactMap { tuple in
  tuple.offset.isMultiple(of: 2) ? tuple.element : nil
}

The code above uses compactMap to transform tuples of (offset: Int, element: Int) into an array of [Int]. Since compactMap filters out all nil values and only keeps the Int values, we can use a ternary statement that checks whether tuple.offset.isMultiple(of: 2) is true. If it is, we return tuple.element and if it isn't, we return nil. The end result is the same as the previous two examples except it's cleaner and doesn't involve any mutable state, or intermediate variables.

If you want to learn more about compactMap, check out the following post I wrote: When to use map, flatMap and compactMap. If you have any questions, feedback, or just want to get in touch. Don't hesitate to reach out to me on Twitter.

Special thanks to Bas Broek for pointing out that tuple.offset.isMultiple(of: 2) is maybe a bit nicer than tuple.offset % 2 == 0.

Exploring protocols and protocol extensions in Swift

In 2015 Apple announced Protocol extensions at WWDC and went on to explain the idea of Protocol Oriented Programming (video here), I think every iOS developer got really exited when they saw this.

The ability to add default implementations to protocol methods through extensions makes it seem like everything we will ever build can and should be protocol based instead of inheritance based like we do in classical OOP. In this post, we'll explore protocols and protocol extensions to see what we can make them do.

Taking advantage of Protocols today

To take advantage of the awesomeness of Protocols we could think of a Protocol as a mixin more than an interface. I've seen people compare Protocols to interfaces in, for instance, Java. While they are similar they will become quite different once we get to use protocol extensions.

If we can provide default implementations for our Protocol methods we should look at Protocol as little mixins of functionality that can be used to enhance existing types. Mixins are not exactly new in programming and if you look at functional programming mixins are considered pretty important. The cool thing about a mixin (or Protocol) driven approach is that it avoids complex, confusing and inflexible class hierarchies. Instead you can provide multiple Protocols, or mixins, to compile an object with. By doing this, the object will be very explicit about what it can and can't do and the object type itself won't matter throughout your code. What does matter throughout your code is the fact that an object contains certain functionality. And to make sure that an object has certain functionality it conforms to a protocol you wrote. Since this could be pretty confusing if you don't use Protocol oriented programming yet, or if you've never heard of mixin based programming (or even Python's multiple inheritance model), we should probably look at an example now.

An example

So let's imagine that we're mapping out some part of the animal kingdom, let's start with an Animal class. This class will only contain the name of the animal and it's size:

class Animal {
  var name: String?
  var size: AnimalSize?
}

A subclass of animal will be Bird. A Bird will have an amount of legs and it will have a number of wings:

class Bird: Animal {
  var legs = 2
  var wings = 2
}

Now we'll also create a Reptile class which will have a favoriteTemperature property so we know when the Reptile will be nice and comfortable.

class Reptile: Animal {
  var favoriteTemperature = 37.0
}

A subclass of Reptile is a Crocodile, technically this is probably very incorrect, but that's okay, in our imaginary animal kingdom anything goes. The Crocodile will get a number of legs property, just like the bird. It won't get the wings though, flying crocodiles would be too scary for me.

class Crocodile: Reptile {
  var legs = 4
}

As you might have noticed both Bird and Crocodile have a legs property. But if we were to create an application where somebody could pass any Animal they'd like and we'd try to make it walk we could do a check similar to this:

func walk(animal: Animal) {
  if let a = animal as? Bird {
    print("walking an animal with \(a.legs) legs")
  } else if let a = animal as? Crocodile {
    print("walking an animal with \(a.legs) legs")
  }
}

But this approach is prone to error because if we add a new animal with legs we will need to add a new section to our if statement to make sure that we allow that legged animal to walk. Not very developer friendly and basically a bug waiting to happen. We can do better than this by using protocols. Let's refactor the Bird and Crocodile to implement a LeggedAnimal protocol:

protocol LeggedAnimal {
  var legs: Int { get set }
}

class BetterBird: Animal, LeggedAnimal {
  var legs = 2
  var wings = 2
}

class BetterCrocodile: Reptile, LeggedAnimal {
  var legs = 4
}

All I did was define a protocol that forces implementers of that protocol to add a legs property to their object that can be get and set. That's exactly what Bird and Crocodile already did so all we need to do is tell the outside world that we have implemented the LeggedAnimal protocol. Now we can also refactor the walk function:

func betterWalk(animal: LeggedAnimal) {
  print("walking an animal with \(animal.legs) legs")
}

Now that we have a protocol we can just make sure that anything we pass to the function is an implementer of the protocol we just wrote. Much cleaner and a lot less error prone. If we add new animals we just need to make sure that we make them comply with the LeggedAnimal protocol if we want them to be able to walk.

Wrapping up

In my own programs I only started making more use of protocols recently. I usually use them to make completely unrelated things relate to each other just like we did with the LeggedAnimal example. It's a small protocols like this that allow for very flexible modeling and less worrying about subclasses and superclasses. Less inheritance usually means less unused code in classes and that's a good thing.

The only downside at this moment is that you still have to provide an implementation of the required properties and methods. In swift 2.0 this will change because then you will be able to provide a default implementation via protocol extensions. These extensions will allow for even more flexible, DRY and powerful code. I'm looking forward to using those in my projects soon.

You can get the example code from this blogpost from my GitHub.