Using Core Data with SwiftUI 2.0 and Xcode 12
Published on: July 20, 2020Updated on: September 30, 2020
In Xcode 12 you can create projects that no longer use an AppDelegate and SceneDelegate to manage the application lifecycle. Instead, we can use Swift's new @main annotation to turn a struct that conforms to the App protocol into the main entry point for our applications.
When you create a new project in Xcode 12, you have the option to use the SwiftUI App application lifecycle for your SwiftUI project.
While Xcode 12 beta 5 introduces an option to include Core Data in your SwiftUI application when you create a new project, you might have an existing SwiftUI project that doesn't use Core Data. Alternatively, you might just be curious how you could manually integrate Core Data in a SwiftUI project since there is nothing magic about the new Core Data template provided by Apple.
Adding Core Data to a SwiftUI project just takes two small steps:
- Add a Core Data model file to your project
- Initialize an
NSPersistentContainer
Adding a Core Data model file to your project
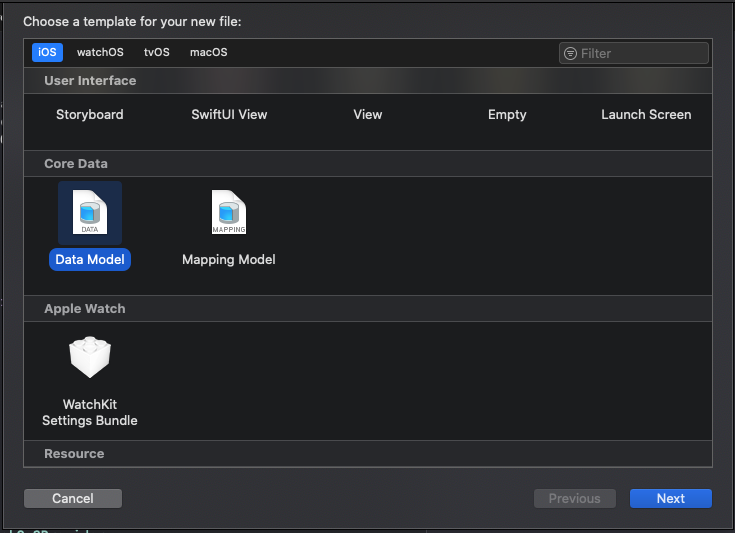
To add a new Core Data model file to your project select File -> New -> File (cmd + N) and select Data Model from the Core Data section in the file type picker.
After selecting this, pick a name for your model. The default that Xcode used to pick is the name of your project but you can choose any name you want.
I personally usually go with the name of my project for no reason other than it feeling familiar since it's the default name Xcode would have chosen in older Xcode versions. Currently, the default name Xcode would pick for you is Model which is a perfectly fine name too.
And that's all there is to it. Your Core Data model file is now added to your project and available to use by an NSPersistentContainer.
Initializing an NSPersistentContainer
Since iOS 10, the recommended way to use and manage a Core Data stack is through NSPersistentContainer. When Xcode generates a Core Data implementation for you, it uses an NSPersistentContainer too. You can initialize an NSPersistentContainer anywhere you want. I will show you how to initialize it as a property in your App struct, but you could just as well initialize the NSPersistentContainer in a dedicated data source object. I would recommend against initializing your NSPersistentContainer from within a View, but it's possible. Keep in mind that you should only load your container once though.
Let's look at the code needed to instantiate an NSPersistentContainer:
struct MyApplication: App {
  let persistentContainer: NSPersistentContainer = {
      let container = NSPersistentContainer(name: "MyApplication")
      container.loadPersistentStores(completionHandler: { (storeDescription, error) in
          if let error = error as NSError? {
              fatalError("Unresolved error \(error), \(error.userInfo)")
          }
      })
      return container
  }()

  var body: some Scene {
    WindowGroup {
      Text("Hello, World!")
    }
  }
}
All you have to do when initializing a persistent container is tell it which model file to load by passing the model name to the initializer, and then call loadPersistentStores on your container instance. After doing this your Core Data stack is initialized and ready to go. From here you can insert the container's viewContext into your app's environment using the @Environment property wrapper in your View, or you can pass it around in other ways.
Remember that you don't have to initialize your persistent container in your App struct. You could also create a PersistenceManager object for example:
class PersistenceManager {
  let persistentContainer: NSPersistentContainer = {
      let container = NSPersistentContainer(name: "MyApplication")
      container.loadPersistentStores(completionHandler: { (storeDescription, error) in
          if let error = error as NSError? {
              fatalError("Unresolved error \(error), \(error.userInfo)")
          }
      })
      return container
  }()
}

struct MyApplication: App {
  let persistence = PersistenceManager()

  var body: some Scene {
    WindowGroup {
      Text("Hello, World!")
    }
  }
}
This would work perfectly fine.
The old version of the Core Data stack generated in your AppDelegate contains one extra feature which is to automatically save any changes when your application goes to the background. You can mimic this behavior by listening for the UIApplication.willResignActiveNotification on NotificationCenter.default.
Note that this auto-save feature is also missing from Apple's new Core Data template for SwiftUI applications.
Unfortunately, I haven't found a way yet to subscribe to this notification from within the App struct because it's a struct and using the closure based listener complains that I capture a mutating self parameter when I access persistentContainer.
The easiest way to work around this is to subscribe within a specialized PersistenceManager like the one I showed you earlier:
class PersistenceManager {
  let persistentContainer: NSPersistentContainer = {
      let container = NSPersistentContainer(name: "MyApplication")
      container.loadPersistentStores(completionHandler: { (storeDescription, error) in
          if let error = error as NSError? {
              fatalError("Unresolved error \(error), \(error.userInfo)")
          }
      })
      return container
  }()

  init() {
    let center = NotificationCenter.default
    let notification = UIApplication.willResignActiveNotification

    center.addObserver(forName: notification, object: nil, queue: nil) { [weak self] _ in
      guard let self = self else { return }

      if self.persistentContainer.viewContext.hasChanges {
        try? self.persistentContainer.viewContext.save()
      }
    }
  }
}
And with that, you should have all the information needed to start using Core Data in your SwiftUI 2.0 applications
In Summary
In this week's post I showed you how you can initialize Core Data from anywhere in your app, allowing you to use it with SwiftUI 2.0's new application lifecycle.
You saw that all you need to do add Core Data to your app, is creating a model file, and initializing an NSPersistentContainer object. This works from anywhere in your app, including apps that use the old AppDelegate based application lifecycle.
If you have any questions about this post, you can find me on Twitter.
