How to make sure your CI pipelines are always up to date?
When you work with CI, you’ll know how frustrating it can be when a CI server has versions of Xcode or other tools installed than the tools that you’re using. Especially major Xcode releases can be problematic. If your CI doesn’t have the same new versions available while your project uses recently released features which will lead your builds to fail.
An obvious example of this would be when you start using features that are exclusive to the latest iOS version. If Xcode doesn’t know about these features then your project won’t build. An out of date CI can cause your team to slow down their release cadence, discourage experimentation, and most importantly it can prevent important bug fixes from being released.
In this post I’d like to highlight some of the struggles that you might experience and how you can get around them by having a CI provider like Bitrise that always makes sure that you can quickly update your CI pipelines to run using the latest Xcode versions.
This post is a sponsored post. Its target is to provide an honest and fair view on Bitrise’s stacks. To make sure that this post is valuable to my readers, all opinions expressed in this post are my own.
Understanding why CI servers go out of date
I can sum this section up in one sentence, it’s a lot of work to maintain CI. And it’s even more work to support new software releases all the time while also maintaining support for older versions.
If you’re working in a company that’s big enough to have its own team to maintain a self-hosted CI server you’ll know that it’s not always trivial to get this team to prioritize your needs. At any given time your CI team will be dealing with build issues for one or more platforms, they will be maintaining and updating servers, and on top of that they will be fulfilling service and feature requests that get submitted by the teams that rely on the CI team to build them the tools that they need.
Because maintaining CI is a lot of work it makes sense to use a CI provider to make maintenance a lot easier. Of course, you sacrifice a little bit in flexibility and ownership but let’s be honest. You probably don’t need to run a self-hosted build server to have access to all the CI features you need.
So while it makes sense that self-hosted solutions require a lot of maintenance, why is it that CI providers have their build server go out of date? After all, CI is the one thing they do, right?
And to be honest, I don’t know exactly why it is that CI providers sometimes needs months to make the latest Xcode versions available to users. I’m sure it’s got something to do with the amount of work involved in maintaining a CI platform that works for loads of programming languages and platforms and making a new Docker image available that uses the latest Xcode of course takes time.
Regardless of reasons why, it’s a productivity killer to not be able to update to the latest Xcode due to CI reasons.
Making sure you can always build on the latest Xcode version
When CI is involved, there’s not much you can do to enforce Xcode updates. When you have an internal team you could maybe stress why it’s essential to get the latest Xcode version available on one or more build machines but that’s no guarantee that the CI team will honor your request quickly. Of course, if the team understands the importance of having up to date CI they should be able to prioritize your Xcode updates and handle them quickly.
Alternatively you can pick a CI provider that promises to make new Xcode versions available on CI machines within a reasonable timeframe. For example, Bitrise is a CI provider that aims to make new Xcode releases available on build machines within a day of being release.
That’s super fast!
And what’s even better, this includes making betas available.
In other words, with Bitrise you always have access to several images with several Xcode versions, including the edge builds (betas) that Apple makes available.
Using the latest Xcode versions with Bitrise
If your project makes use of Bitrise you’ll have a bitrise.yaml file in your project. In this file, you can specify exactly which Xcode version you’d like to use by specifying a “stack”. This stack consists of a macOS version as well as an Xcode version.
Bitrise aims to make new stacks available to developers as soon as they possibly can which means that you can usually switch to a new stack a day or so after Apple releases a new Xcode version. For an overview of the available stacks, take a look at this page.
The quickest way to leverage a new stack is to migrate over to a new stack by updating your bitrise.yaml and update the meta:bitrise.io:stack property.
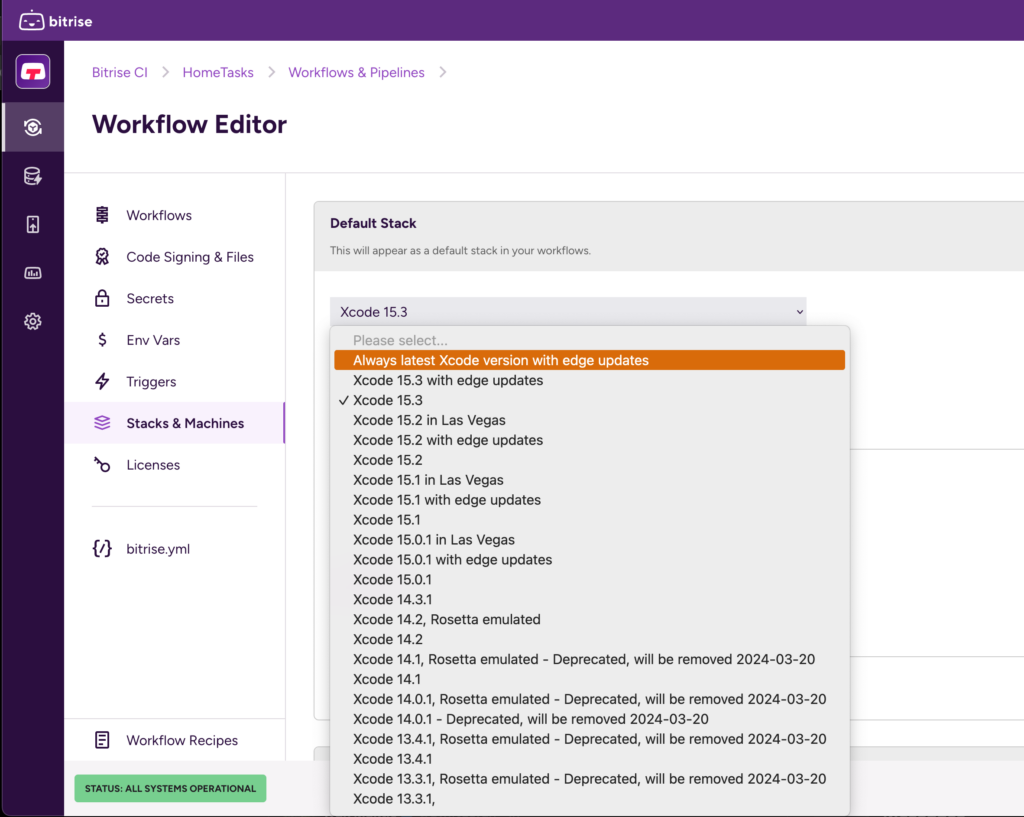
If you’re not using the bitrise.yaml file to configure your CI, you can use the web interface to configure your stack instead. You can do this in your workflow editor by selecting the “Stacks and Machines” section. In there, you can choose which Xcode version you want to use and there’s even an option that gets you the most recent release possible every time.
However, you might not want to switch your entire project over just yet. If needed, you can make a new branch in your repository, update the bitrise.yaml there and then push your new branch. At that point you can instruct Bitrise to run builds whenever you push to that branch or you can start new builds manually.
This approach can be particularly useful when you’d like to test your project on the latest Xcode betas every once in a while but you’re not ready to switch your entire project over to be built using the betas just yet. All you’d need to do is rebase your beta branch on main every once in a while and push to start a new build (or start one manually).
If you’re not entirely sure how you can set up your Bitrise CI pipelines take a look at this guide that became available recently. It’s a comprehensive overview of 50+ recipes that help you set up useful and reliable CI pipelines.
In Summary
In this post, I explained why it’s important that you always have recent (the latest) Xcode available on your CI server. I explained that it takes time and effort that dedicated CI teams sometimes don’t have (of course, depending on your team size), and that it can be a lot of work to make new images available all the time.
Next, I explained how Bitrise aims to make new Xcode releases available within a day or so and how that’s extremely important if you’re using features that are only available in the latest iOS and/or Xcode versions. The last thing you want is for CI to hold you back while you’re working on new features for your users.
Of course, having the latest Xcode available on your build machines won’t solve problems that are a result of team members using different Xcode versions than you have on your CI but at least you know that your CI isn’t holding you back due to new Xcode versions being unavailable.
Getting some team members to update their Xcode versions is much easier than getting your CI team to prepare new Docker images with new Xcode versions for you.