Handling deeplinks in a SwiftUI app
Published on: July 6, 2020Updated on: July 7, 2025
The quickest way to handle deeplinks in your app is through the onOpenURL(perform:) view modifier which has been available since iOS 14. It allows developers to register a URL handler on their views so they can respond to URLs by modifying state for their views as needed.
In this post, we'll cover all the steps involved in setting up your app to handle deeplinks. We'll start with explaining what deeplinks are, and then we'll configure an Xcode project to allow your app to handle incoming deeplinks.
Note that we won't cover setting up Universal Links in this post; we'll solely focus on handling incoming links. These can be deeplinks or Universal Links, but the setup process for Universal Links is slightly more involved than adding the ability to handle deeplinks in your app.
To learn more about Universal Links, you can read my post about adding support for Universal Links to your app.
Setting your app up to handle deeplinks
To set your app up for handling incoming deeplinks, you need to register which url schemes your app should respond to. A URL scheme usually something like yourapp://, or in the case of the screenshot below maxine://. This means that whenever somebody tries to open a URL that looks like maxine://workouts/20250601 my app can be asked to handle this URL. Other examples of URL Schemes are http://, https://, ws:// etc.
You'll want to make sure that your scheme is somewhat unique so that you're not competing with other apps for that scheme. It's good to know that iOS will use the first app that the user installed to handle a scheme if multiple apps claim the same scheme. So for example, if you register myapp:// and the user installs your app, then your app will be used to handle myapp:// links if your app was the first to claim support for that scheme.
To claim a scheme, you go to the Info editor for your project and you can configure your URL Type as follows:
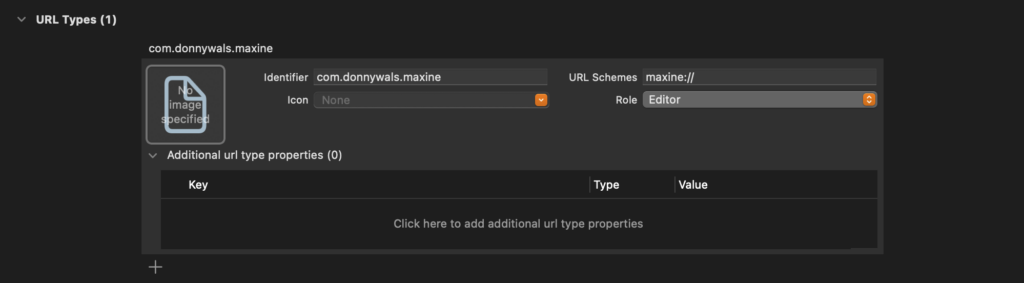
Note that you can ignore every field except for the identifier and the schemes. For macOS apps you can specify a "role" that's assigned to the link. This will allow you to enable read-only access for specific URL schemes for example.
In this post, we'll not explore the specifics of macOS so I'm going to leave this setting as Editor.
Handing incoming deeplinks
To have a central point for handling incoming links, you can use the onOpenURL(perform:) view modifier. on the root of your scene. The perform closure that you pass to this view modifier is called either when your app is asked to handle a URL that uses your URL scheme, or when your app is asked to handle an incoming Universal Link. So really, onOpenURL(perform:) becomes the central entry point for your app when it comes to handling incoming links.
Here's what applying onOpenURL(perform:) looks like when it's applied to your scene.
@main
struct MyApplication: App {
  var body: some Scene {
    WindowGroup {
      ContentView()
        .onOpenURL { url in
          // handle the URL that must be opened
        }
    }
  }
}
I will cover what it means exactly to handle the url in the next section of this article, but usually it will involve mutating some state to load and display the view associated with the URL that must be opened.
What's really neat is that you can specify multiple onOpenURL handlers throughout your app. This means that you can make multiple, smaller changes to your app state which means that you no longer have one place where all of your deeplink handling and view manipulation takes place.
Furthermore, onOpenURL is called when your app is in the foreground, background or not running at all. This means that there is now a single entry point for your app to handle URLs. Even if your app is relaunched after being force-closed.
In the next section, I will show you an example of how you can select a tab in a TabView depending on the URL that your app is requested to open. After that, I will show you how to navigate to a list item in a view that's embedded in a TabView by adding a second onOpenURL view modifier on a child View that contains a List.
Activating a tab in a TabView when opening a URL
In SwiftUI, views are a function of their state. This means that virtually everything in a SwiftUI application can be represented and manipulated as a data model. This means that we can represent the currently selected tab in a SwiftUI TabView as a property on an App struct.
The following code shows how:
struct MyApplication: App {
  @State var activeTab = 0

  var body: some Scene {
    WindowGroup {
      TabView(selection: $activeTab) {
        HomeView()
          .tabItem {
            VStack {
              Image(systemName: "house")
              Text("Home")
            }
          }
          .tag(0)

        SettingsView()
          .tabItem {
            VStack {
              Image(systemName: "gearshape")
              Text("Settings")
            }
          }
          .tag(1)
      }
      .onOpenURL { url in
        // determine which tab should be selected and update activeTab
      }
    }
  }
}
What's important to notice here is the activeTab property. This property is marked as @State and represents the selected tab in the TabView. When creating the TabView, I pass a binding to activeTab to the TabView's initializer. Setting the TabView up like this means that updating activeTab will cause the TabView to update its selected tab as well.
Notice that I set a tag on the views that are added to the TabView. This tag is used to identify the TabView's items. When activeTab matches one of the tags associated with your views, the TabView will activate the matching tab.
In this case that means setting activeTab to 1 would activate the tab that displays SettingsView.
Let's see how you can implement onOpenURL to figure out and activate the correct tab. To do this, I'm going to introduce an extension on URL, and a new type called TabIdentifier:
enum TabIdentifier: Hashable {
  case home, settings
}

extension URL {
  var isDeeplink: Bool {
    return scheme == "my-url-scheme" // matches my-url-scheme://<rest-of-the-url>
  }

  var tabIdentifier: TabIdentifier? {
    guard isDeeplink else { return nil }

    switch host {
    case "home": return .home // matches my-url-scheme://home/
    case "settings": return .settings // matches my-url-scheme://settings/
    default: return nil
    }
  }
}
The code above is just a convient way to figure out which tab belongs to a URL without having to duplicate logic all over the app. If you decide to implement a similar object, the isDeeplink computed property should be updated according to the URLs you want to support. If you're implementing Universal Links, you'll want to check whether the URL's host property matches your hostname. I've set up a very minimal check here for demonstration purposes where I only care about the URL scheme.
The tabIdentifier property is a computed property that uses the host property to determine which tab should be selected. For a Universal Link you'll probably want to use the pathComponents property and compare using the second entry in that array, depending on your mapping strategy. Again, I set this up to be very basic.
You can use this basic setup in the App struct as follows:
struct MyApplication: App {
  @State var activeTab = TabIdentifier.home

  var body: some Scene {
    WindowGroup {
      TabView(selection: $activeTab) {
        HomeView()
          .tabItem {
            VStack {
              Image(systemName: "house")
              Text("Home")
            }
          }
          .tag(TabIdentifier.home) // use enum case as tag

        SettingsView()
          .tabItem {
            VStack {
              Image(systemName: "gearshape")
              Text("Settings")
            }
          }
          .tag(TabIdentifier.settings) // use enum case as tag
      }
      .onOpenURL { url in
        guard let tabIdentifier = url.tabIdentifier else {
          return
        }

        activeTab = tabIdentifier
      }
    }
  }
}
Because I made TabIdentifier Hashable, it can be used as the activeTab identifier. Each tab in the TabView is associated with a TabIdentifier through their tags, and by reading the new tabIdentifier that I added to URL in my extension, I can easily extract the appropriate tab identifier associated with the URL that I need to open.
As soon as I assign the acquired tabIdentifier to activeTab, the TabView is updated marking the appropriate tab as selected along with displaying the appropriate View.
Of course this is only half of what you'll want to typically do when opening a deeplink. Let's take a look at activating a NavigationLink in a different view next.
Handling a URL by activating the correct NavigationLink in a List
You already know how to activate a tab in a TabView when your app needs to handle a URL. Often you'll also need to navigate to a specific detail page in the view that's shown for the selected tab item. The cleanest way I have found to do this, is by adding a second onOpenURL handler that's defined within the detail view that should activate your navigation link.
When you define multiple onOpenURL handlers, the system will call them all, allowing you to make small, local changes to your view's data model. Like selecting a tab in the App struct, and activating a NavigationLink in a child view. Before I show you how to do this, We'll need another extension on URL to extract the information we need to activate the appropriate NavigationLink in a List:
enum PageIdentifier: Hashable {
  case todoItem(id: UUID)
}

extension URL {
  var detailPage: PageIdentifier? {
    guard let tabIdentifier = tabIdentifier,
          pathComponents.count > 1,
          let uuid = UUID(uuidString: pathComponents[1]) else {
      return nil
    }

    switch tabIdentifier {
    case .home: return .todoItem(id: uuid) // matches my-url-scheme://home/<item-uuid-here>/
    default: return nil
    }
  }
}
I've added a new enum called PageIdentifier. This enum has a single case with an associated value. This associated value represents the identifier of the object that I want to deeplink to. My app is a to-do app, and each to-do item uses a UUID as its unique identifier. This is also the identifier that's used in the deeplink. The approach above is similar to what I've shown in the previous section and if you decide you like my URL parsing approach, you'll have to make some modifications to adapt it in your app.
The next step is to implement the HomeView, and select the appropriate item from its list of items:
struct HomeView: View {
  @StateObject var todoItems = TodoItem.defaultList // this is just a placeholder.
  @State var activeUUID: UUID?

  var body: some View {
    NavigationView {
      List(todoItems) { todoItem in
        NavigationLink(destination: TodoDetailView(item: todoItem), tag: todoItem.id, selection: $activeUUID) {
          TaskListItem(task: todoItem)
        }
      }
      .navigationTitle(Text("Home"))
      .onOpenURL { url in
        if case .todoItem(let id) = url.detailPage {
          activeUUID = id
        }
      }
    }
  }
}
Notice that my HomeView has a property called activeUUID. This property serves the exact same purpose that activeTab fulfilled in the previous section. It represents the identifier for the item that should be selected.
When creating my NavigationLink, I pass a tag and a binding to activeUUID to each NavigationLink object. When SwiftUI notices that the tag for one of my navigation links matches the activeUUID property, that item is selected and pushed onto the NavigationView's navigation stack. If you already have a different item selected, SwitUI will first go back to the root of your NavigationView (deactivating that link) and then navigate to the selected page.
In onOpenURL I check whether url.detailPage points to a todoItem, and if it does I extract its UUID and set it as the active UUID to navigate to that item.
By definiing two onOpenURL handlers like I just did, I can make small changes to local state and SwiftUI takes care of the rest. Both of these onOpenURL handlers are called when the app is expected to handle a link. This means that it's important for each View to check whether it can (and should) handle a certain link, and to make small changes to the view it belongs to rather than making big app-wide state changes like you would in a UIKit app.
In Summary
In this post, you saw how you can use the onOpenURL view modifier to handle open URL requests for your app. You learned that you can define more than one handler, and that onOpenURL is called for all scenarios where your app needs to open a URL. Even if your app is launched after being force closed.
First, I showed you how you can parse a URL to determine which tab in a TabView should be selected. Then I showed you how you can change the active tab in a TabView by tagging your views and passing a selection biding to the TabView's initializer. After that, you saw how you can navigate to a detail view by doing more URL parsing, and passing a tag and binding to your NavigationLink.
If you have any comments, questions, or feedback about this post please reach out on X. I love hearing from you.