Implementing a one-way sync strategy with Core Data, URLSession and Combine
Published on: August 24, 2020A common use of a Core Data store is to cache data from a remote resource locally to support offline functionality of an app. There are multiple ways to implement a caching mechanism and many of them don't involve Core Data. For example, you could simply fetch a JSON file from a server and store the contents of that JSON file on disk.
A downside of fetching a full data set every time is that you risk using a lot of bandwidth, especially if your data set is large, or if your data set is expected to grow over time.
An alternative might be to send a parameter to your server to tell the server when you last fetched data, which means that the server can respond with updated records only, and you can merge these updates into your local store. Using Core Data in this case helps, but you can achieve this with plain SQLite too.
Regardless of being able to achieve this functionality with other tools than Core Data, I want to talk about implementing a sync strategy on top of Core Data simply because I like the technology and have been using it for years now with little to no problems.
By the end of this post you should have a solid idea of what a basic sync strategy looks like. We'll only focus on fetching data and caching it. If your application modifies data and sends this modified data back to the server your strategy will need some modifications that I won't cover in this article.
In other words, this article explains how you can implement a one-way sync strategy.
Defining the server-side expectations
Syncing data is usually a non-trivial task, especially if you don't want to fetch all data from the server every time. Throughout this article I'm going to assume that you're working with a server that is capable of sending you only the changes from a given point in time. However, if your server returns a full data set instead of only changes, the sync strategy in this post should work the same. The only difference would be that a full data set uses more bandwidth and might take more time to process depending on the size of the data set.
The exact shape of the objects that a server returns doesn't matter much, the most important point is that objects that your server returns have a unique identifier. Consider the following JSON response:
{
  "events": [
    {
      "id": 1,
      "title": "My Event",
      "location": {
        "id": 2,
        "name": "Donny's House"
      }
    }
  ]
}
This response contains an array of events. Each event has a unique id, and it has a property called location. This location property will be imported as a relationship between an Event object and a Location object.
We can use this structure just fine for new objects and for modified objects. A potential downside of working with this structure is that a modified location would trigger changes on one or more events which means that we do more processing than needed. An easy workaround would be to have the server include a seperate key for modified locations:
{
  "events": [
    {
      "id": 1,
      "title": "My Event",
      "location": {
        "id": 2,
        "name": "Donny's House"
      }
    }
  ],
  "locations": [
    {
      "id": 3,
      "name": "Melkweg, Amsterdam"
    }
  ]
}
Having this seperate locations key is useful if a location changed but the event that it belongs to remains the same. If both the location and the event changed the server should probably omit the location from the locations array in the JSON since it'll also be part of an event in the events array. I consider this to be a server-side optimization that can be made which is outside of the scope of this post.
At this point the JSON can tell us about objects that are new or modified but not about objects that are deleted. Since we don't need a full object to know what to delete we can include a deleted key in the json that contains any deleted event or location ids:
{
  "events": [
    {
      "id": 1,
      "title": "My Event",
      "location": {
        "id": 2,
        "name": "Donny's House"
      }
    }
  ],
  "locations": [
    {
      "id": 3,
      "name": "Melkweg, Amsterdam"
    }
  ],
  "deleted": {
    "events": [2, 8],
    "locations": [4, 7]
  }
}
And lastly, the server should provide us with a key, or timestamp, that we can use for the next request. The reason we want the server to provide a timestamp rather than letting the client determine one is that we shouldn't rely on the client's clock to make decisions on the server. Furthermore, if the server is in charge of generating these keys it can decide for itself whether this key is a timestamp or something else.
This means that the full JSON I'm working from in this post looks like this:
{
  "events": [
    {
      "id": 1,
      "title": "My Event",
      "location": {
        "id": 2,
        "name": "Donny's House"
      }
    }
  ],
  "locations": [
    {
      "id": 3,
      "name": "Melkweg, Amsterdam"
    }
  ],
  "deleted": {
    "events": [2, 8],
    "locations": [4, 7]
  },
  "version_token": "1234567890"
}
Your server's responses might look completely different, and that's perfectly fine. My goal is to explain the strategy I'm building on top of this response in a way that will allow you to write your own sync strategy even if your server is completely different.
Configuring your Core Data store
When you implement a sync strategy that writes remote data to a local Core Data store it's crucial that you prevent data duplication. While Core Data should typically not be treated as a store that has a concept of primary keys, we can apply a unique constraint on one or more properties of a Core Data model.
To do this, open the Core Data model editor, select the Entity that needs a unique contraint and use the Data model inspector in the right-hand sidebar to add Constraints. You can provide a list of comma-separated values if you want to determine uniqueness on a combination of multiple properties.
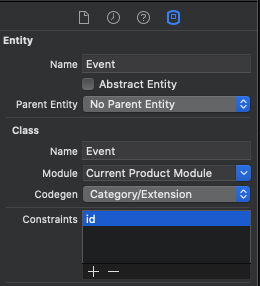
When you add a unique constraint like this, Core Data will consider it an error if you try to save an object with a duplicate value for the key you provided. So in this case, saving two Event objects with the same id would result in an error.
Before I explain why this error is useful and how you can use it to your advantage, I want to work a little bit on our data importer. In an earlier post I explained how you can build a Core Data abstraction that doesn't rely on the AppDelegate or any of Apple's default templates for SwiftUI or UIKit applications.
I'm going to assume that you have a similar setup in your application but ultimately it won't matter much how you've set up your application. The following code can be used as a simple starting point for your data importer:
class DataImporter {
  let importContext: NSManagedObjectContext

  init(persistentContainer: NSPersistentContainer) {
    importContext = persistentContainer.newBackgroundContext()
    importContext.mergePolicy = NSMergeByPropertyObjectTrumpMergePolicy
  }
}
You can create an instance of this DataImporter wherever you need it in your application. Typically this will be somewhere in a ViewModel or other place that you would normally use to make network requests, fetch data, or perform other potentially slow and costly operations.
The most important part of the snippet above is this:
importContext.mergePolicy = NSMergeByPropertyObjectTrumpMergePolicyBy setting the mergePolicy for the background context to NSMergeByPropertyObjectTrumpMergePolicy we tell Core Data to resolve any conflicts between the store and the data we're attempting to save using the properties from the object we want to save. This means that if we have a stored Event, and want to save an event with the same id as the Event that's already stored, Core Data will overwrite the stored event's values with the new event's values.
This is perfect for an application where we want to sync data from the server into our local data store. It's save to assume that the server has the most recent and correct version of every object, so whenever we import we'll want to overwrite any existing data with data from the server.
Since we'll be importing data on a background context and the persistent container's viewContext should pick up any changes we make automatically, we'll need to set the viewContext's automaticallyMergesChangesFromParent property to true. If you're using one of Apple's premade templates you can insert container.viewContext.automaticallyMergesChangesFromParent = true at the point where the container is created.
If you're using a custom abstraction you can do the same except you'll be adding this line in code you wrote yourself.
Setting automaticallyMergesChangesFromParent = true will make sure that the viewContext is aware of any changes that were made to the persistent container. When you save a background context, the persistent container is automatically informed of the changes that were made. The viewContext is considered to be a child of the persistent container so when you set automaticallyMergesChangesFromParent to true, the viewContext will automatically be made aware of changes in the persistent container.
This is particularly useful if your UI uses an NSFetchedResultsController. When your viewContext does not automatically merge changes from its parent, your NSFetchedResultsController won't automatically update when your background context saves after running your import.
One last thing you should do before writing your importer logic is to make sure you have a way to transform your JSON into managed objects. One way is to make your managed objects work with Codable. Since I have a full post that already covers this I won't explain how to do this in this post.
Writing your import logic
Now that you have a Core Data store set up and you know what the server's response data looks like, let's implement our importer logic.
Since the server returns a version_token key that should be used to ask the server for changes after we've done an initial import, the importer should keep track of this token.
I'll store it in UserDefaults since it's just a single value and we don't need to keep any history of it:
class DataImporter {
  var versionToken: String? {
    get { UserDefaults.standard.string(forKey: "DataImporter.versionToken") }
    set { UserDefaults.standard.set(newValue, forKey: "DataImporter.versionToken") }
  }

  // existing initializer
}
We'll also need to define a Decodable struct that's used to decode the server's response into:
struct ImporterResponse: Decodable {
  let events: [Event]
  let locations: [Location]
  let deleted: ImporterResponse.Deleted
  let versionToken: String
}

extension ImporterResponse {
  struct Deleted: Decodable {
    let events: [Int]
    let locations: [Int]
  }
}
I'm using a nested struct to decode the deleted items into. I will set my JSONDecoder's keyDecodingStrategy to convertFromSnakeCase so the version_token from the JSON is converted to versionToken in my struct.
Now that we have something to decode the response into we can write the import function:
func runImport() {
  // 1. Build the correct URL
  var url = URL(string: "https://www.mywebsite.com/datasource")!
  if let versionToken = self.versionToken {
    url.appendPathComponent(versionToken)
  }

  URLSession.shared.dataTaskPublisher(for: url)
    .map(\.data)
    .sink(receiveCompletion: { completion in
      if case .failure(let error) = completion {
        print("something went wrong: \(error)")
      }
    }, receiveValue: { [weak self] data in
      guard let self = self
        else { return }

      self.importContext.perform {
        do {
          // 2. Decode the response
          let response = try self.decoder.decode(ImporterResponse.self, from: data)

          // 3. Store the version token
          self.versionToken = response.versionToken

          // 4. Build batch delete requests
          let deletedEventsPredicate = NSPredicate(format: "id IN %@", response.deleted.events)
          let deletedEventsRequest: NSFetchRequest<Event> = Event.fetchRequest()
          deletedEventsRequest.predicate = deletedEventsPredicate
          let batchDeleteEvents = NSBatchDeleteRequest(fetchRequest: deletedEventsRequest)

          let deletedLocationsPredicate = NSPredicate(format: "id IN %@", response.deleted.locations)
          let deletedLocationsRequest: NSFetchRequest<Location> = Location.fetchRequest()
          deletedLocationsRequest.predicate = deletedLocationsPredicate
          let batchDeleteLocations = NSBatchDeleteRequest(fetchRequest: deletedLocationsRequest)

          do {
            // 5. Execute deletions
            try self.importContext.execute(batchDeleteEvents)
            try self.importContext.execute(batchDeleteLocations)

            // 6. Finish import by calling save() on the import context
            try self.importContext.save()
          } catch {
            print("Something went wrong: \(error)")
          }
        } catch {
          print("Failed to decode json: \(error)")
        }
      }

    }).store(in: &cancellables) // store the returned cancellable in a property on `DataImporter`
}
There's a lot of code here but if you follow the comments you'll see that the code I wrote is fairly trivial.
The first step in my code is to construct a valid URL. If we have a versionToken, I append it to the URL. In your app you might have to send your token or timestamp differently, but I'm sure you get the point.
After building the URL a request is made and the response is decoded. My JSON decoder is defined as a lazy var on the DataImporter object as follows:
lazy var decoder: JSONDecoder = {
  let decoder = JSONDecoder()
  decoder.keyDecodingStrategy = .convertFromSnakeCase
  decoder.userInfo[.managedObjectContext] = importContext
  return decoder
}()
Note that I'm using the decoding strategy from my earlier post which means that my JSON response is immediately decoded into NSManagedObject instances using my import context. This means that I don't have to perform any extra work to import the objects from the JSON response into my managed object context since this happens when the JSON is decoded into my managed object. I strongly recommend that you read my earlier post if this seems confusing or weird to you.
Once the response is decoded and the received events and locations are added to my managed object context I can extract the versionToken and store it in UserDefaults for future imports.
The fourth step is to prepare and configure batch delete requests for events and locations to get rid of any events and locations that the server has deleted. A batch delete request takes a regular fetch request and we can use a predicate to make sure only the items that should be deleted actually get deleted.
Lastly, the batch delete requests are executed and we can call save() on the import context to write all the changes we made to the persistent store. If everything was set up properly this will work perfectly and since we defined a mergePolicy on the importContext any conflicts between the old and the new data will be resolved using properties from the object that we're trying to save, which will overwrite the existing data.
While there's a lot to unpack in this flow, it's actually fairly straightforward because we're able to make good use of Core Data's features and a little bit of custom work to make NSManagedObject work with Codable.
In Summary
In this post, you've learned how you can implement a data importing flow that uses Core Data, URLSession and Combine. You saw how a server's response might look when it sends incremental updates, and you learned why this is more convenient than fetching all data everytime your app launches.
Next, I went on to show you how you can set up a Core Data store that applies unique constraints to certain properties of your entities and how you can use a merge policy to resolve conflicts that arise when you attempt to save an object that has an conflicting property. In this article we used NSMergeByPropertyObjectTrumpMergePolicy which will overwrite the stored data with the data from the object that you attempted to store. A perfect policy for a sync like this.
And lastly, I showed you a basic implementation of an import function that performs an import on a background context, deletes any unneeded data and then saves the background context. As long as you set automaticallyMergesChangesFromParent on your viewContext to true, your view contxt will automatically pick up any changes which will in turn trigger an NSFetchedResultController's delegate methods and Core Data will fire the appropriate notifications through NSNotificationCenter.
I hope that this post gave you some valuable insight into how Core Data can be used as a cache for remote data. If you have any questions about this post, or if you've spotted any mistakes, feel free to reach out to me on Twitter. I love hearing from you.
