Understanding and resolving merge conflicts
Published on: January 10, 2024Updated on: April 23, 2024
Git is great, and when it works well it can be a breeze to work with. You push , pull, commit, branch, merge, but then… you get into a merge conflict, In this post, we’ll explore merge conflicts. We’ll look at why they happen, and what we can do to avoid running into merge conflicts in the first place.
Let’s start by understanding why a merge conflict happens.
Understanding why a merge conflict happens
Git is usually pretty good at merging together branches or commits. So why does it get confused sometimes? And what does it mean when a merge conflict occurs?
Let me start by saying that a merge conflict is not your fault. There’s a good chance that you couldn’t have avoided it, and it’s most certainly not something you should feel bad about.
Merge conflicts happen all the time and they are always fixable.
The reason merge conflicts happen is that git sometimes gets conflicting information about changes. For example, maybe your coworker split a huge Swift file into two or more files. You’ve made changes to parts of the code that was now moved into an extension.
The following two code snippets illustrate the before situation, and two “after” situations.
// Before
struct MainView: View {
  var body: some View {
    VStack {
      Text("This is an example")

      Button("Counter ++") {
        // ...
      }
    }
    .padding(16)
  }
}

// After on branch main
struct MainView: View {
  var body: some View {
    VStack {
      Text("This is another example")
      Text("It has multiple lines!")

      Button("Counter ++") {
        // ...
      }
    }
    .padding(16)
  }
}

// After on feature branch
struct MainView: View {
  var body: some View {
    VStack {
      MyTextView()

      CounterButton()
    }
    .padding(16)
  }
}
When git tries to merge this, it gets confused.
Programmer A has deleted some lines, replacing them with new views while programmer B has made changes to those lines. Git needs some assistance to tell it what the appropriate way to merge this is. A merge conflict like this is nobody’s fault because it’s perfectly reasonable for one developer to be refactoring code and for another developer to be working on a part of that code.
Usually you’ll try to avoid two developers working on the same files in a short timespan, but at the same time git makes it so that we can work on the same file on multiple branches so it’s not common for developers to synchronize who works on which files and when. Doing so would be a huge waste of time, so we instead we rely on git to get our merges right in most cases.
Whenever git sees two conflicting changes on the same part of a file, it asks a human for help. So let’s move on to seeing different approaches to resolving merge conflicts.
Resolving merge conflicts
There’s no silver bullet for resolving your merge conflicts. Typically you will choose one of three options when you’re resolving a conflict:
- Resolve using the incoming change (theirs)
- Resolve using the current change (mine)
- Resolve manually
In my experience you’ll usually want to use a manual resolution when fixing merge conflicts. Before I explain how that works, let’s take a Quick Look at how resolving using “mine” and “theirs” works.
A merge conflicts always happens when you try to apply changes from one commit onto another commit. Or, when you try to merge one branch into another branch.
Sometimes git can merge parts of a file while other parts of the file cause conflicts. For example, if my commit changes line 2 of a specific file, and the other commit removes that line. My commit also adds a few lines of code at the end of the file, and the other commit doesn’t.
Git would be smart enough to append the new lines to the file, but it can’t figure out what to do with line 2 of the files since both commits have made changes in a way that git can’t merge.
In this case, we can make a choice to either resolve the conflict for line 2 using my commit (make a change to line 2) or using the other commit (delete the line altogether).
Deciding what needs to be done can sometimes require some work and collaboration.
If your coworker deleted a specific line, it’s worth asking why they did that. Maybe line 2 declares a variable that’s no longer needed or used so your coworker figured they’d delete it. Maybe you didn’t check whether the variable was still needed but you applied a formatting change to get rid of a SwiftLint warning.
In a situation like this, it’s safe to resolve your conflict using “their” change. The line can be removed so you can tell git that the incoming change is what you want.
In other situations things might not be as straightforward and you’ll need to do a manual merge.
For example, let’s say that you split a large file into multiple files while your coworker made some changes to one of the functions that you’ve now moved into a different file.
If this is the case, you can’t tell git to use one of the commits. Instead, you’ll need to manually copy your coworker’s changes into your new file so that everything still works as intended. A manual conflict resolution can sometimes be relatively simple and quick to apply. However, they can also be rather complex.
If you’re not 100% sure about the best way to resolve a conflict I highly recommend that you ask for a second pair of eyes to help you out. Preferably the eyes of the author of the conflicting commit because that will help make sure you don’t accidentally discard anything your coworker did.
During a merge conflict your project won’t build which makes testing your conflict resolution almost impossible. Once you’ve resolved everything, make sure you compile and test your app before you commit the conflict resolution. If things don’t work and you have no idea what you’ve missed it can be useful to just rewind and try again by aborting your merge. You an do this using the following command:
git merge --abortThis will reset you back to where you were before you attempted to merge.
If you approach your merge conflicts with caution and you pay close attention to what you’re doing you’ll find that most merge conflicts can be resolved without too much trouble.
Merge conflicts can be especially tedious when you try to merge branches by rebasing. In the next section we’ll take a look at why that’s the case.
Resolving conflicts while rebasing
When you’re rebasing your branch on a new commit (or branch), you’re replaying every commit on your branch using a new commit as the starting point.
This can sometimes lead to interesting problems during a rebase where it feels like you’re resolving the same merge conflicts over and over again.
In reality, your conflicts can keep popping up because each commit will have its own incompatibilities with your new base commit.
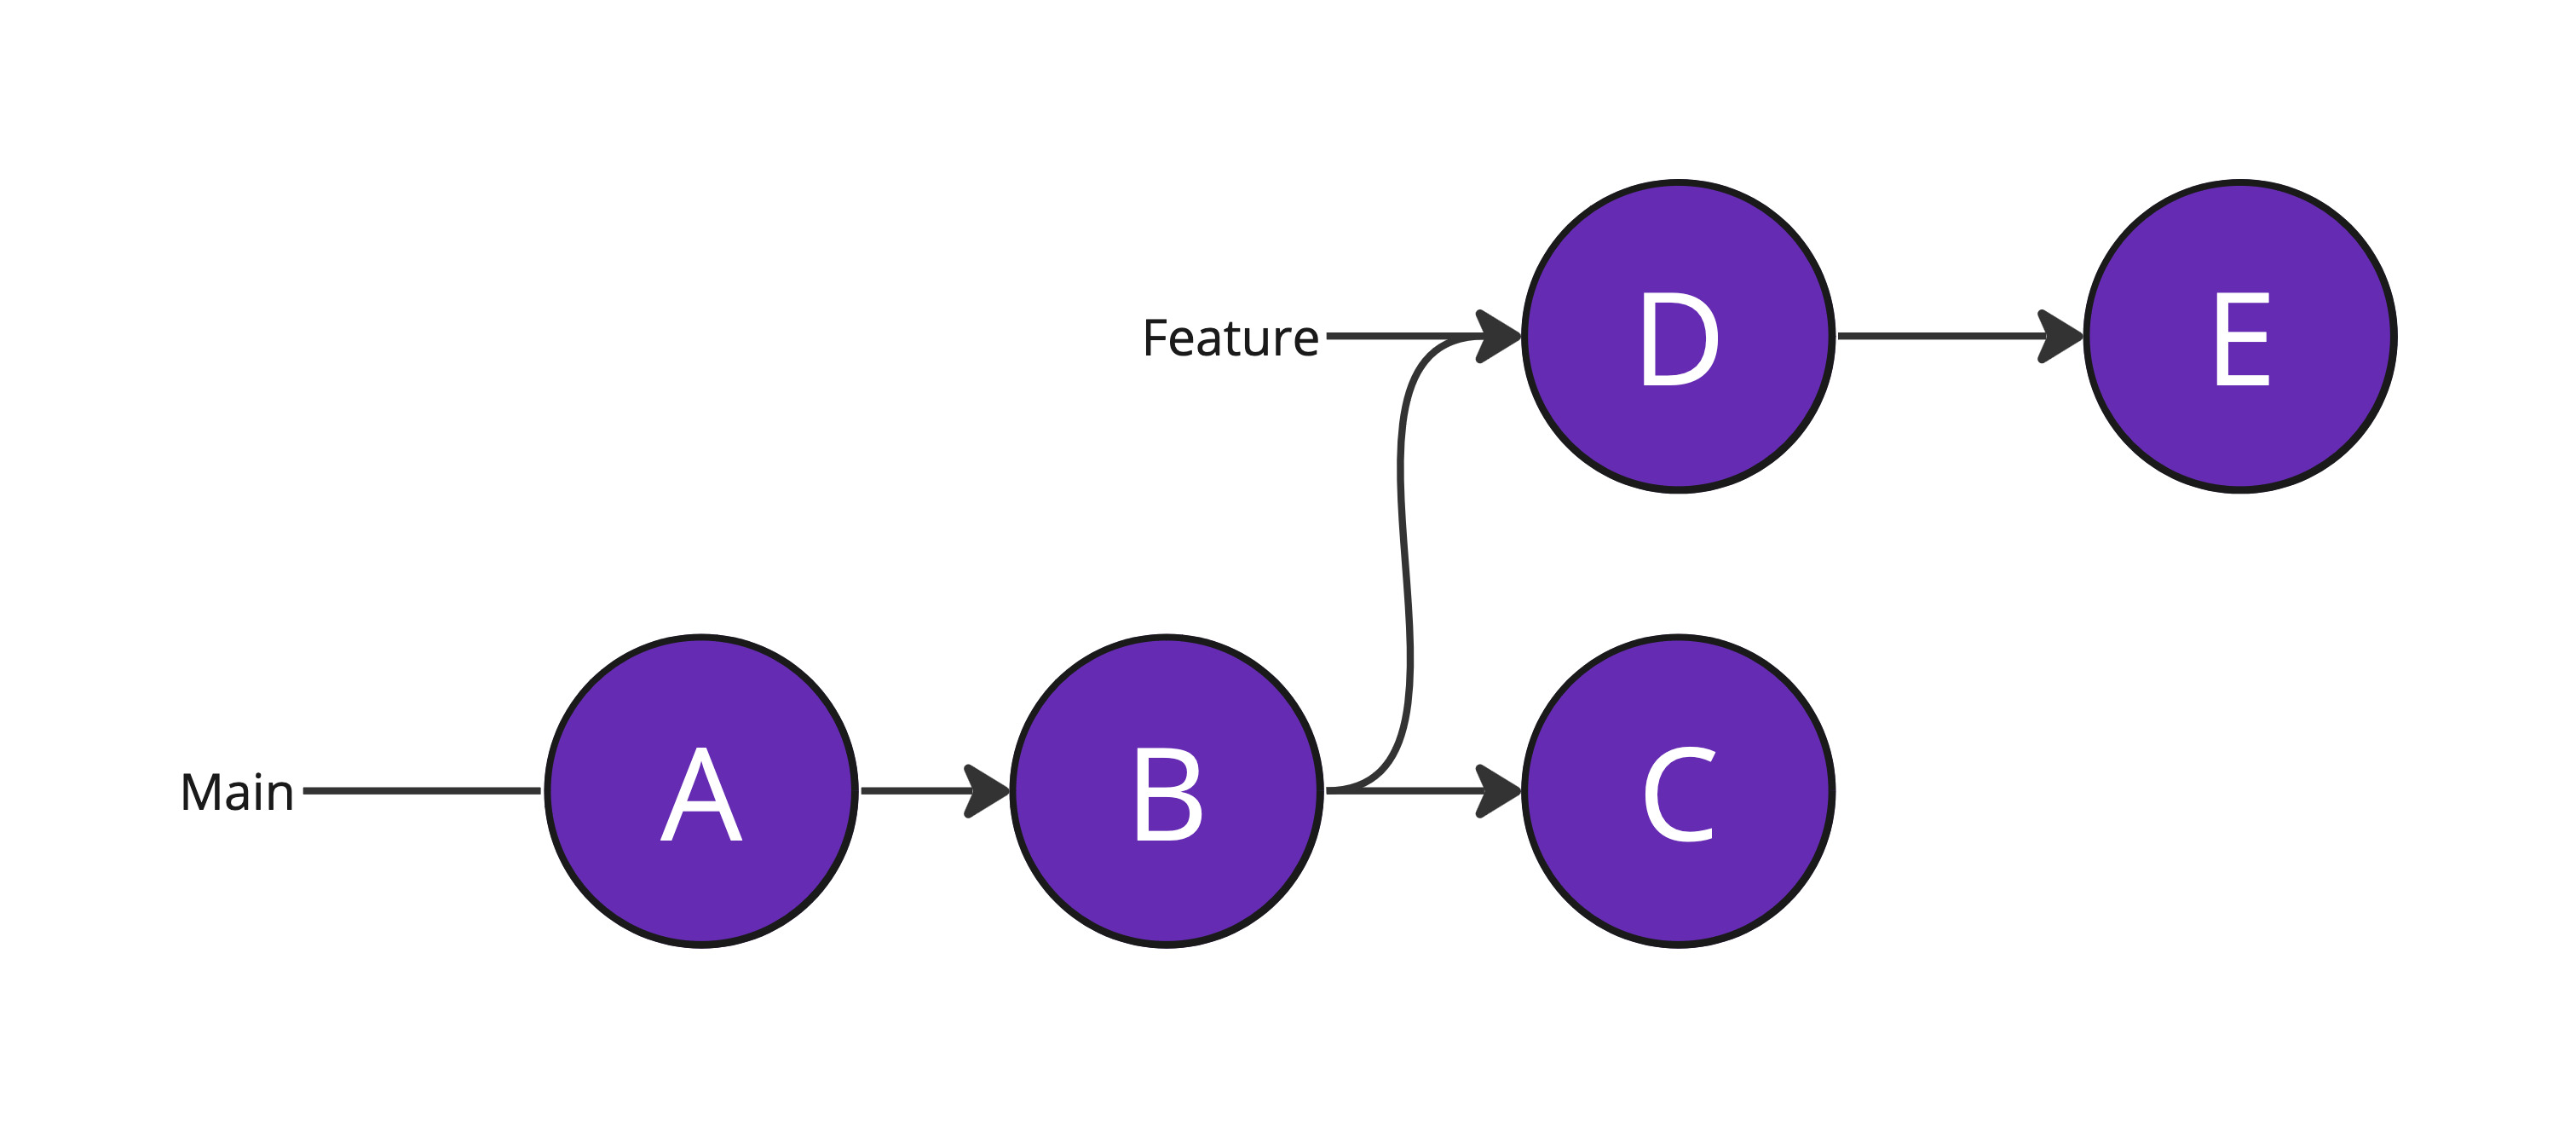
For example, consider the following diagram as our git history:
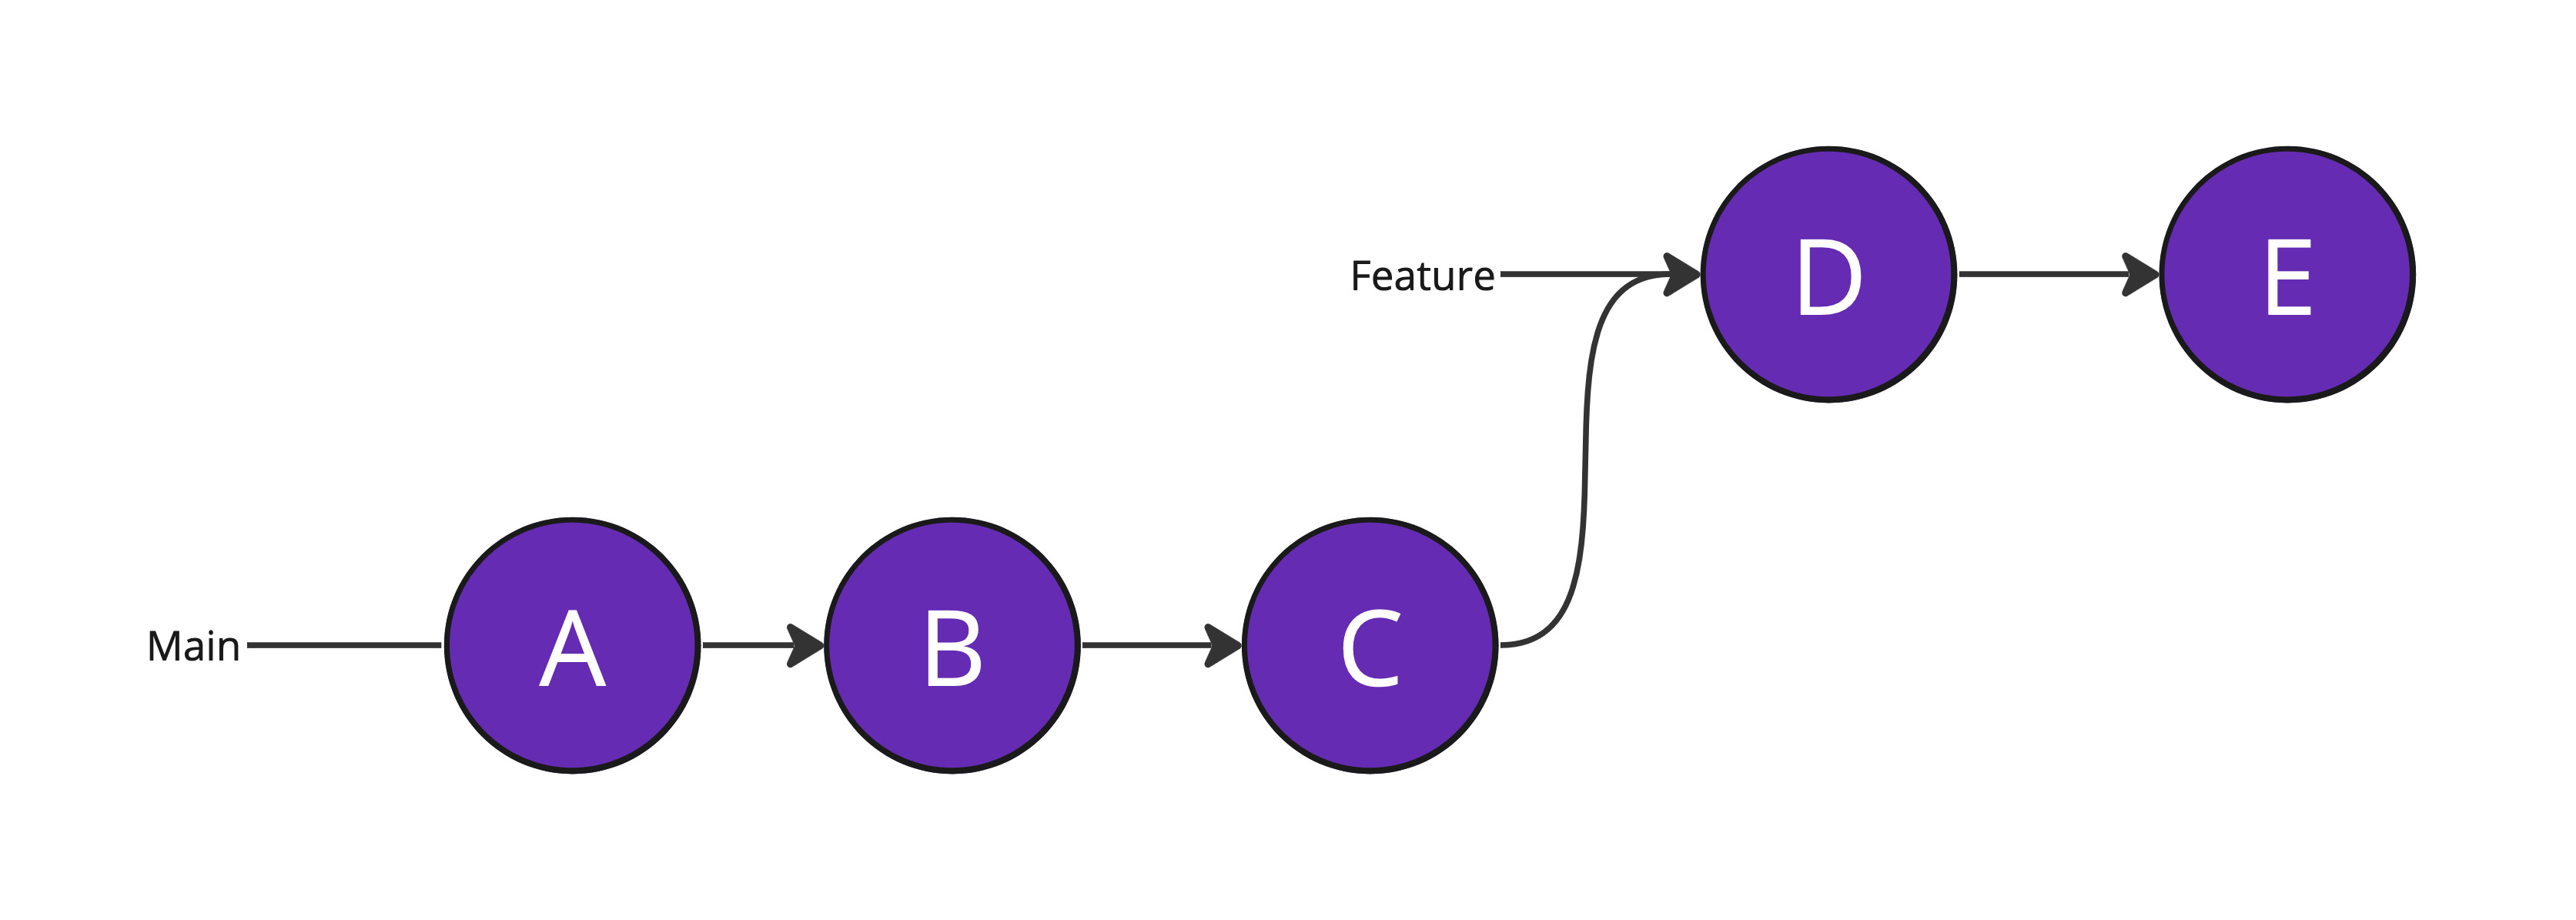
You can see that our main branch has received some commits since we’ve created our feature branch. Since the main branch has changed, we want to rebase our feature branch on main so that we know that our feature branch is fully up to date.
Instead of using a regular merge (which would create a merge commit on feature) we choose to rebase feature on main to make our git history look as follows:
We run git rebase main from the command line and git tells us that there’s a conflict in a specific file.
Imagine that this file looked like this when we first created feature:
struct MainView: View {
  var body: some View {
    VStack {
      Text("This is an example")

      Button("Counter ++") {
        // ...
      }
    }
    .padding(16)
  }
}
Then, main received some new code to make the file look like this:
struct MainView: View {
  var body: some View {
    VStack {
      Text("This is another example")
      Text("It has multiple lines!")

      Button("Counter ++") {
        // ...
      }
    }
    .padding(16)
  }
}
But our feature branch has a version of this file that looks as follows:
struct MainView: View {
  var body: some View {
    VStack {
      MyTextView()

      CounterButton()
    }
    .padding(16)
  }
}
We didn’t get to this version of the file on feature in one step. We actually have several commits that made changes to this file so when we replay our commits from feature on the current version of main, each individual commit might have one or more conflicts with the “previous” commit.
Let’s take this step by step. The first commit that has a conflict looks like this on feature:
struct MainView: View {
  var body: some View {
    VStack {
      MyTextView()

      Button("Counter ++") {
        // ...
      }
    }
    .padding(16)
  }
}

struct MyTextView: View {
  var body: some View {
    Text("This is an example")
  }
}
I’m sure you can imagine why this is a conflict. The feature branch has moved Text to a new view while main has changed the text that’s passed to the Text view.
We can resolve this conflict by grabbing the updated text from main, adding it to the new MyTextView and proceed with our rebase.
Now, the next commit that changed this file will also have a conflict to resolve. This time, we need to tell git how to get from our previously fixed commit to this new one. The reason this is confusing git is that the commit we’re attempting to apply can no longer be applied in the same way that it was before; the base for every commit in feature has changed so each commit needs to be rewritten.
We need to resolve this conflict in our code editor, and then we can continue the rebase by running git add . followed by git rebase --continue. This will open your terminal’s text editor (often vim) allowing you to change your commit message if needed. When you’re happy with the commit message you can finish your commit by hitting esc and then writing :wq to write your changes to the commit message.
After that the rebase will continue and the conflict resolution process needs to be repeated for every commit with a conflict to make sure that each commit builds correctly on top of the commit that came before it.
When you’re dealing with a handful of commits this is fine. However if you’re resolving conflicts for a dozen of commits this process can be frustrating. If that’s the case, you can either choose to do a merge instead (and resolve all conflict at once) or to squash (parts of) your feature branch. Squashing commits using rebase is a topic that’s pretty advanced and could be explained in a blog post of its own. So for now, we’ll skip that.
When you’ve decided how you want to proceed, you can abandon your rebase by running git rebase --abort in your terminal to go back to the state your branch was in before you attempted to rebase. After that, you can decide to either do a git merge instead, or you can proceed with squashing commits to make your life a little bit easier.
Git rebase and your remote server
If you’ve resolved all your conflicts using rebasing, you have slightly altered all of the commits that were on your feature branch. If you’ve pushed this branch to a remote git server, git will tell you that your local repository has n commits that are not yet on the remote, and that the remote has a (usually) equal number of commits that you do not yet have.
If the remote has more commits than you do, that’s a problem. You should have pulled first before you did your rebase.
The reason you need to pull first in that scenario is because you need to be able to rebase all commits on the branch before you push the rewritten commits to git since in order to do a push like that, we need to tell git that the commits we’re pushing are correct, and the commits it had remotely should be ignored.
We do this by passing the --force flag to our git push command. So for example git push --force feature.
Note that you should always be super cautious when force pushing. You should only ever do this after a rebase, and if you’re absolutely sure that you’re not accidentally discarding commits from the remote by doing this.
Furthermore, if you’re working on a branch with multiple people a force push can be rather frustrating and problematic to the local branches of your coworkers.
As a general rule, I try to only rebase and force push on branches that I’m working on by myself. As soon as a branch is being worked on my others I switch to using git merge, or I only rebase after checking in with my coworkers to make sure that a force push will not cause problems for them.
When in doubt, always merge. It’s not the cleanest solution due to the merge commits it creates, but at least you know it won’t cause issues for your teammates.
In Summary
Merging branching is a regular part of your day to day work in git. Whether it’s because you’re tying to absorb changes someone made into a branch of your own or it’s because you want to get your own changes in to your main branch, understanding different merging techniques is key.
Regardless of how you intend to merge branches, there’s a possibility to run into a merge conflict. In this post, you’ve learned why merge conflicts can happen, and how you can resolve them.
You’ve also learn why rebases can run into several merge conflicts and why you should always resolve these conflicts one by one. In short, it’s because git replays each commit in your branch on top of the “current” commit for the branch you’re rebasing on.
The key to resolving conflicts is always to keep your cool, take it easy, and work through the conflicts one by one. And when in doubt it’s always a good idea to ask a coworker to be your second pair of eyes.
You also learned about force pushing after rebasing and how that can be problematic if you’re working on your branch with multiple people.
Do you have any techniques you love to employ while resolving conflicts? Let me know on X or Threads!
